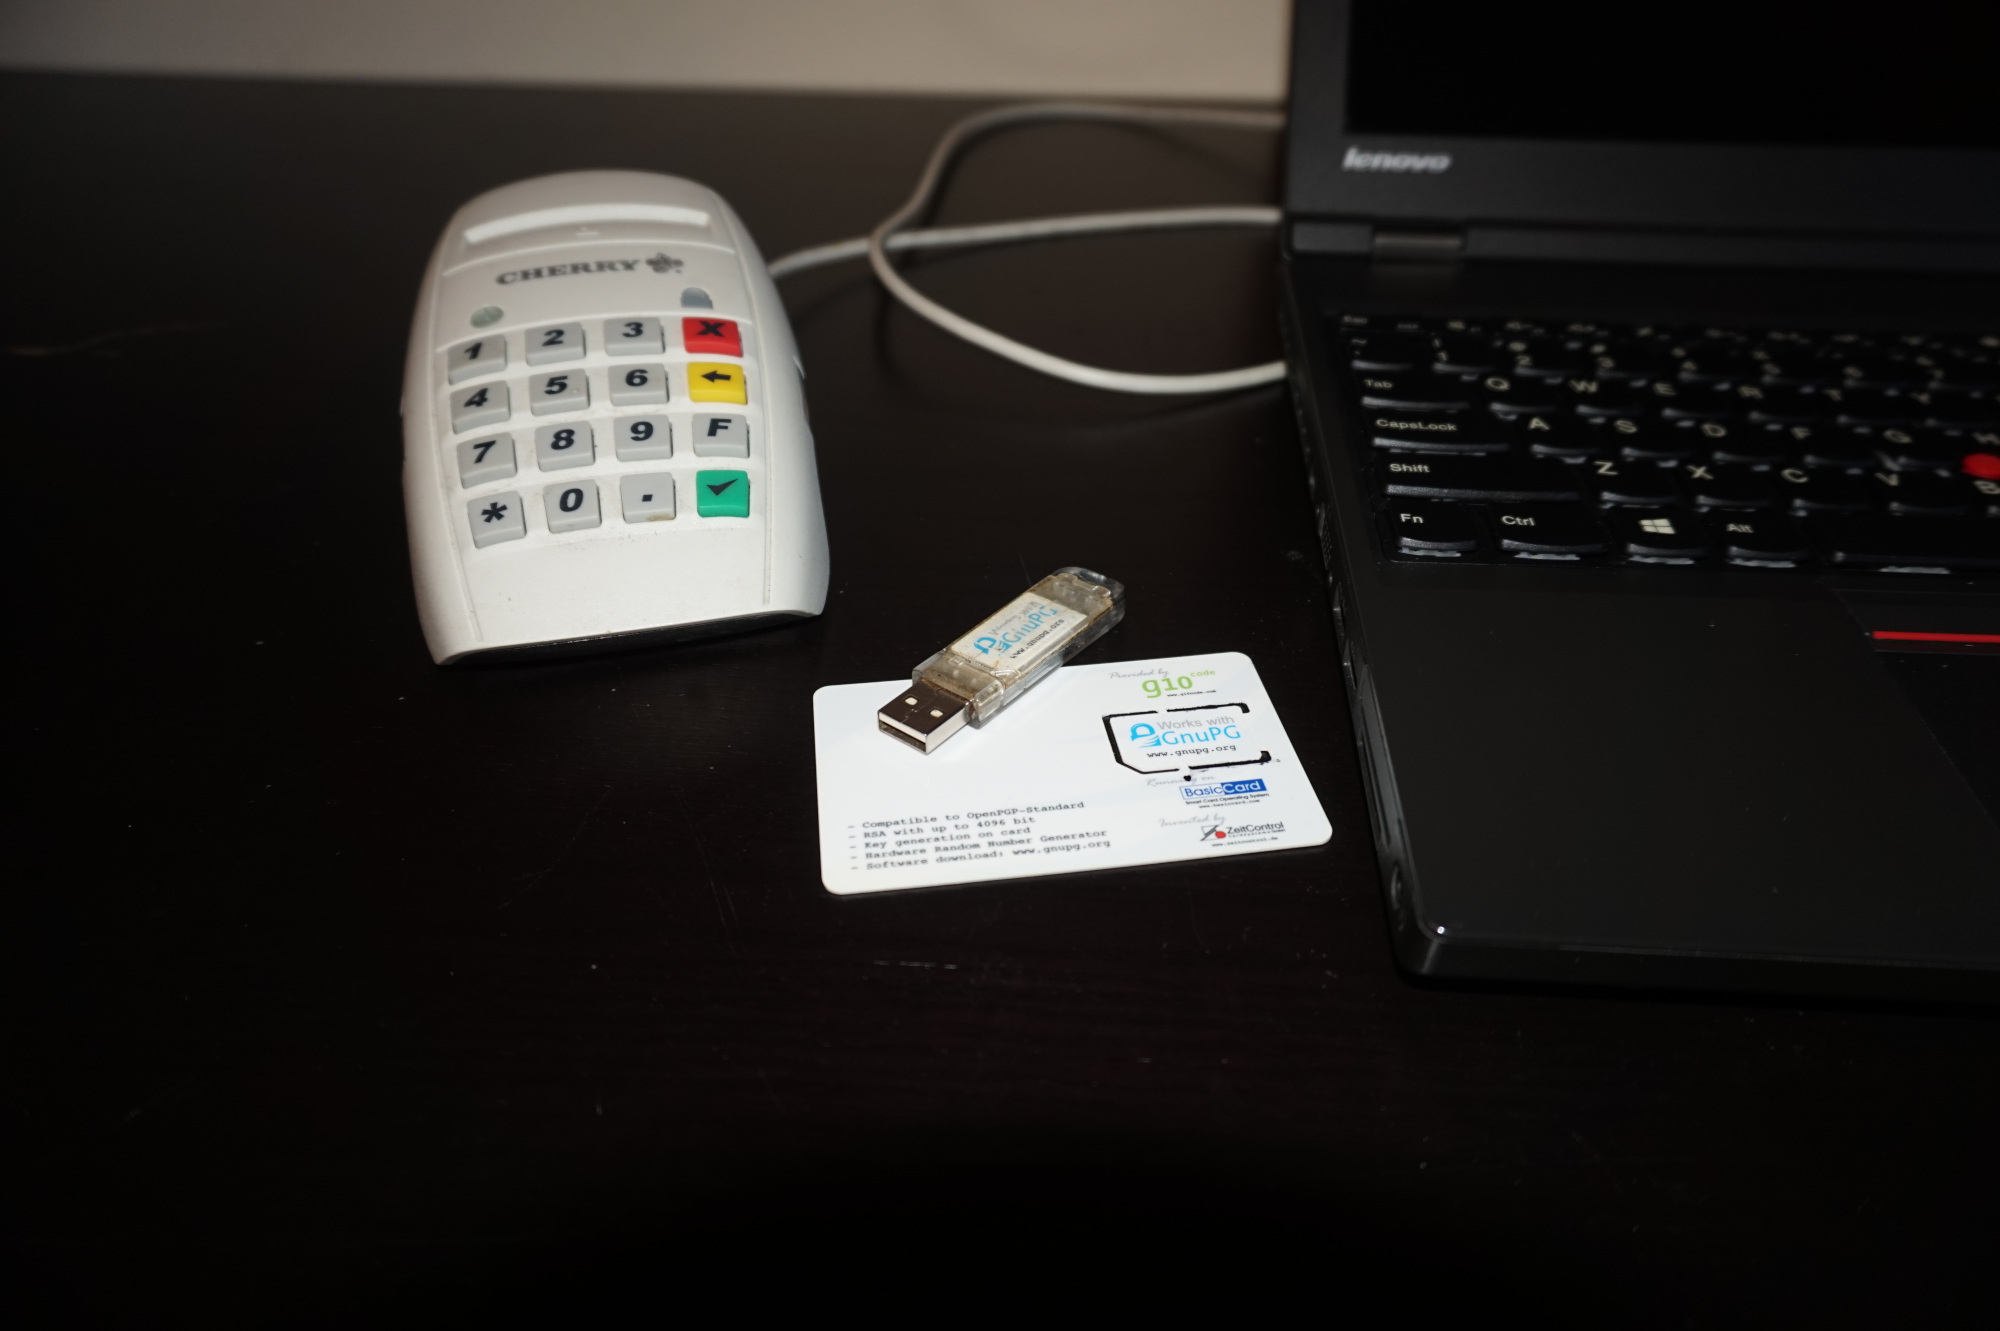
I use a Free Software Foundation Europe fellowship GPG smartcard for my email encryption and package signing. While FSFE doesn’t provide the smartcard anymore it’s still available at www.floss-shop.de.
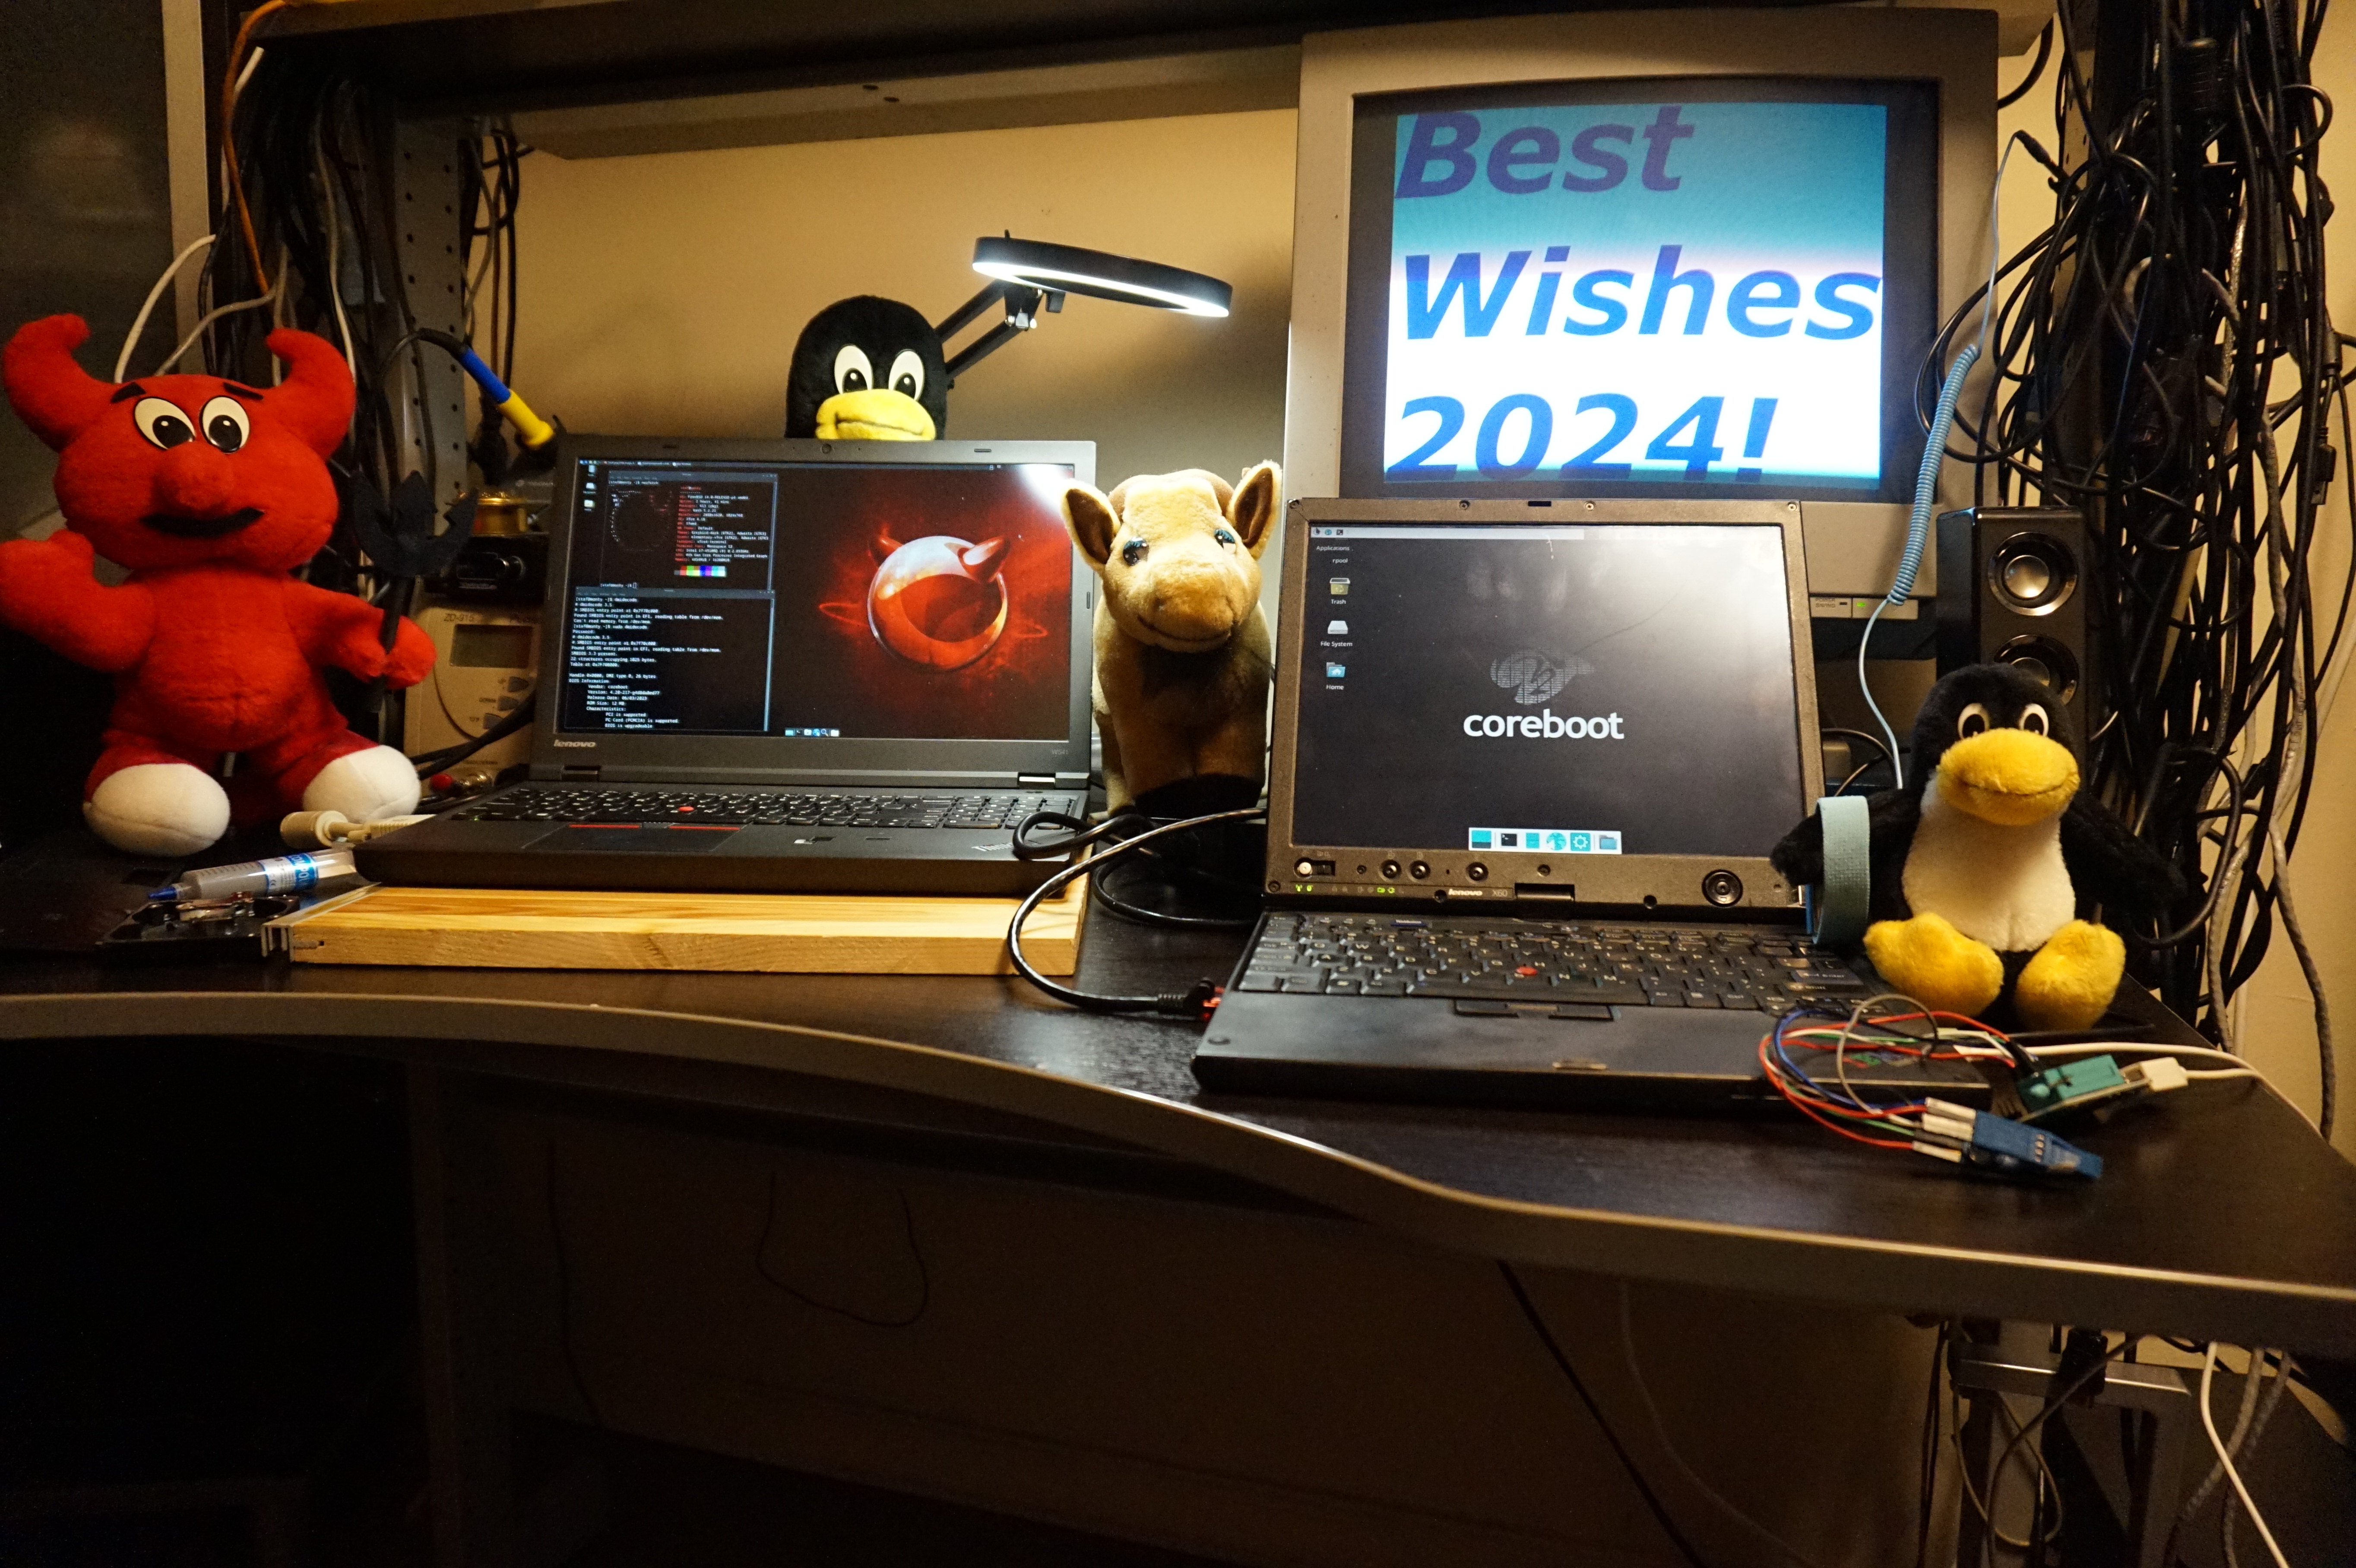
I moved to a Thinkpad w541 with coreboot running Debian GNU/Linux and FreeBSD so I needed to set up my email encryption on Thunderbird again.
It took me more time to reconfigure it again - as usual - so I decided to take notes this time and create a blog post about it. As this might be useful for somebody else … or me in the future :-)
The setup is executed on Debian GNU/Linux 12 (bookworm) with the FSFE fellowship GPG smartcard, but the setup for other Linux distributes, FreeBSD or other smartcards is very similar.
But with the latest versions of FreeBSD ( not sure when it started to work, but it works on FreeBSD 14) you can run FreeBSD as a virtual machine on ARM64 with UEFI just like on x86 on GNU/Linux with KVM.
UEFI on KVM is in general provided by the open-source tianocore project.
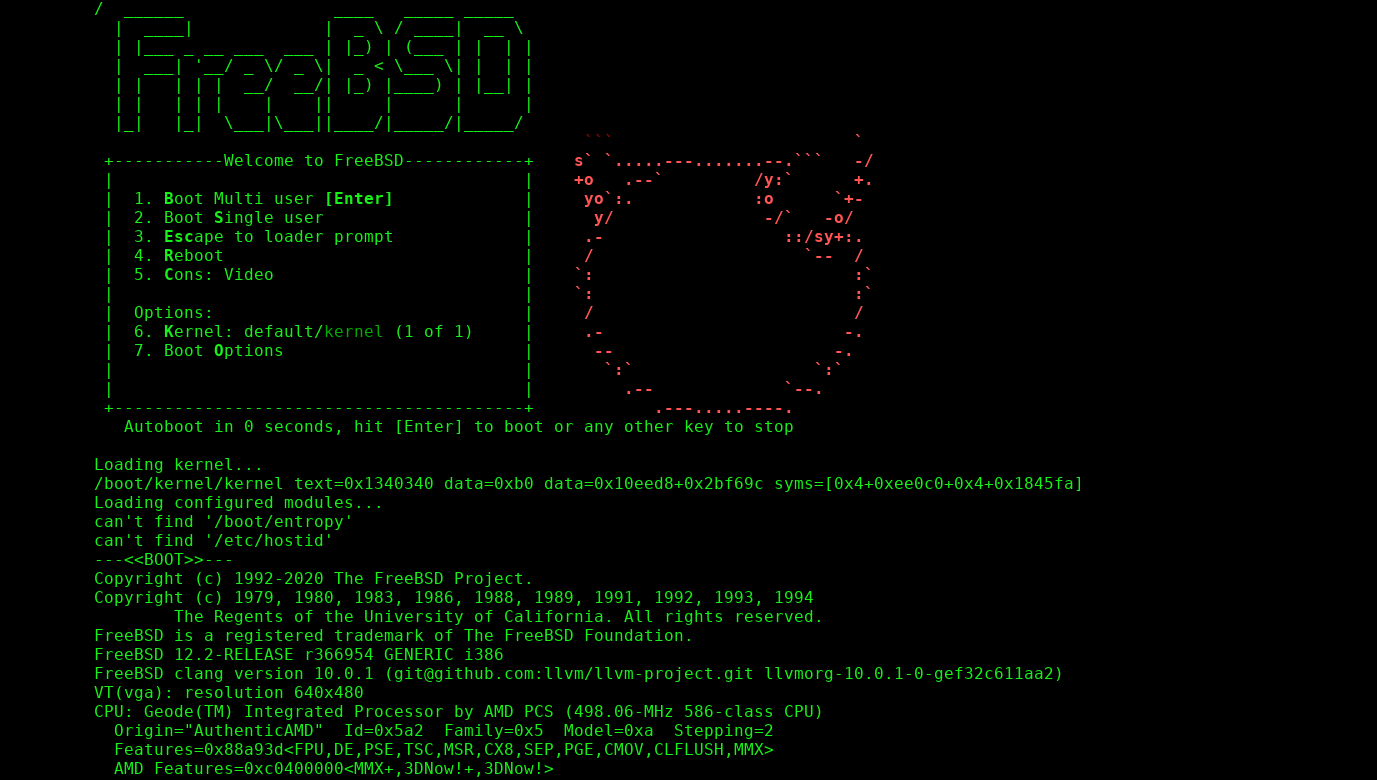
I didn’t find much information on how to run OpenBSD with UEFI on x86 or ARM64.
So I decided to write a blog post about it, in the hope that this information might be useful to somebody else. First I tried to download the OpenBSD 7.4 ISO image and boot
it as a virtual machine on KVM (x86). But the iso image failed to boot on a virtual with UEFI enabled. It looks like the ISO image only supports a legacy BIOS.
ARM64 doesn’t support a “legacy BIOS”. The ARM64 download page for OpenBSD 7.4 doesn’t even have an ISO image, but there is an install-<version>.img
image available. So I tried to boot this image on one of my Raspberry Pi systems and this worked. I had more trouble getting NetBSD working as a virtual machine on the Raspberry Pi but this might be a topic for another blog post :-)
You’ll find my journey with my installation instructions below.
In my previous blog post, we installed GitLab-CE and did some post configuration.
In this blog post, we’ll continue to create user accounts and set up SSH to the git repository.
In the next blog posts will add code to GitLab and set up GitLab runners on different Operating systems.
When you want or need to use CI/CD you have a lot of CI/CD platforms where you can choose from. As with most “tools”, the tool is less important. What (which flow, best practices, security benchmarks, etc) and how you implement it, is what matters.
Jenkins started as Hudson at Sun Microsystem(RIP). Hudson is one of the many open-source projects that were started at Sun and killed by Oracle. Jenkins continued as the open-source fork of Hudson.
Jenkins has evolved. If you need to do more complex things you probably end up creating a lot of groovy scripts, nothing wrong with groovy. But as with a lot of discussions about programming, the ecosystem (who is using it, which libraries are available, etc) is important.
Groovy isn’t that commonly used in and known in the system administration ecosystem so this is probably something you need to learn if you’re coming for the system administrator world ( as I do, so I learnt the basics of Groovy this way ).
The other option is to implement CI/CD using the commonly used source hosting platforms; GitHub and GitLab.
I use FreeBSD on my home network to serve services like email, git, fileserver, etc.
For some other services, I use k3s with GNU/Linux application containers.
The FreeBSD services run as Jails.
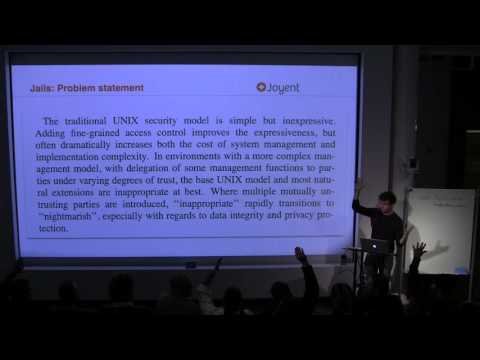
For those who aren’t familiar with FreeBSD Jails. Jails started the whole concept of “containers”.
If you want to know more about the history of FreeBSD Jails, Solaris zones and containers on Un!x systems in general and the challenges to run containers securely I recommend the video;
“Papers We Love: Jails and Solaris Zones by Bryan Cantrill”
Sun took containers to the next level with
Solaris zones
, allowing a fine-grade CPU and memory allocation.
On GNU/Linux LXC was the most popular container framework. …Till Docker came along.
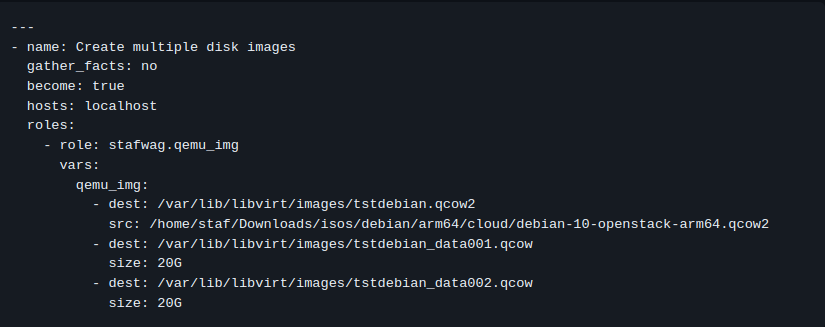
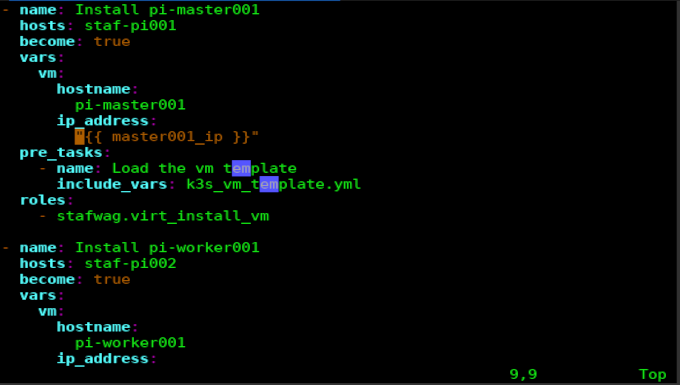
I use KVM and cloud-init to provision virtual machines on my home network.
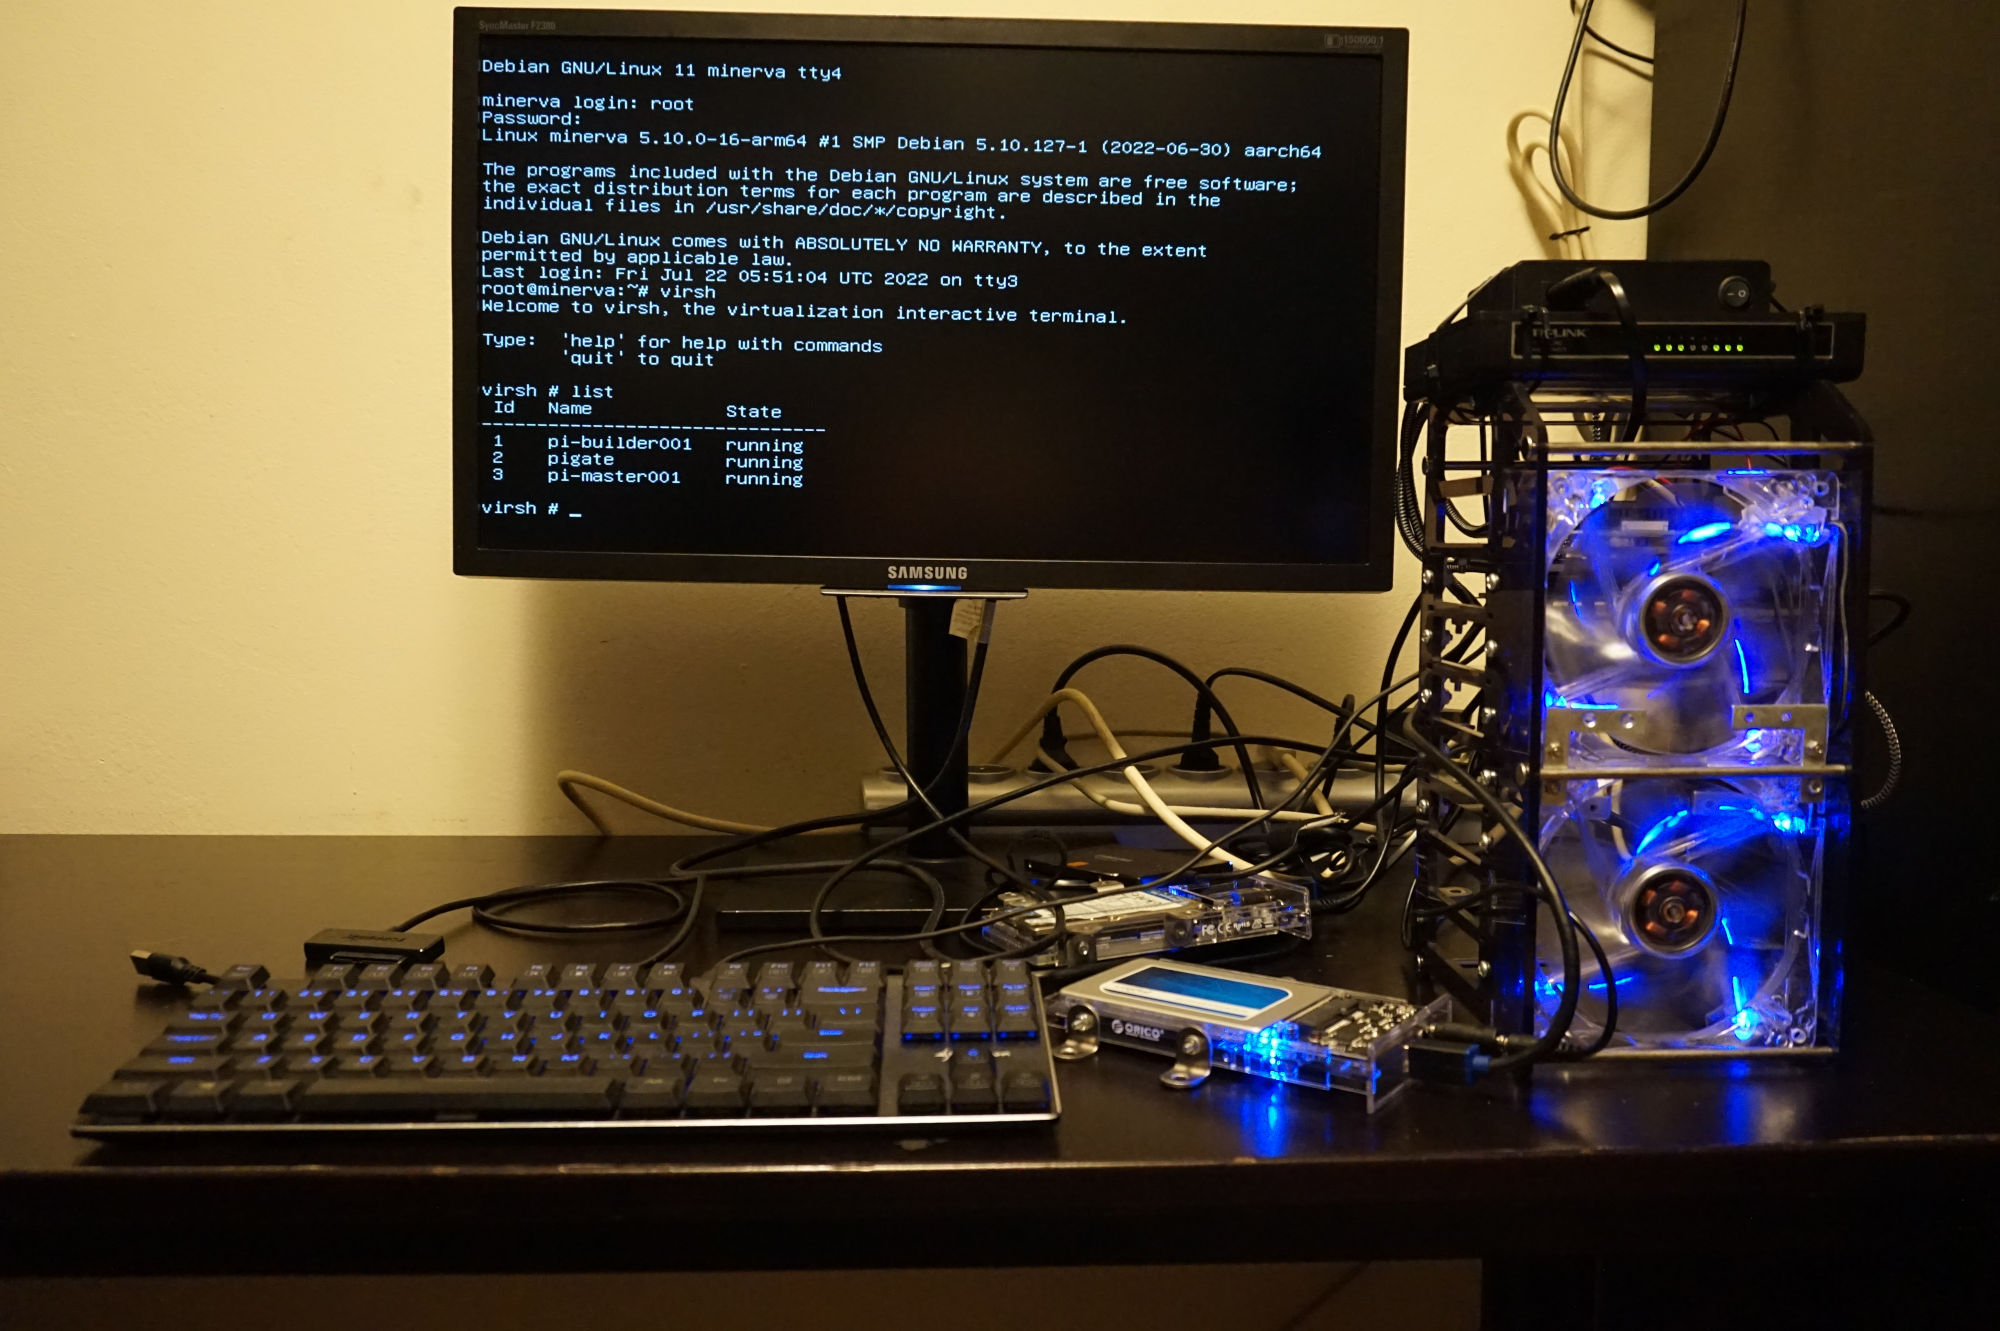
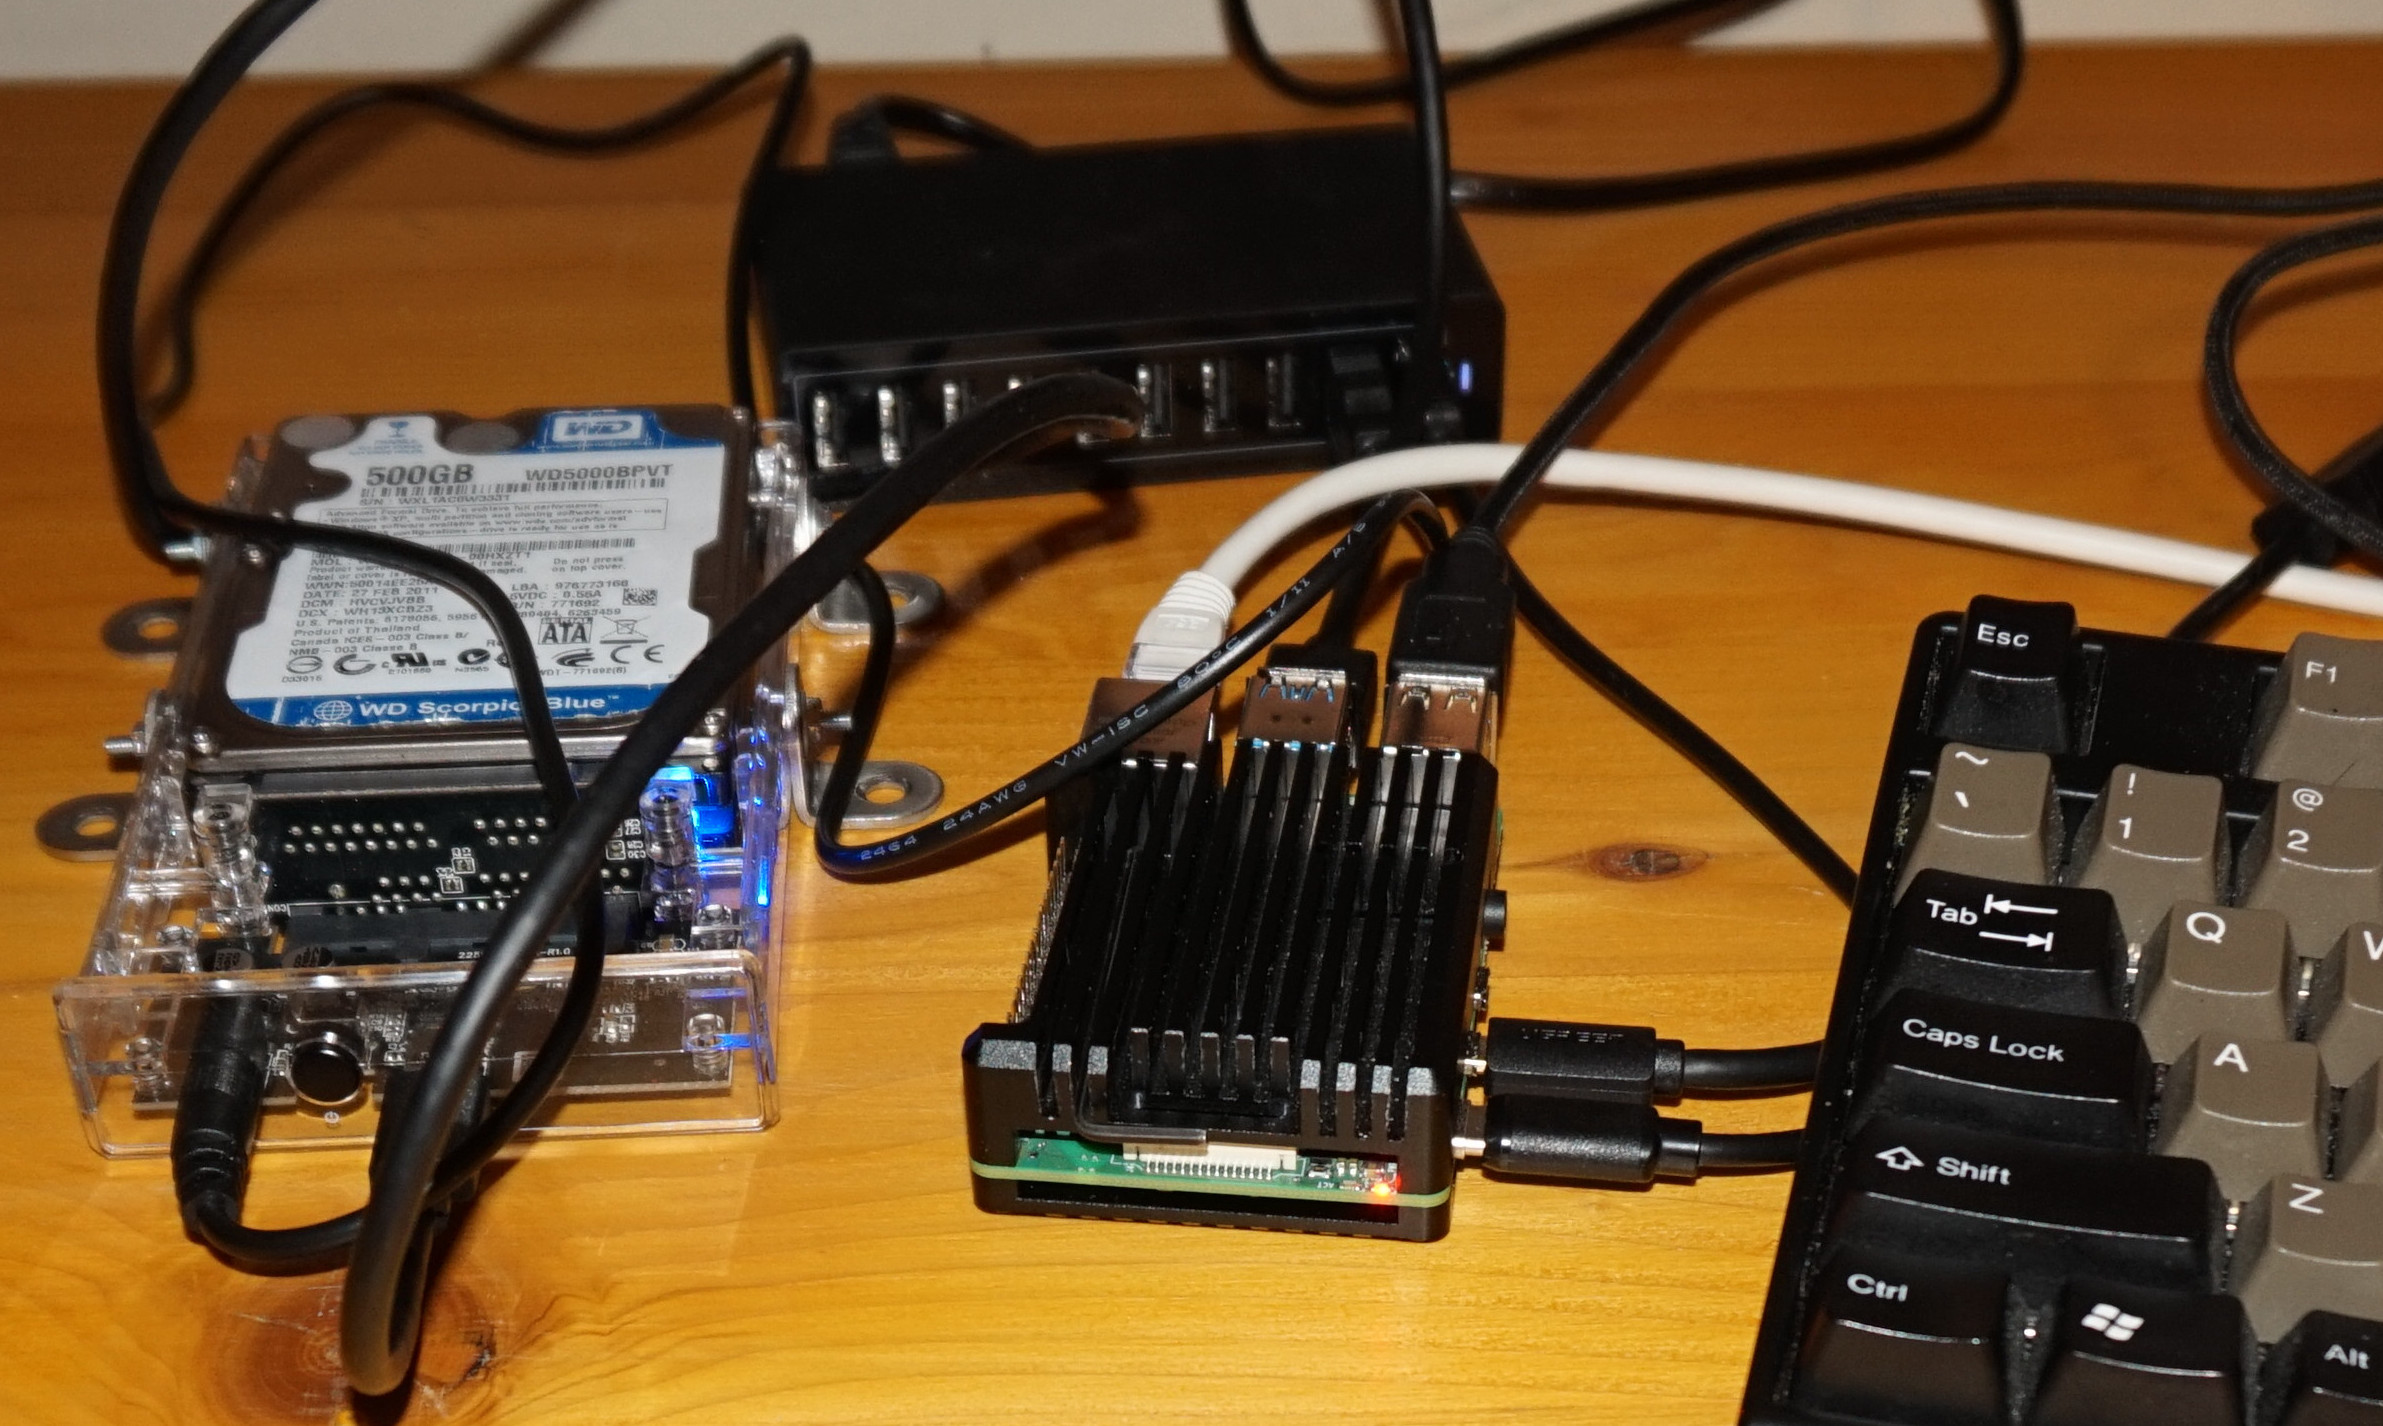
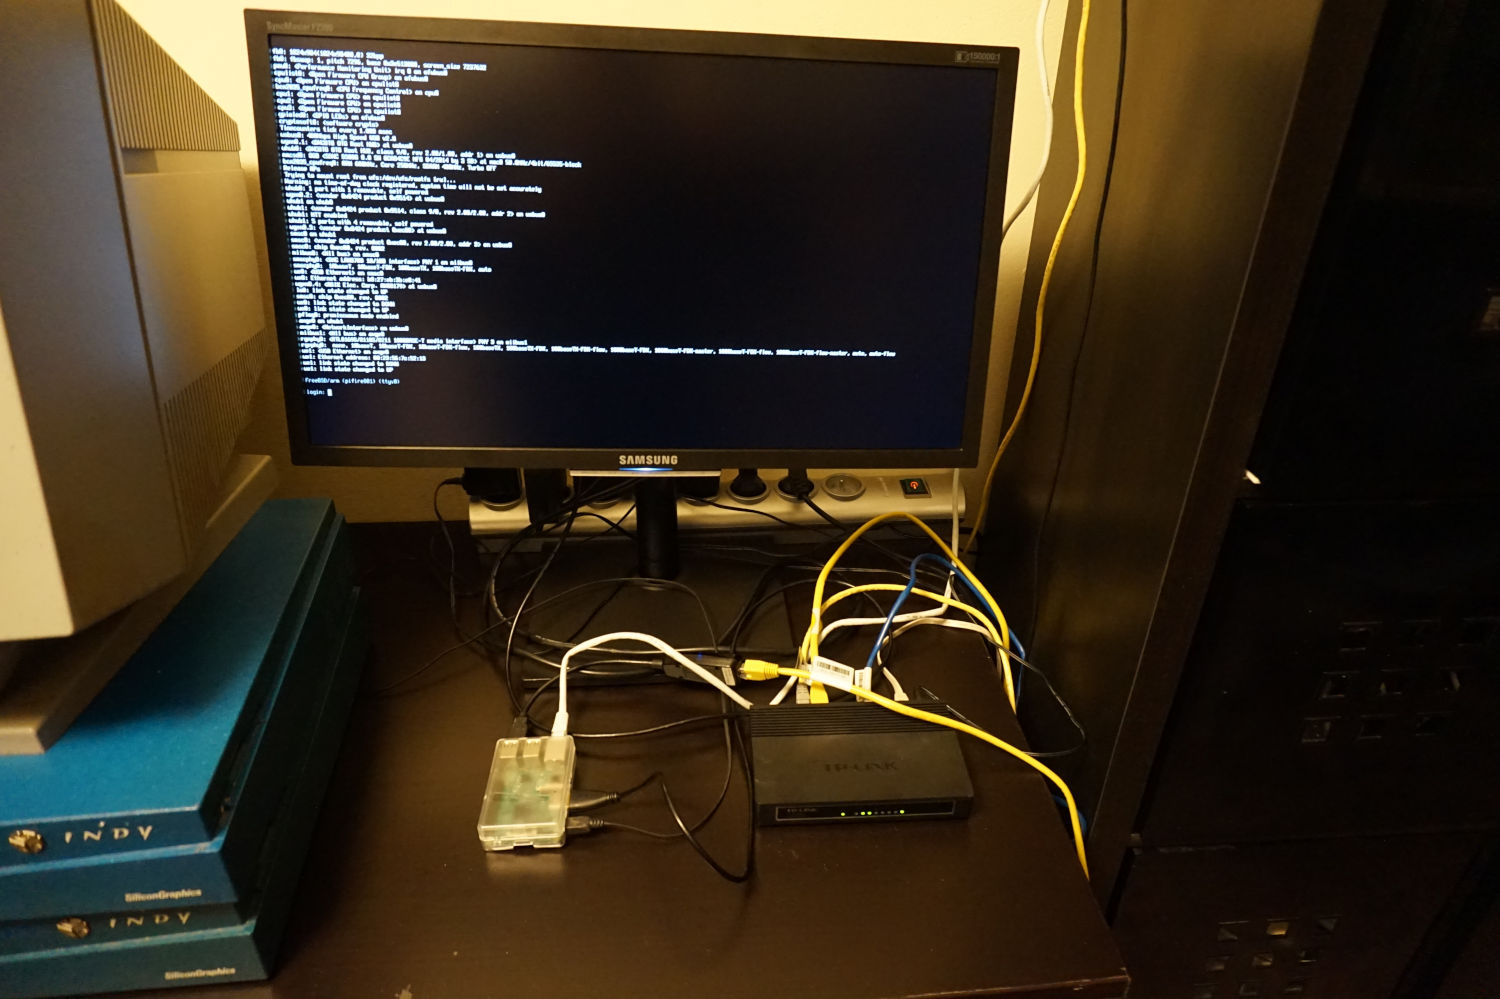
I migrated all my services to Raspberry PIs running GNU/Linux and FreeBSD to save power.
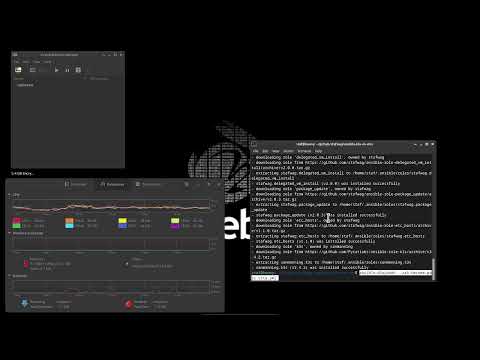
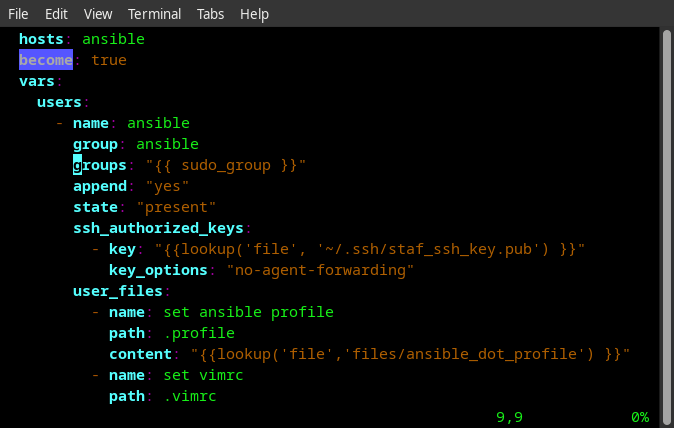
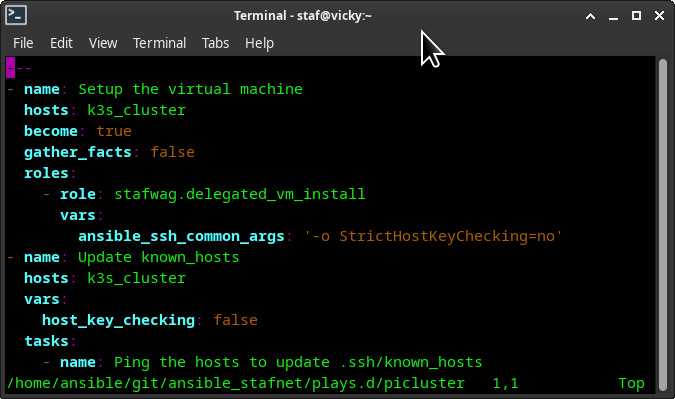
So I started to create a few ansible roles to provision the virtual machines.
delegated_vm_install is a wrapper around these roles to provision the virtual machine in a delegated way.
It allows you to specify the Linux/libvirt KVM host as part of the virtual machine definition.
Changelog
delegated_vm_install 1.1.0
update_ssh_known_hosts directive added
update_ssh_known_hosts directive added to allow to update
the ssh host key after the virtual machine is installed.
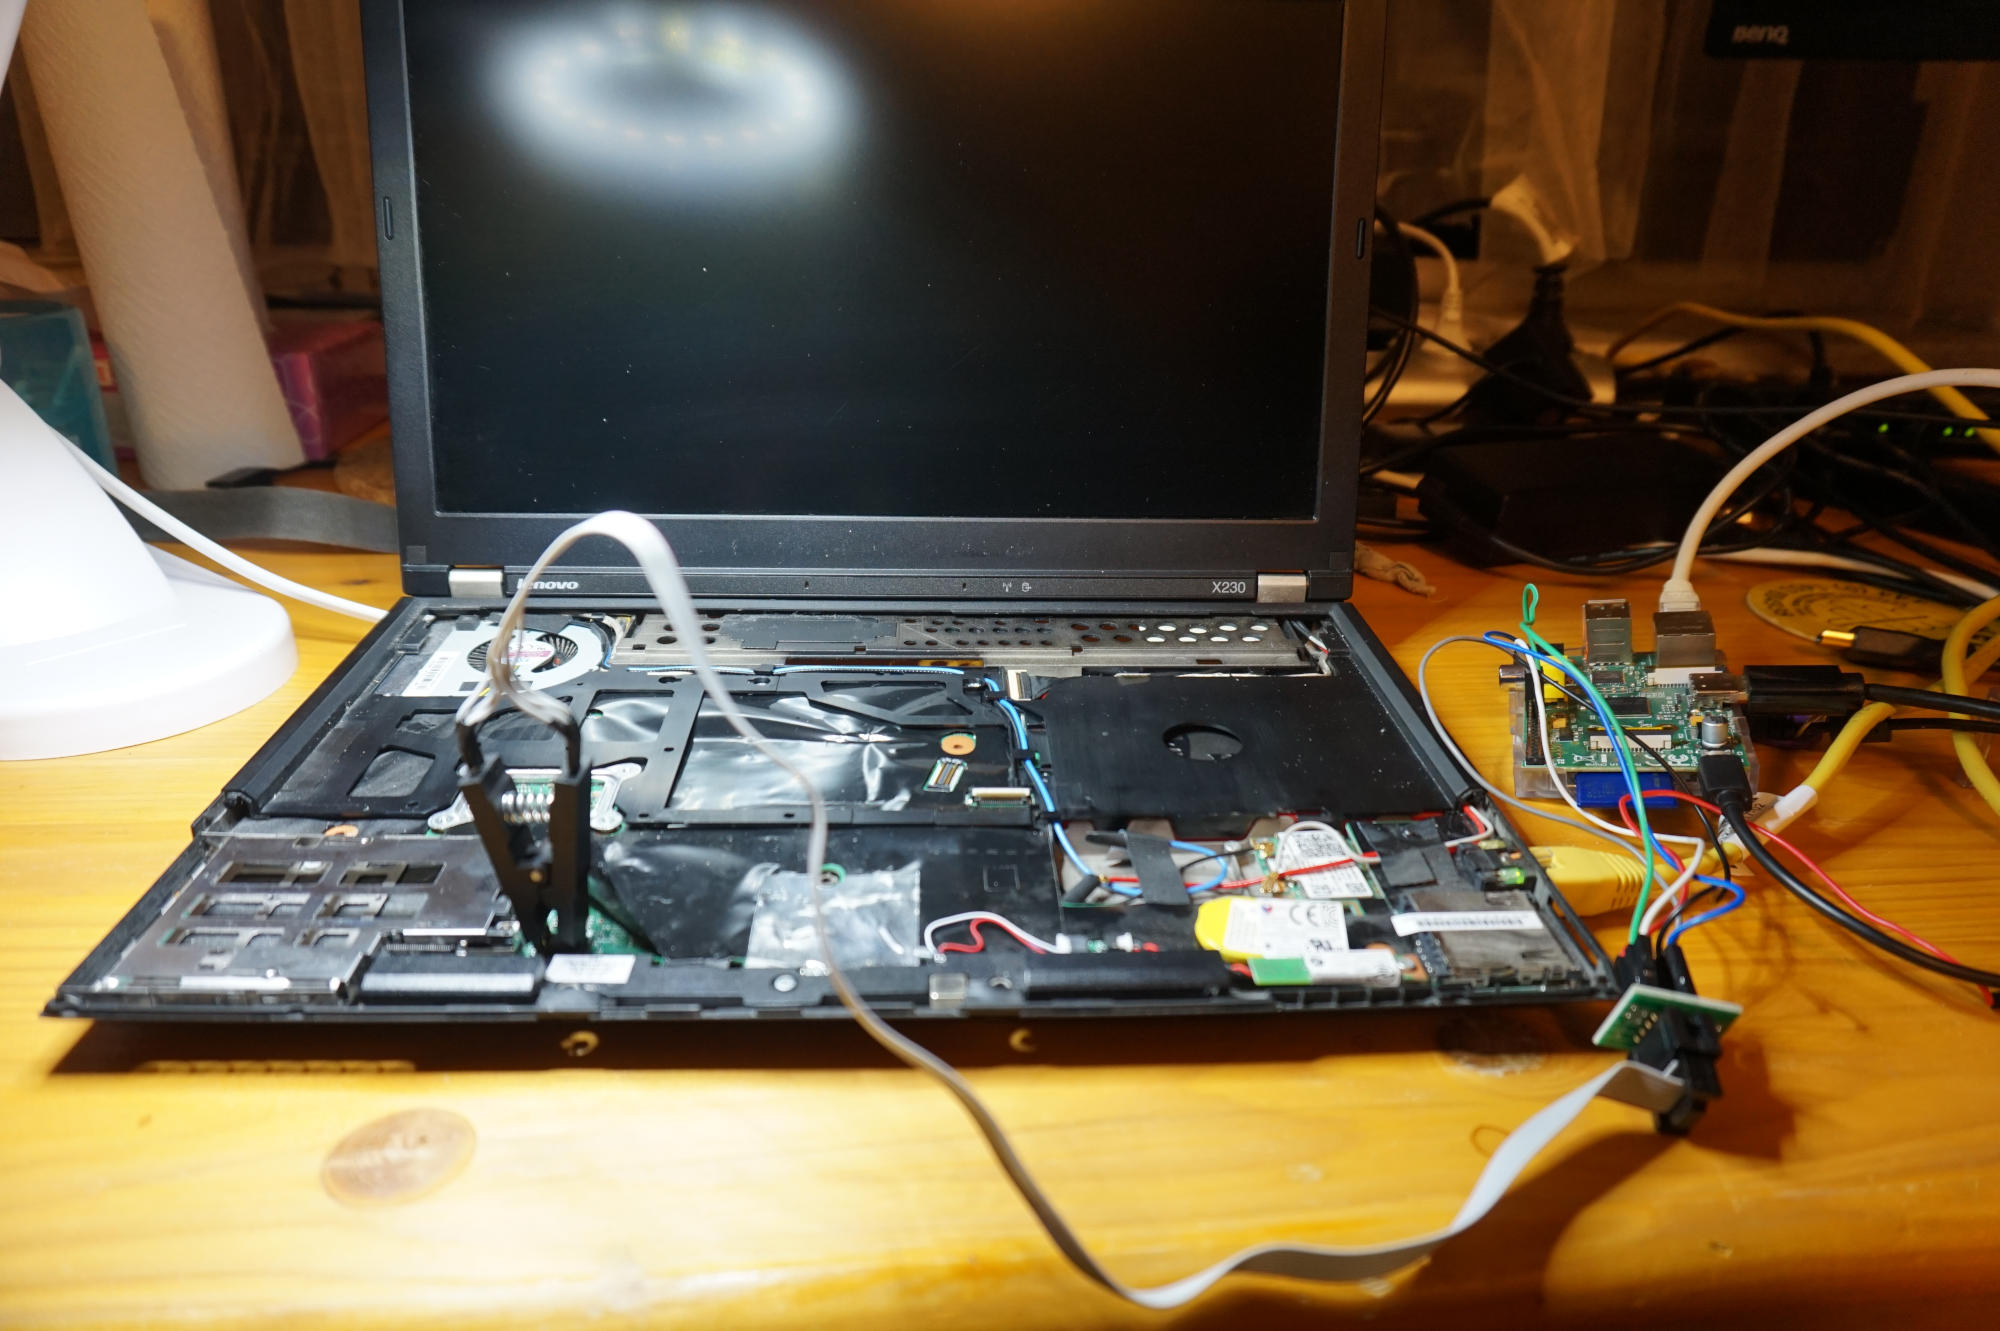
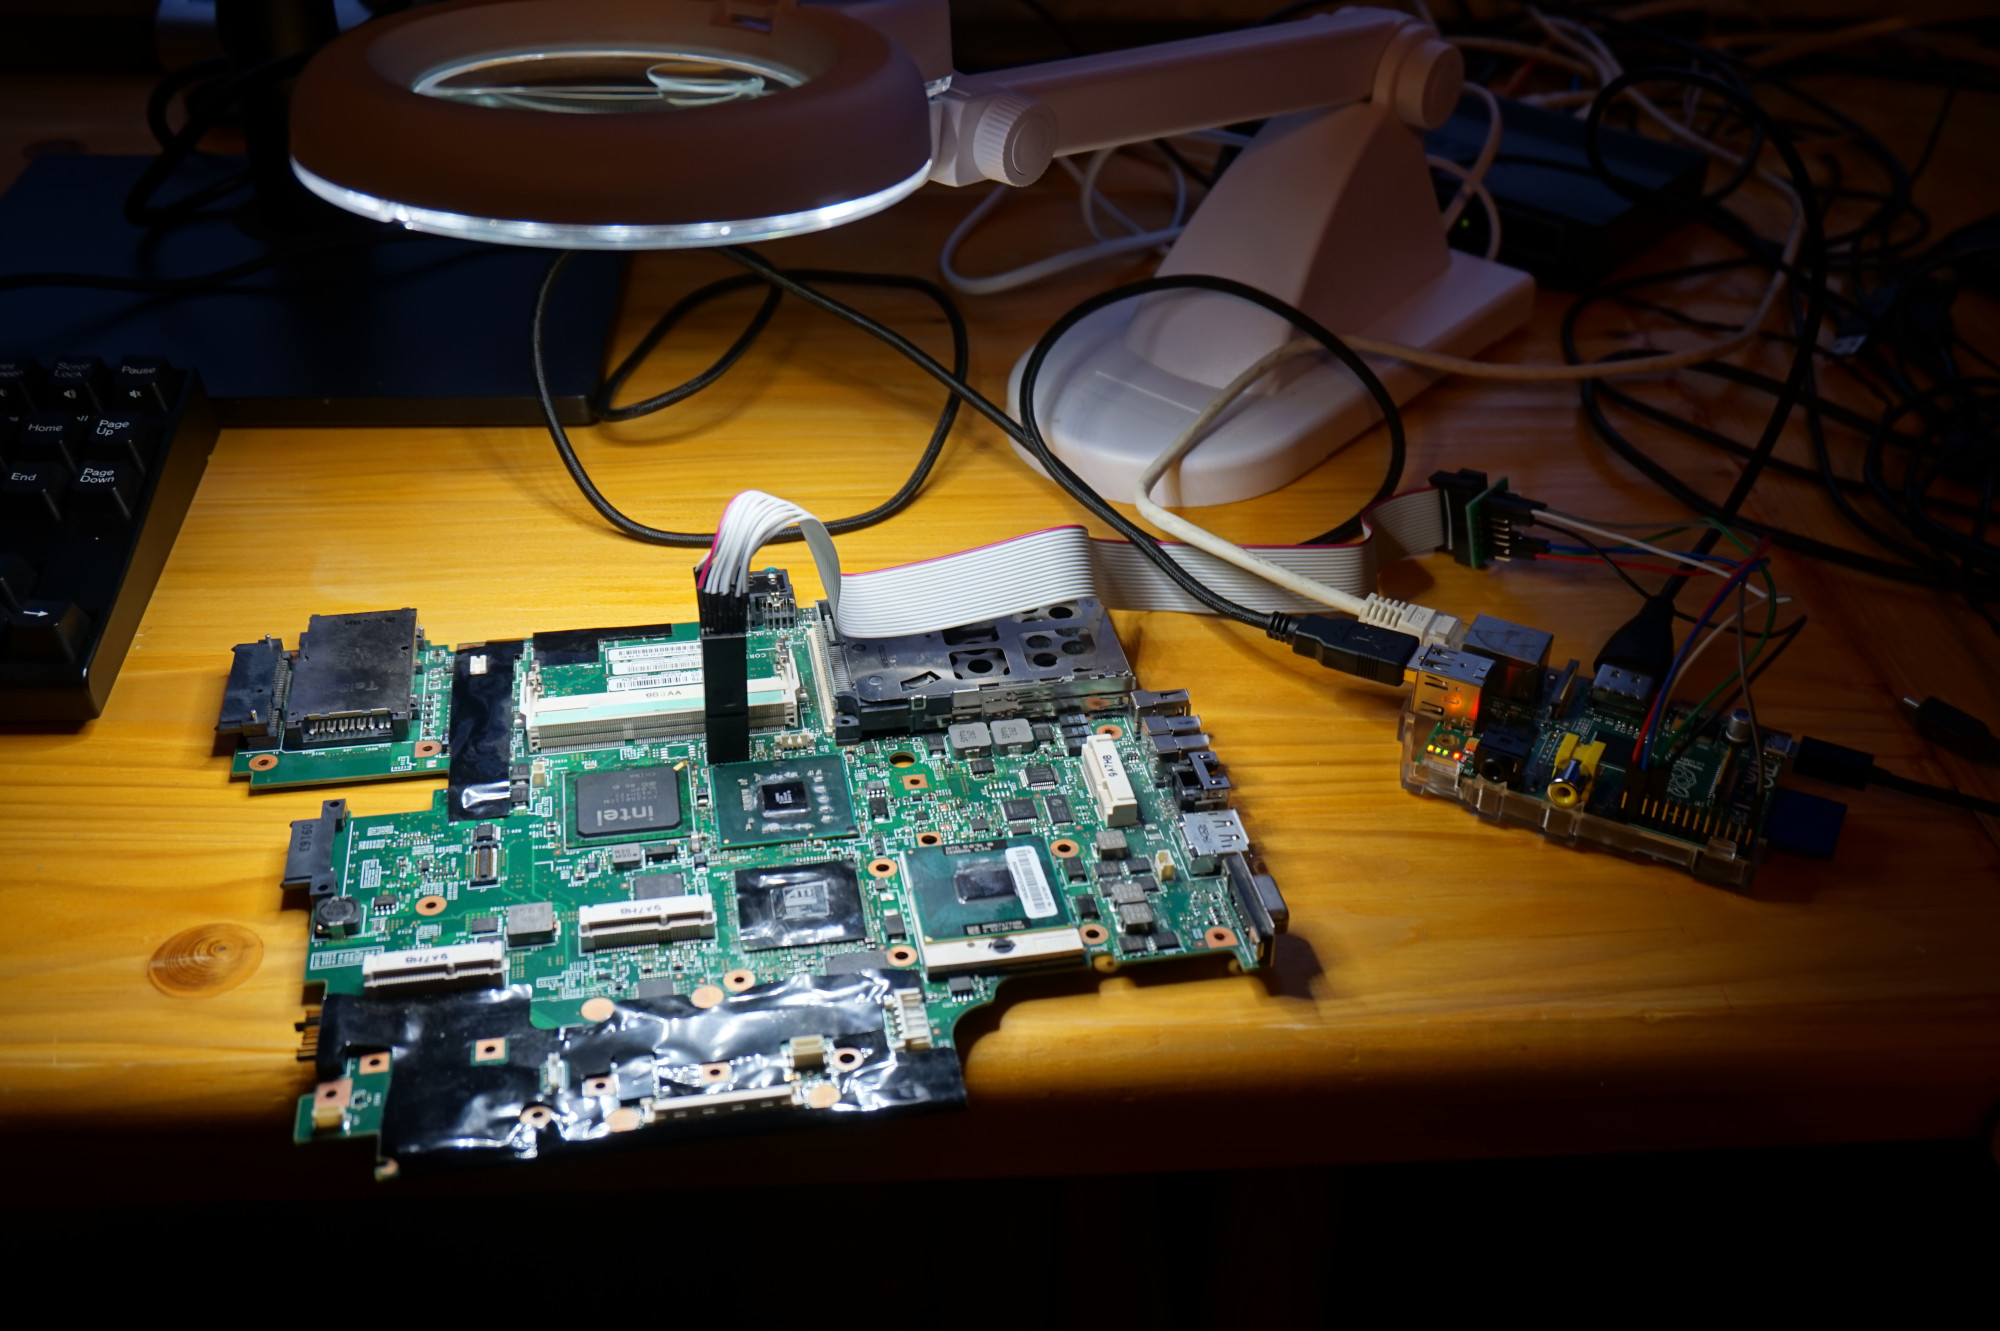
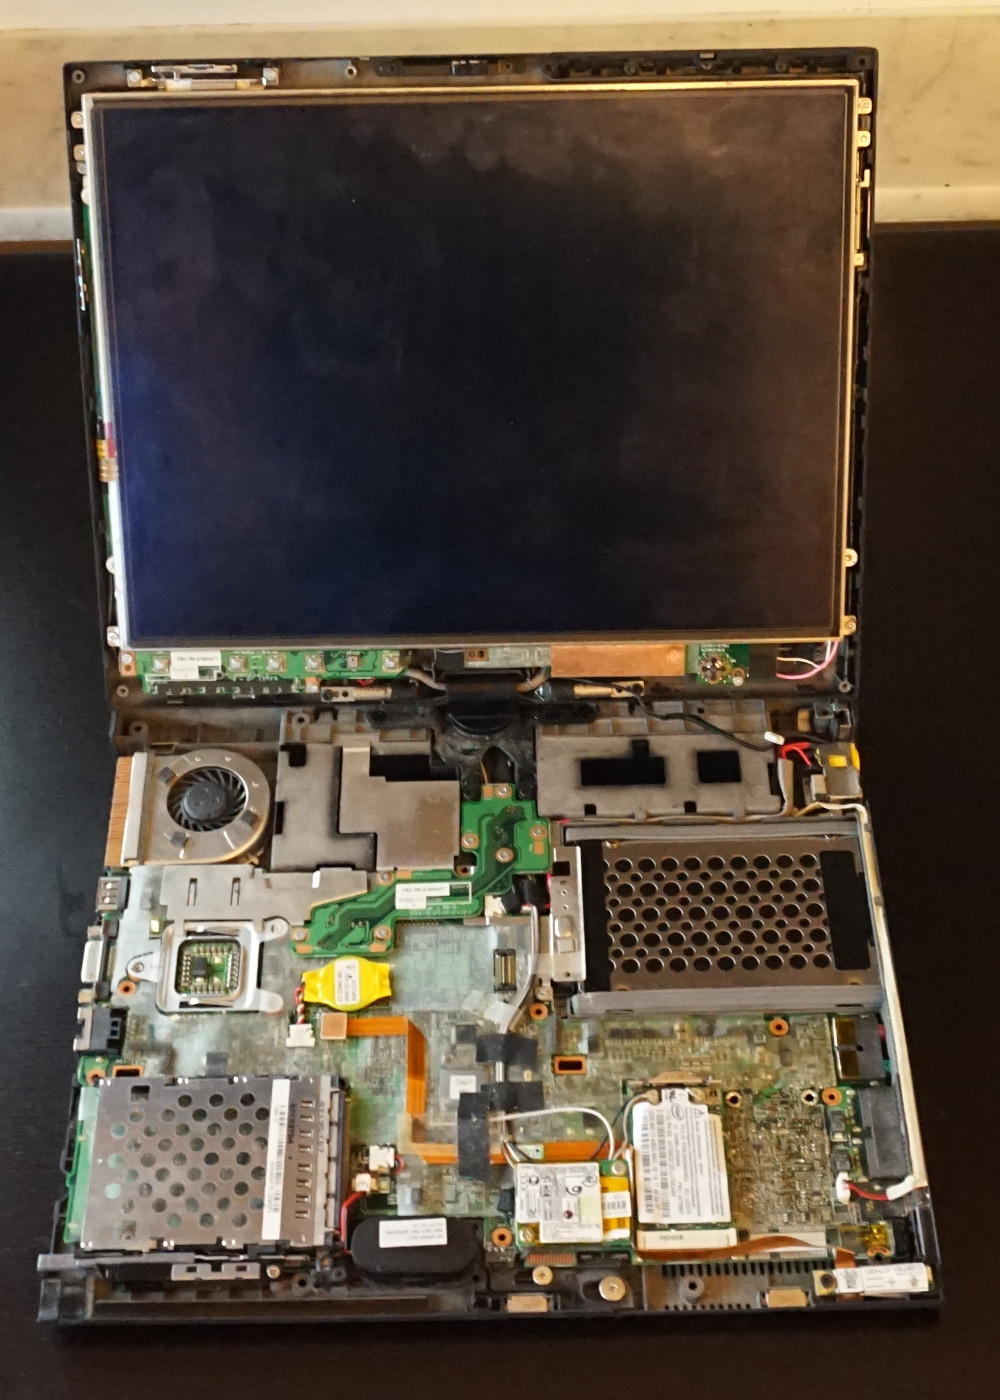
I already use coreboot on my Lenovo W500 with FreeBSD. I bought a Lenovo x230 for a nice price I decide to install coreboot on it. After reading a lot of online documentation. I decided to install the skulls coreboot distribution on it. The skulls project has nice documentation on how to install it.
To replace the BIOS with coreboot you will need to disassemble the laptop and use a clip on the BIOS chip to
install it.
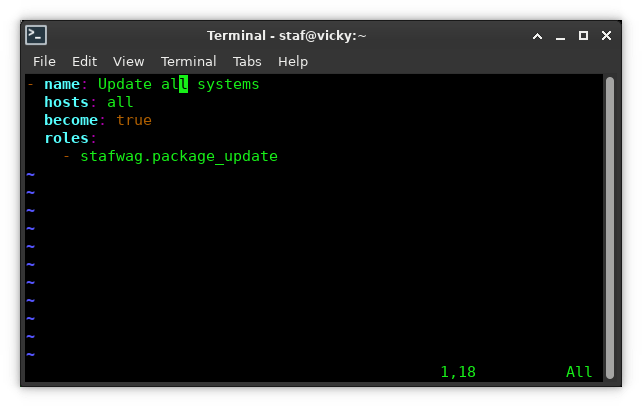
Keeping your software up-to-date is an important task in System Administration. Not only for security reasons but also to roll out bug fixes to your systems.
As always we should try to automate this process as much as possible.
Ansible has a package module to install packages in a generic way. It supports most Un*x platforms (GNU/Linux, BSD, …). But it doesn’t allow you to update all packages.
Package update enables you to update all packages on most Linux distributions and the BSD operating systems. It can also update the running jails on FreeBSD.
In previous blog posts, I described howto setup stubby as a DNS-over-TLS resolver. I used stubby on my laptop(s) and unbound on my internal network.
I migrated to unbound last year and created a docker container for it.
Unbound is a popular DNS resolver, it’s less known that you can also use it as an authoritative DNS server.
This work was based on Debian Buster, I migrated the container to Debian Bullseye reorganize it a bit to make it easier to
store the zones configuration outside the container like a configmap or persistent volume on Kubernetes.
The main reason I went with Manjaro was that the ArchLinux Arm image/tgz for the Raspberry Pi 4 was still 32 bits, or you needed to create-your-own kernel.
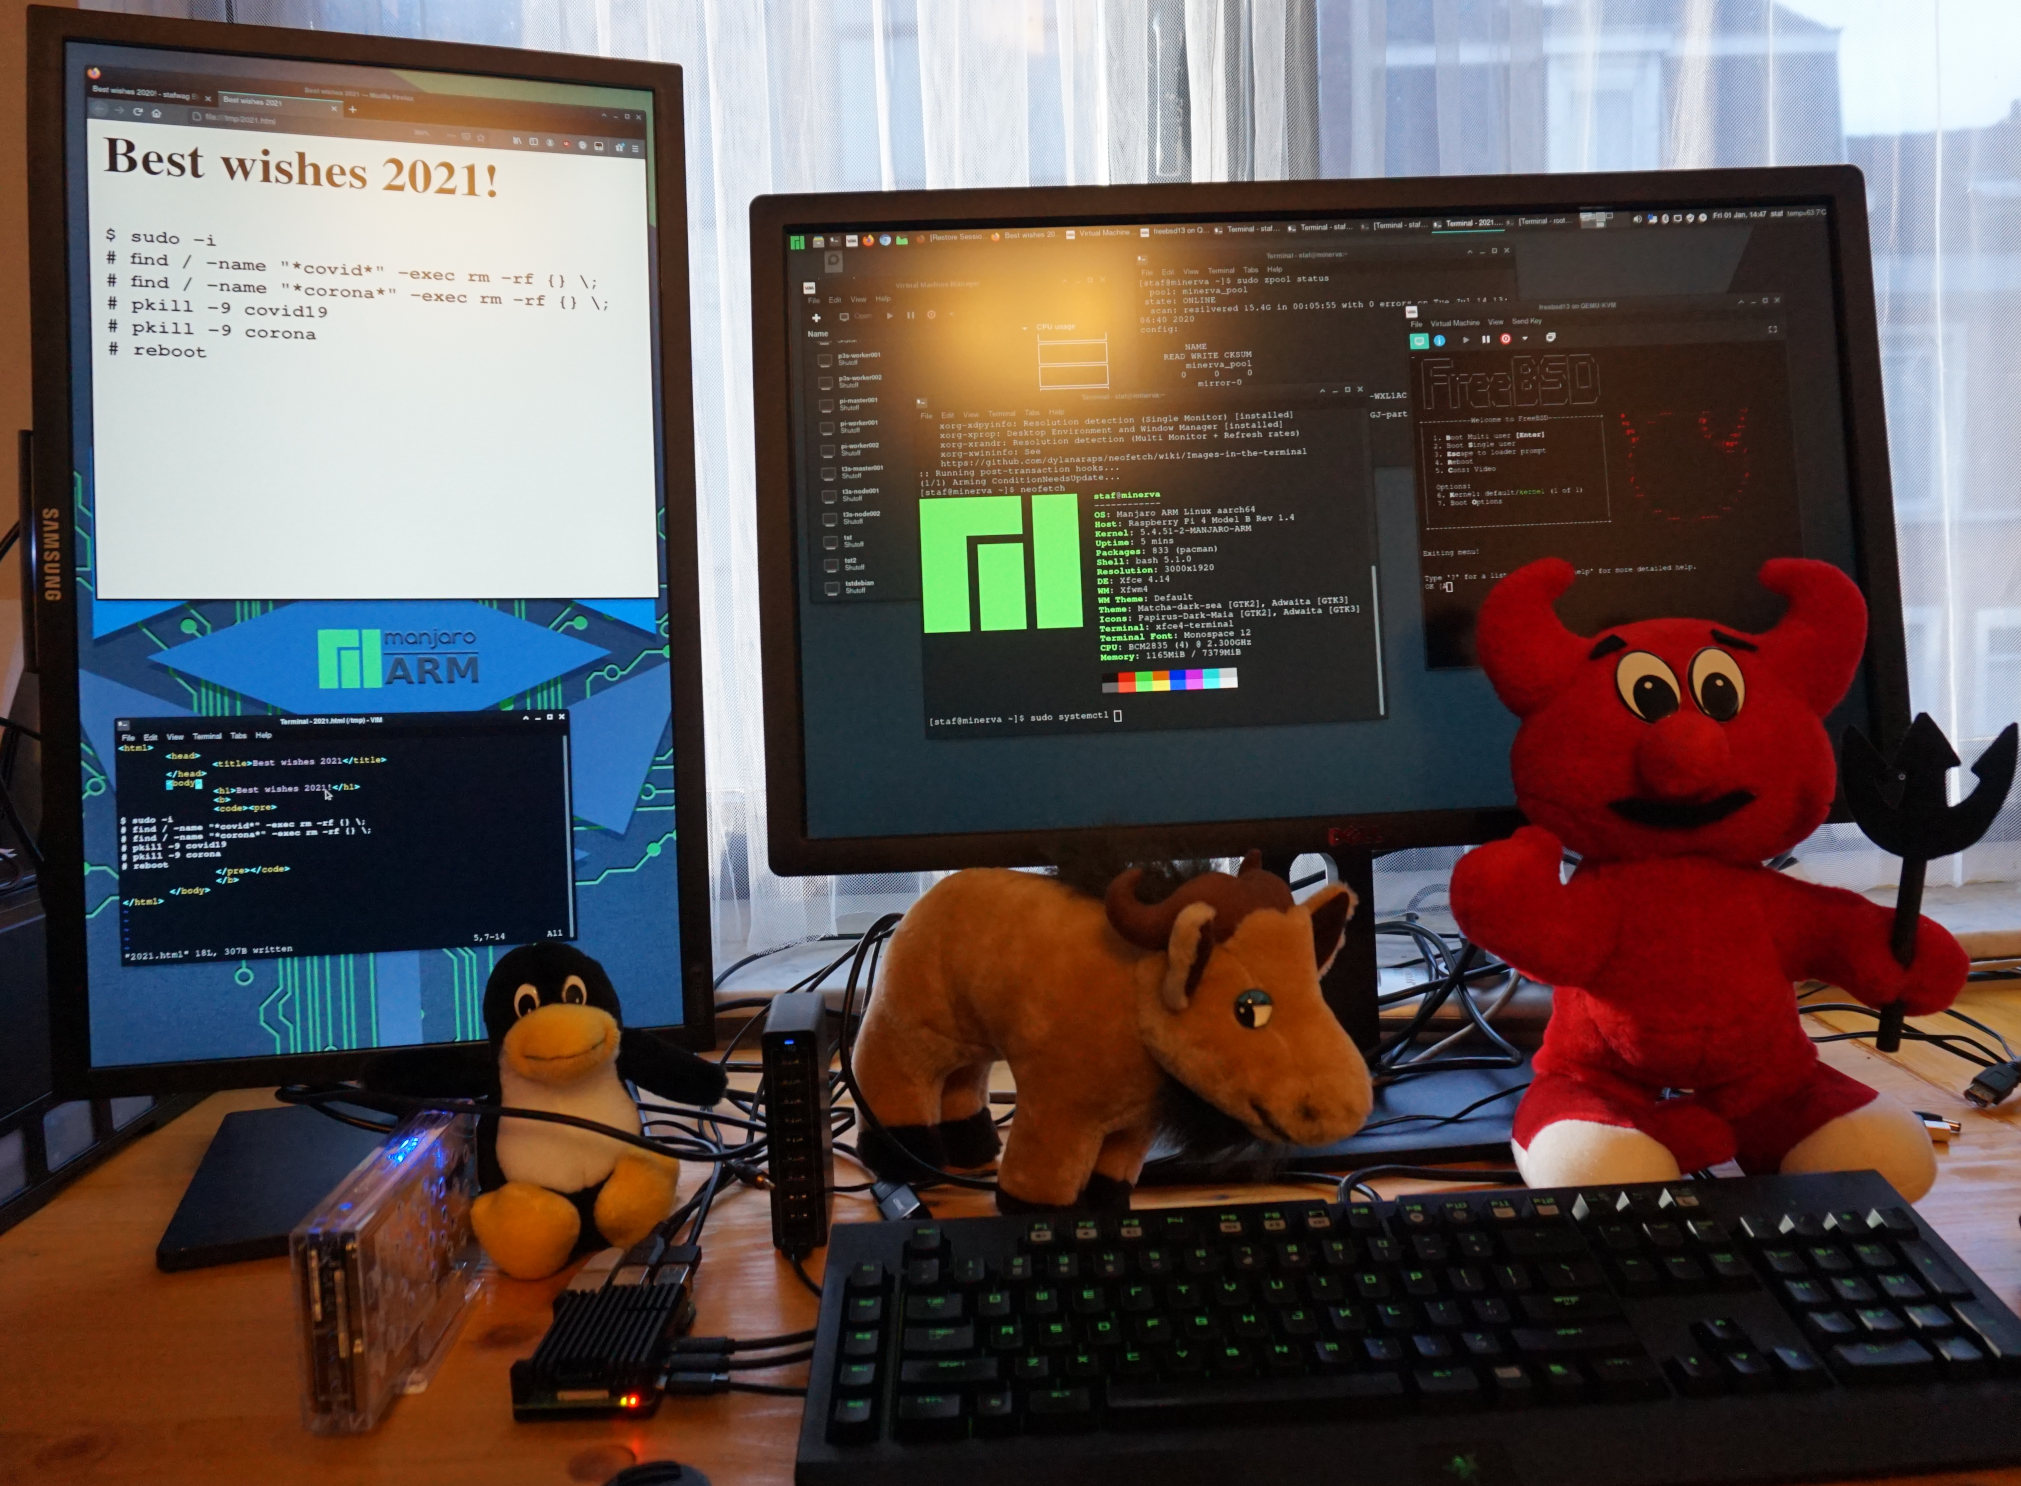
But started to like Manjaro Linux, it provided a stable base with regular updates. This year I upgraded my setup with 2 additional Raspberry Pi 4 to provide clustering for my k3s (Kubernetes) setup. I used virtual machines on the Raspberry Pi to host the k3s nodes. Also because want to the Pi for other tasks and virtual machines makes it easier to split the resources. It’s also an “abstraction layer” if you want to combine the cluster with other ARM64 systems in the future.
I always (try to) to full disk encryption, when you have multiple nodes it’s important to be able to unlock the encryption remotely.
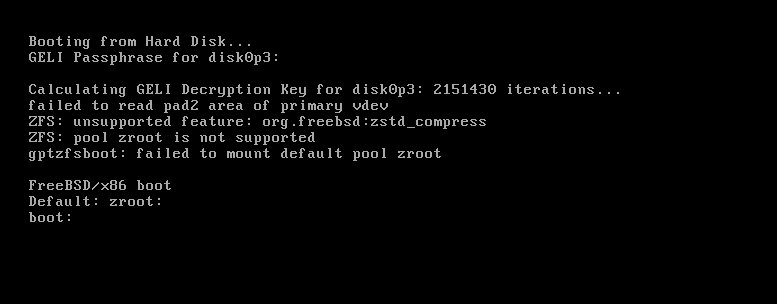
One of the nice new features of FreeBSD 13 is OpenZFS 2.0.
OpenZFS 2.0 comes with zstd compression support. Zstd compression can have compression ratios similar to gzip
with less CPU usage.
For my backups, I copy the most import data - /etc/, /home, … - first locally to a ZFS dataset. This data gets synced to a backup server.
This local ZFS dataset was compressed with gzip, after upgrading the zroot pool and setting zstd as the compress method. FreeBSD failed
to boot with the error message:
ZFS: unsupported feature: org.freebsd:zstd
ZFS: pool zroot is not supported
gptzfsboot: failed to mount default pool zroot
As this might help people with the same issue, I decided to create a blog post about it.
In my last blog post, we set up a FreeBSD virtual machine with QEMU. I switched from the EDK2 (UEFI) firmware to U-boot, the EDK2 firmware had issues with multiple CPU’s in the virtual machines.
In this blog post, we’ll continue with the Network setup, install the virtual machine from a CDROM image and how to start the virtual machine during the PI start-up.
This works great for GNU/Linux distributions but FreeBSD as a virtual machine didn’t work for me. When I tried to install FreeBSD or import a virtual machine image,
FreeBSD wasn’t able to mount the root filesystem and ended with an “error 19”.
On the FreeBSD wiki, there are a few articles on how to use ARM64 FreeBSD with QEMU directly.
You find my journey of getting a FreeBSD Virtual Machine below.
I use Manjaro on my Raspberry PI, but the same setup will work with other GNU/Linux distributions.
OpenVAS is an opensource security scanner it started as a fork of Nessus which went
from an opensource project to a closed source scanner.
I always prefer opensource software, for security tools, I even prefer it more… It nice to see/audit where the security data comes from, instead of the “magic” that is used by the close source software.
To scan for missing patches on your systems there are faster/better tools available that can be integrated into your build pipeline
more easily. But OpenVAS is still a very nice network security scanner. Relying on one security tool is also not a “best security practice”.
Kali GNU/Linux has become the default Linux distribution for security auditing pen testing, it’s nice to have OpenVAS installed on
your Kali GNU/Linux setup. If you just want to have OpenVAS available there is also a (virtual) appliance available from the OpenVAS
developers ( Greenbone ).
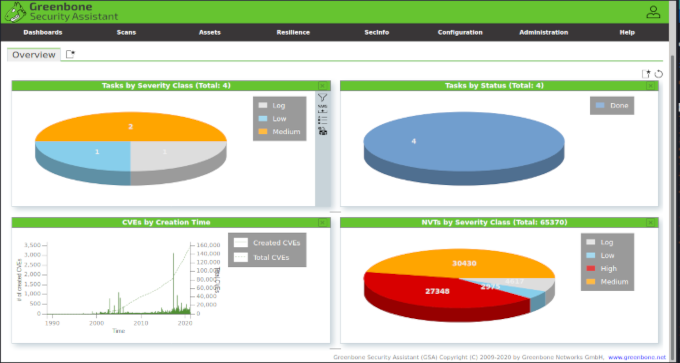
You’ll find my journey to install OpenVAS on Kali GNU/Linux.
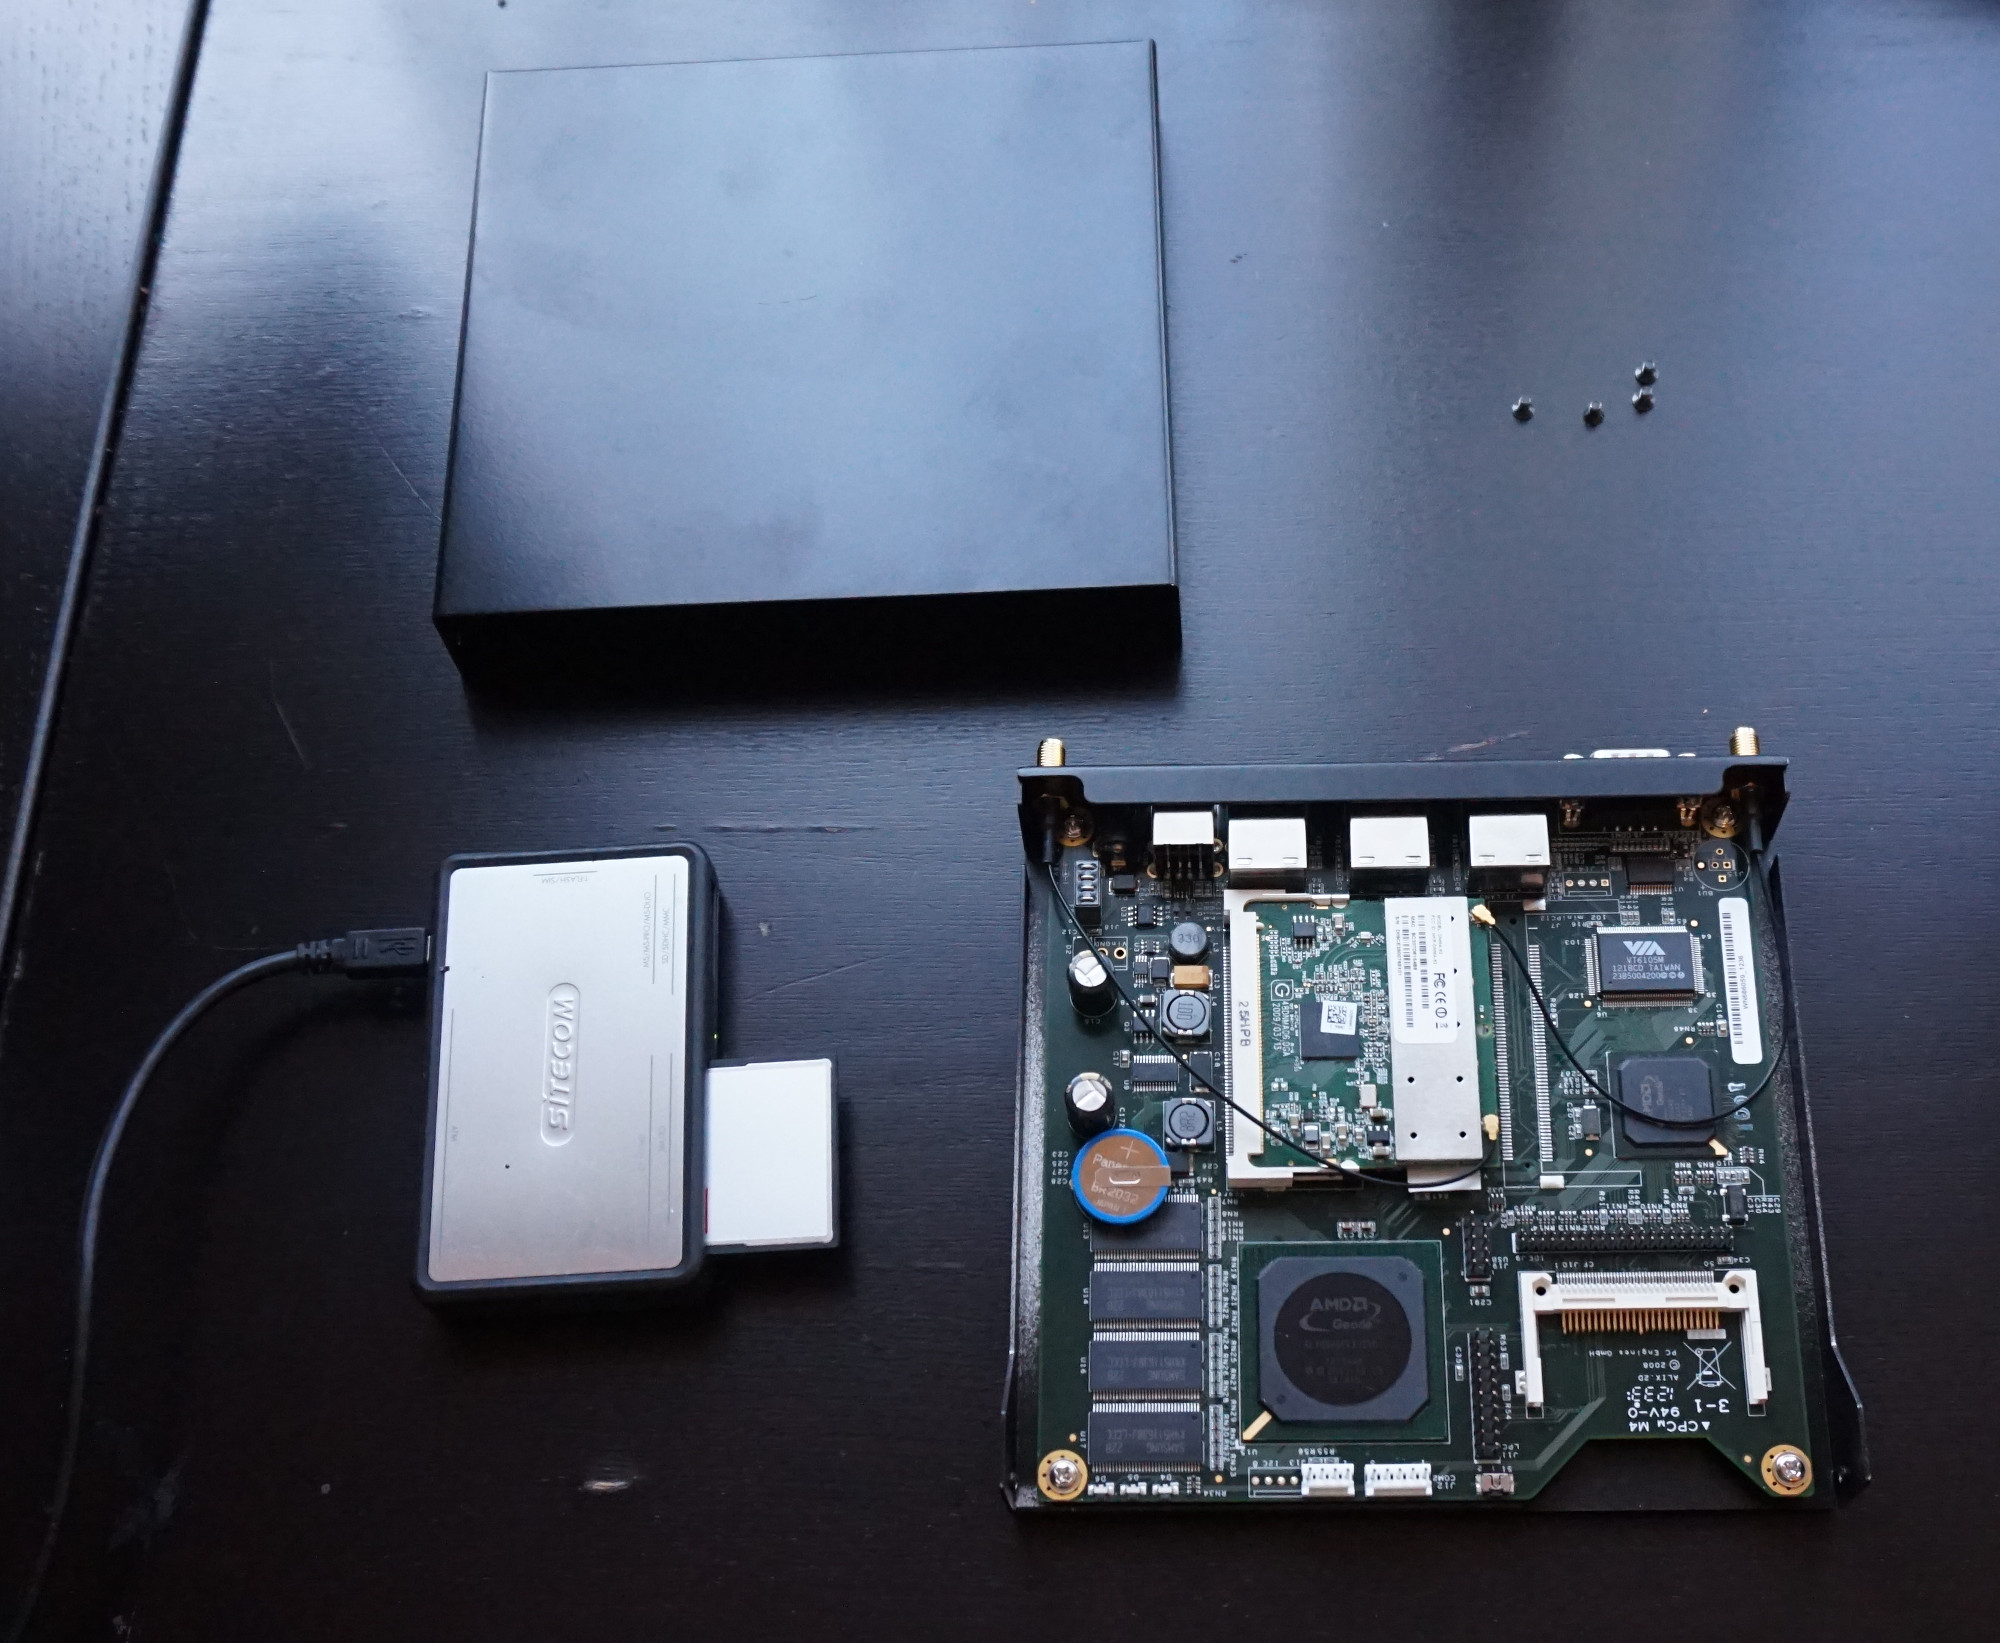
I migrated to OPNsense after pfSense dropped support for 32 bits. Unfortunately, OPNsense also dropped support for 32 bits CPUs in the 19.1.7 release 20.7 release. I decided to install FreeBSD on my Alix to use it as my firewall.
To make it possible to reinstall my Alix firewall, I installed FreeBSD on my Raspberry Pi 2 to use it as my firewall during the installation of FreeBSD on my Alix.
You’ll find my journey to install FreeBSD my an Alix firewall below.
Unfortunately, OPNsense also dropped support for 32 bits CPU’s in the 19.1.7 release 20.7 release. I decided to install FreeBSD on the alix to use it as my firewall. But I need a temporary firewall solution so I can install FreeBSD on my alix board. I have a Raspberry PI 2 that I wasn’t using.
You’ll find my journey to use my RPI2 as my firewall below.
I prefer RISC as a CPU architecture over CISC. RISC is a simpler design that should deliver more CPU performance with fewer transistors and is more power-efficient. We have to recognize that Intel and AMD have made great progress in increasing the performance and efficiency of the x86 CISC architecture.
Power is currently the most powerful alternative that doesn’t require binary blobs; this is not only great for free/open source activists. A truly open-source firmware that can be reviewed / audited is also for nice security reasons.
I use OpenZFS on my PI. The latest kernel update broke zfs on my PI due to a License conflict, the solution is to disable PREEMPT in the kernel config. This BUG was already resolved with OpenZFS with the main Linux kernel tree at least on X86_64/AMD64, not sure why the kernel on the raspberry pi is still affected.
I was looking for an excuse to build a custom kernel for my Pi anyway :-). I cloned the default manjaro RPI4 kernel and disabled PREEMPT in the kernel config.
I wanted to verify how usable the latest PI is for desktop and home server usage.
For desktop usage, it is “usable”.
For video playback in the browser, I recommend disabling 60fps (https://greasyfork.org/en/scripts/23329-disable-youtube-60-fps-force-30-fps) and keep the video playback to 720p. Please note that if you want to use it for Netflix you will need Widevine for the DRM content. As far as I know, there isn’t an ARM64 version available. An ARM32 version exists but I didn’t try (yet).
For (home) server usage ARM64 or AArch64 is getting more usable.
Cloud providers are also offering ARM64 based systems. A container-based workload - like Docker, LXC, FreeBSD jails etc - is probably better suited for a small device like the Raspberry PI. Virtual machines are still important for server usage so let see how the PI4 can handle it.
Most GNU/Linux distributions RedHat, Centos, Ubuntu, Debian are offering cloud images for ARM64. To configure these images you’ll need cloud-init.
The Raspberry PI has become more and more powerful in the recent years, maybe too powerful to be a “maker board”. The higher CPU power and availability of more memory - up to 8GB - makes it more suitable for home server usage.
The latest firmware (EEPROM) enables booting from a USB device. To enable USB boot the EEPROM on the raspberry needs to be updated to the latest version and the bootloader that comes with the operating system - the start*.elf, etc files on the boot filesystem - needs to support it.
I always try to use filesystem encryption. You’ll find my journey to install GNU/Linux on an encrypted filesystem below.
64 Bits operating systems
The Raspberry PI 4 has a 64 bits CPU, the default operating system - Raspberry Pi OS (previously called Raspbian) - for the Rasberry PI is still 32 bits to take full advantage of the 64bits CPU a 64 bits operating system is required.
You’ll find an overview GNU/Linux distributions for RPI4 below.
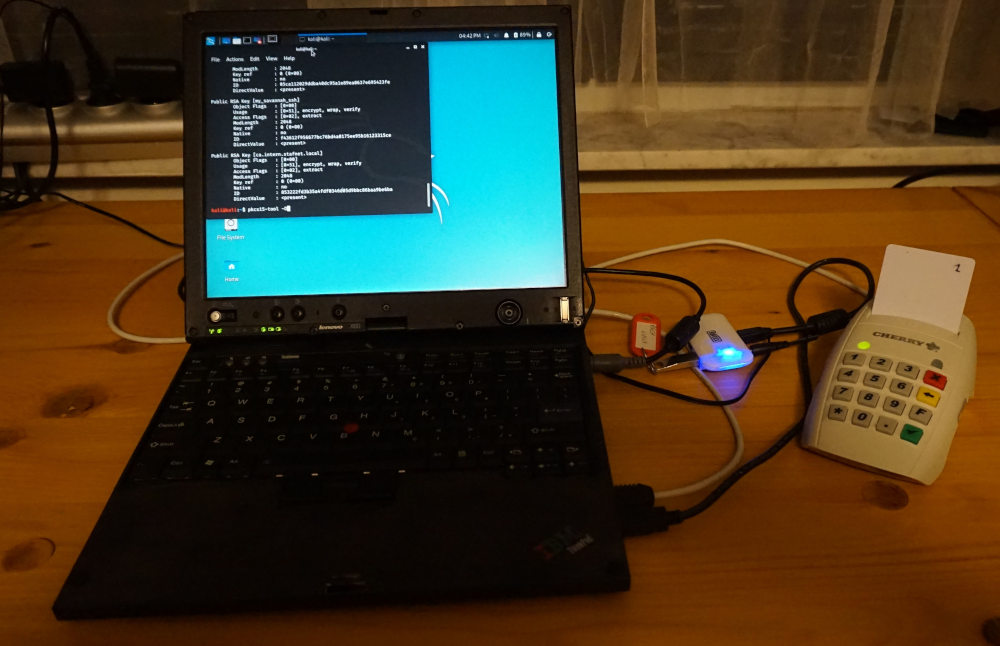
When you want to store your GnuPG private key(s) on a smartcard, you have a few options like the Yubikey, NitroKey GPG compatible cards, or the OpenPGP. The advantage of these cards is that they support GnuPG directly. The disadvantage is that they can only store 1 or a few keys.
Another option is SmartCardHSM, NitroKey HSM is based on SmartCardHsm and should be compatible. The newer versions support 4k RSA encryption keys and can store up 19 RSA 4k keys. The older version is limited to 2k RSA keys. I still have the older version. The advantage is that you can store multiple keys on the card. To use it for GPG encryption you’ll need to set up a gpg-agent with gnupg-pkcs11-scd.
In this blog post, we will set up a CA authority with SmartCardHSM.
When you to create internal certificate authority for internal services it’s important to protect the private key. When somebody with bad intentions gets access to the private key(s) of the signing certificate authorities, it can be used to issue new certificates. This would enable the man in the middle attacks.
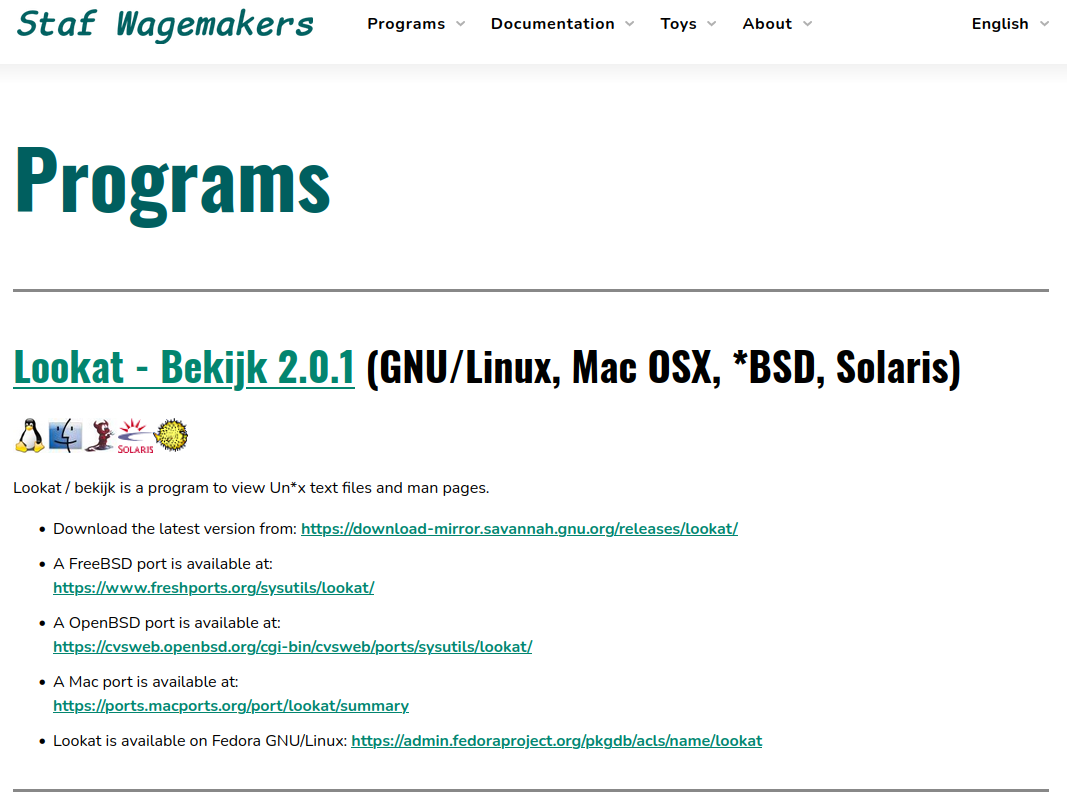
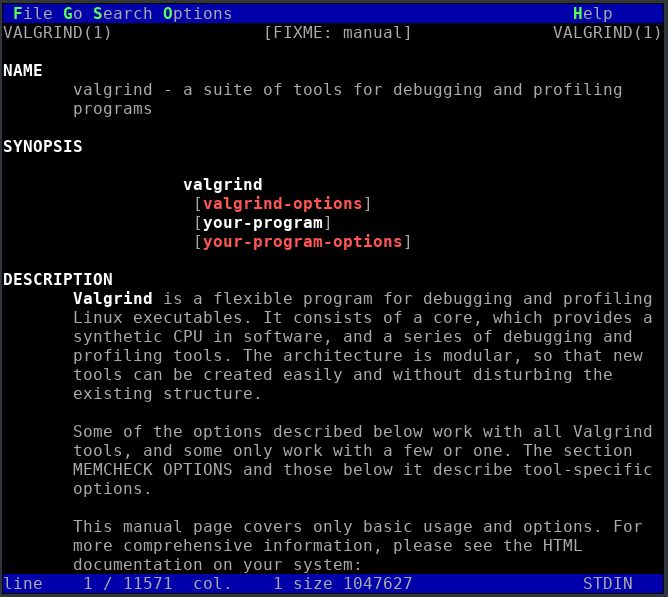
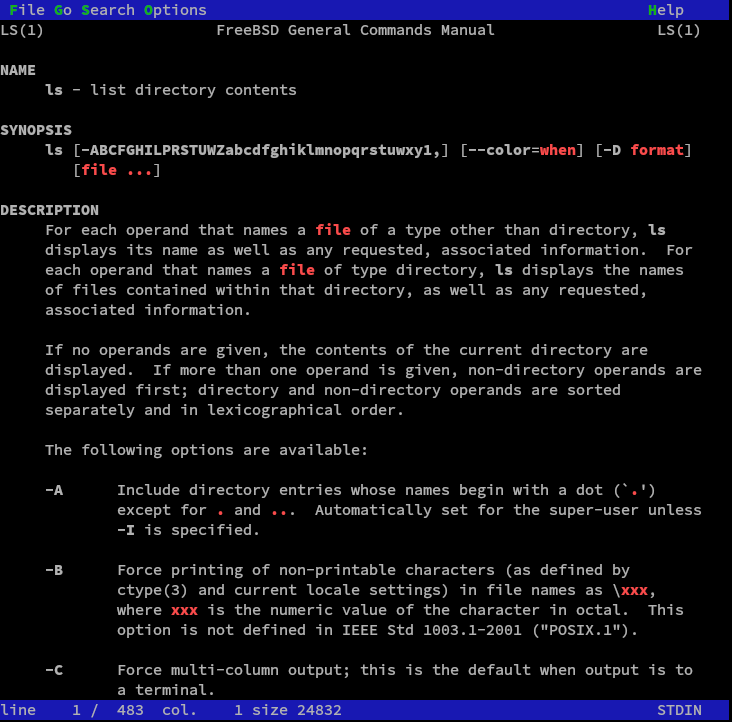
“lookat” (or “bekijk” in Dutch) is a program to view text files and manual pages. It is designed to be more user-friendly than more conventional text viewers such as less. And supports colored manpages.
Lookat 2.0.1 is the latest stable release of Lookat/Bekijk.
ChangeLog
BUGFIX: corrected screen refresh code. To handle non-utf8 terminals
correctly.
BUGFIX: ensure that menus are initialized before using them.
BUGFIX: corrected type menu handling.
BUGFIX: failed to open type enabled extentions from the commandline.
The source code was - and is still also hosted - on GitHub.
There are a few reasons for the move;
I was looking for an easy way to store binary releases. Binary releases aren’t supported by GitHub.
There might be a solution for this at GitLab but scp to upload a release is more convenient.
I use(d) Libreboot on my Lenovo W500. And it works fine… but I want to install FreeBSD on it. The GRUB payload Libreboot uses by default isn’t compatible with the FreeBSD bootloader. It is possible to boot FreeBSD from GRUB or try to recompile Libreboot with the SeaBIOS payload. …But I just wanted to play with coreboot, to be honest :-)
I migrated my blog from Octopress to Jekyll. The primary reason is that octopress isn’t maintained any more. I’m sure its great theme will live on in a lot of projects.
I like static webpage creators, they allow you to create nice websites without the need to have any code on the remote website. Anything that runs code has the possibility to be cracked, having a static website limit the attack vectors. You still need to protect the upload of the website and the system(s) that hosts your site of course.
The primary reason is to have a firewall that will be always up-to-update, unlike most commercial customer grade firewalls that are only supported for a few years. Having a firewall that runs opensource software - it’s based on FreeBSD - also make it easier to review and to verify that there are no back doors.
When I tried to upgrade it to the latest release - 19.1.7 - the upgrade failed because the filesystem ran out of inodes. There is already a topic about this at the OPNsense forum and a fix available for the upcoming nano OPNsense images.
In my previous two posts (1,
2 ), we created Docker Debian and
Arch-based images from scratch for the i386 architecture.
In this blog post - last one in this series - we’ll do the same for yum based distributions like CentOS and Fedora.
Building your own Docker base images isn’t difficult and let you trust your distribution Gpg signing keys instead of the docker hub. As explained in the first blog post. The mkimage scripts in the contrib directory of the Moby project git repository is a good place to start if you want to build own docker images.
In a traditional environment, systems are installed from a CDROM. The configuration is executed by the system administrator through the installer. This soon becomes a borning and unpractical task when we need to set up a lot of systems also it is important that systems are configured in same - and hopefully correct - way.
In a traditional environment, this can be automated by booting via BOOTP/PXE boot and configured is by a system that “feeds” the installer. Examples are:
Actually, I got it a couple of months back but I didn’t have time to play with it and it took some time to get some parts from Aliexpress.
The Thinkpad W500 is probably the most powerful system that is compatible with Libreboot, it has a nice high-resolution display with a 1920 x 1200 resolution which is even a higher screen resolution than the Full HD resolution used on most new laptops today.
Binary blobs are bad. Having a closed source binary-only piece of software on your system is not only unacceptable for Free Software activists it also makes it more difficult to review what it really does and makes it more difficult to review it for security concerns.
Having your system vulnerable is also a bad thing of course. Can’t wait to get a computer system with an open CPU architecture like RISC-V.
In my previous blog article we install on GNU/Linux which is my main desktop operation system. My NAS and the services that are required to be always running are on FreeBSD.
In this arcticle we will setup Stubby - the DNS Privacy Daemon - on FreeBSD.
** Installing and configuring an encrypted dns server is straightforward, there is no reason to use an unencrypted dns service. **
DNS is not secure or private
DNS traffic is insecure and runs over UDP port 53 (TCP for zone transfers ) unecrypted by default.
This make your unencrypted DNS traffic a privacy risk and a security risk:
anyone that is able to sniff your network traffic can collect a lot information from your leaking DNS traffic.
with a DNS spoofing attack an attacker can trick you let go to malicious website or try to intercept your email traffic.
Encrypt your dns traffic
Encrypting your network traffic is always a good idea for privacy and security reasons - ** we encrypt, because we can! ** - .
More information about dns privacy can be found at https://dnsprivacy.org/
Kernel-based Virtual Machine (KVM) has become the defacto hypervisor on GNU/Linux systems it works with great performance as it utilizes the CPU virtualization extensions Inetl VT-x or AMD-V). KVM doesn’t emulate hardware but uses QEMU for this.
Nested Virtual guest
It’s possible to use nested virtualization this make it possible to run a hypervisor inside a KVM virtual machine.
It was running pfsense and was quite happy about it. Pfsense dropped support for 32 bits in their pfsense 2.4 release.
This would left me with a unsupported firewall which was one of the reasons to use pfsense instead of a closed source commercial router.
I could have moved to a new firewall like the pcengines apu but there is no reason to replace hardware that works fine.
The nice thing about opensource software is that we’ve options to choose from if software doesn’t match your usecase we’ve other options to choose from.
On telephone network there are alternative internet providers but they use the network
of proximus.
I switched my internet connection from ADSL to VDSL and switched to a new provider ( edpnet).
The internet speed was below the expectations and my modem reported errors on the line. After fixing the internal phone cabbeling in my appartment I wanted the retrigger the DLM monitoring.
To start the DLM monitoring in Belgium you need to call 0800 22 424 and type in your line number. If you don’t have a proximus phone number the line number is not the same as your phone number. To get your line number you need to connect an analog phone to our line and call 1924 this will read aloud your line number.
When you create an new virtual KVM virtual system the video ram is limited to 16MB by default to use a higer screen resolution you need
to increase the video ram. The available resolution reported by the virtual screen may also not include the resolution that you want to
utilize.
You’ll find my journey to enable higher screen resolutions in my KVM (qemu) virtual systems below.
I used the relay host of my internet provider but this was causing issues since my email was getting mark as SPAM in gmail.
It was already on my to-do list to move my outgoing mail to my mail provider also to make it easier to move to another ISP or to implement SPF but was not on the top of my to-do list.
My email provider requires authentication, so I needed to reconfigure postfix in my FreeBSD mail jail to use a relay host with authentication.
Usage is very easy just clone the git repository and run the script.
Microcode
Microcode isn’t uploaded to the CPU but loaded during the boot strap of the CPU.
Normally the BIOS upload the microcode to the CPU but this can also be done by the by the bootloader, or the operating system kernel.
I own a Unicompmodel-m keyboard. The keyboard has a nice key feel but it has windows super key(s).
I don’t use super key(s), and would prefer to have a keyboard without it. But when it has super keys I’d rather have it without the windows logo on it so it was time to replace them with the tux version
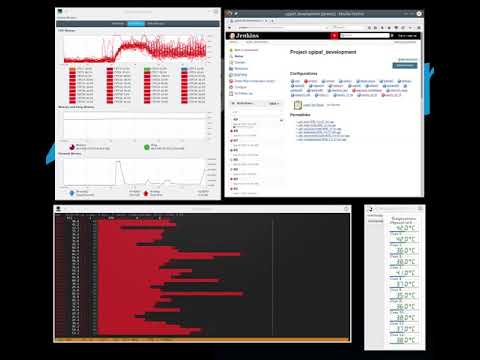
I’m able to run all test on multiple operation systems now. I still need to review this setup and perhaps move some tests to docker instead of the virtual machines to save some memory. …but this jenkins setup was configured before docker was a thing.
My jenkins builds are taking too long mainly due the lack of memory. I mainly use jenkins to verify that my software work on different operation systems (GNU/Linux distributions / *BSD / Solaris).
Looking for a solution that is still affordable I ended up with building a dual Xeon workstation. CPU and memory comes from www.ebay.be
In my previous post, I setup on my PostgresSQLFreeBSD jail, In this post we continue with the bacaula server.
In this post we will continue with the database connection (Catalog) we’ll go the extra mile 1,609344 km and encrypt the catalog connection with ssl. Why? We encrypt.. because we can!
Bacula Components
Bacula Director
The Bacula Director is daemon that runs in the backgroud that control all backup operations.
Bacula Console
The Bacula console is an administrator program that allows an system administrator to control the Bacula director.
Bacula File
The Bacula File is a backup client install on the backup client.
Bacula Storage
The backup media.
Catalog
The Catalog is the index of the backups. Bacula supports three types of index databases mySQL ( mariaDB), PostgreSQL and SQLite
Bacula monitor
A Bacula monitor service is a program that allows the system administrator to cerify the status of the bacula Directors, Bacula File Daemons and Bacula Storage Daemons.
I do take backups; my current solution are couple of shell script wrapper around dump/zfs send/btrfs send/rsync which is a mess.
So decided give bacula a try
I use ezjail to manage my FreeBSD jails. PostgresSQL is my favorite database and will use this database as the backend for bacula and will use this database as the backend for bacula. I want to move all my databases to 1 FreeBSD jail this should make the easier to create reliable database backup in the further. For this reason we’ll setup 2 FreeBSD jails 1 for the database and 1 for bacula.
You’ll find my journey of installing PostgreSQL on a FreeBSD jail. In another blog post we will continue with the installation of bacula.
After Parabola GNU/Linux is booted verify that you have internet access if the network card is support and dhcp is enabled on you network you should get a network address.
I tried to compile libreboot on Debian and Parabola GNU/Linux but both failed, compling Libreboot on Trisquel 7 works fine so I’ll use Trisquel to replace the BIOS with libreboot.
I’m not sure that I’ll use Trisquel 7 as my daily driver since it is a bit outdated…
I might go with Debian Strech without the non-free repositories to get a fully Free Software Laptop/tablet. I’ll need to replace the Intel wifi adapter since this requires non-free firmware.
You’ll find a small howto install libreboot on a Thinkpad X60 below.
Build Libreboot
The latest version of libreboot isn’t available via a binary distribution so I decided to build it from source.
I’m preparing to move my workstation to arch linux Before I’ll install it on my physical workstation I did the installation on a virtual machine. I’ll use btrfs as the filesystem during the installation. btrfs is a nice filesystem but it had some serious dataloss issue with RAID5/RAID6 recently.
btrfs might not stable enough for a production environment but it has some nice features like snapshots, send/recieve, compression etc. I use zfs for my important date anyway.
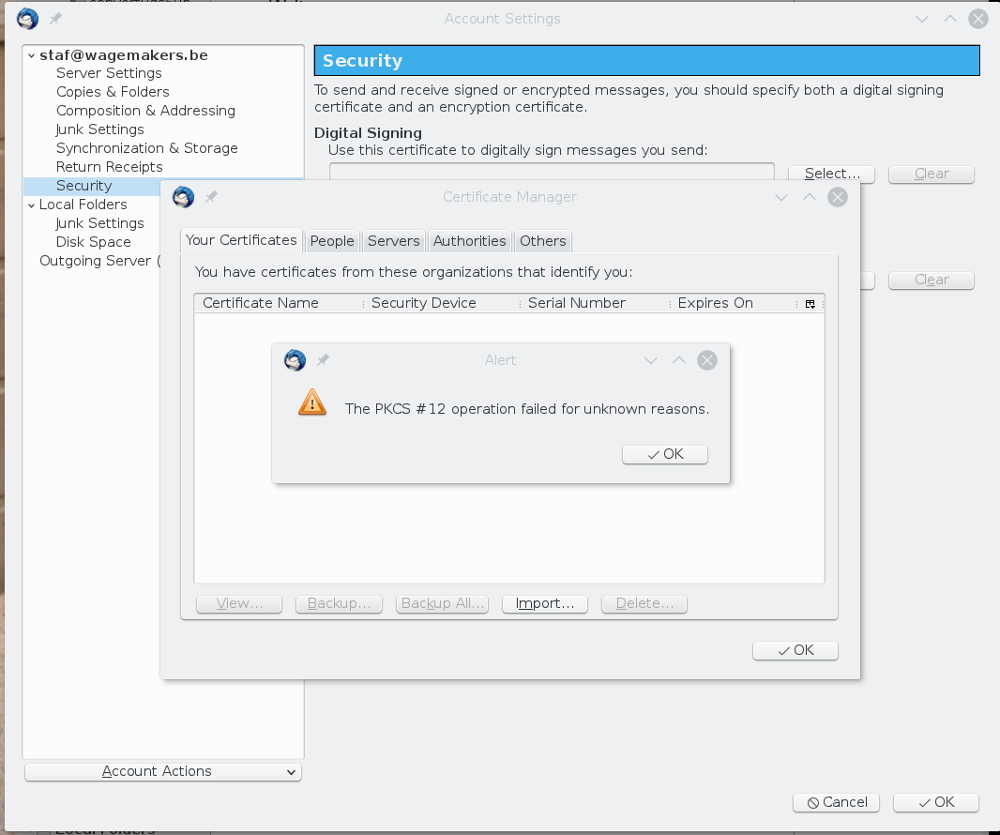
The import of the pkcs12 failed in Thunderbird with the message: “The PKCS #12 operation failed for unknown reasons.”
Searching the internet didn’t provide a solution. To debug this issue I started to extract the private / certificate from the pkcs12 file provided by globalsign and creating a new one.
To execute this command I use an encrypted luks volume.
I like ARM but unfortunatelly a lot of the ARM soc’s have no opensource drivers for the GPU
The manufacturer of the odroid u3 - hardkernel - provides ubuntu 14.04 images with xbmc and mali support. It isn’t possible to get the newer of version of xbmc - now kodi - running, or I didn’t succeed withit. I’ll look for another solution for my media server needs this might be my raspberry pi1 model B+ that is laying around doing nothing running openelec
Like I said I like the performance of the ordoid U3 that why I installed archLinuxArm to play with Docker. I could have sticked with Ubuntu 14.04 but with Arch Linux I get more up-to-date software.
Since we are using docker on arm we have to build our own docker base images instead of using the docker registery. I have security concerns about installtion and using unsigned non-verified software anyway. If you build your own image it possible to audit/verify the build process.
I use a yubi key for my ssh authentication. But I’ve other ssh keys for my remote services so wanted something that allows me to take a backup of my keys see this post for more information on to backup/restore a SmartCard-HSM
I still have too many private keys on a local filesystem, I started to use the yubikey neo for my ssh authentication. Mainly because the nice formfactor of the yubikey.
For my other private keys/data I was looking for something cheeper since I need to have a backup of my secured data so I bought a few Smartcard-HSM smartcards they cost 16 € each while a yubi-key neo cost 54 € at amazon.de
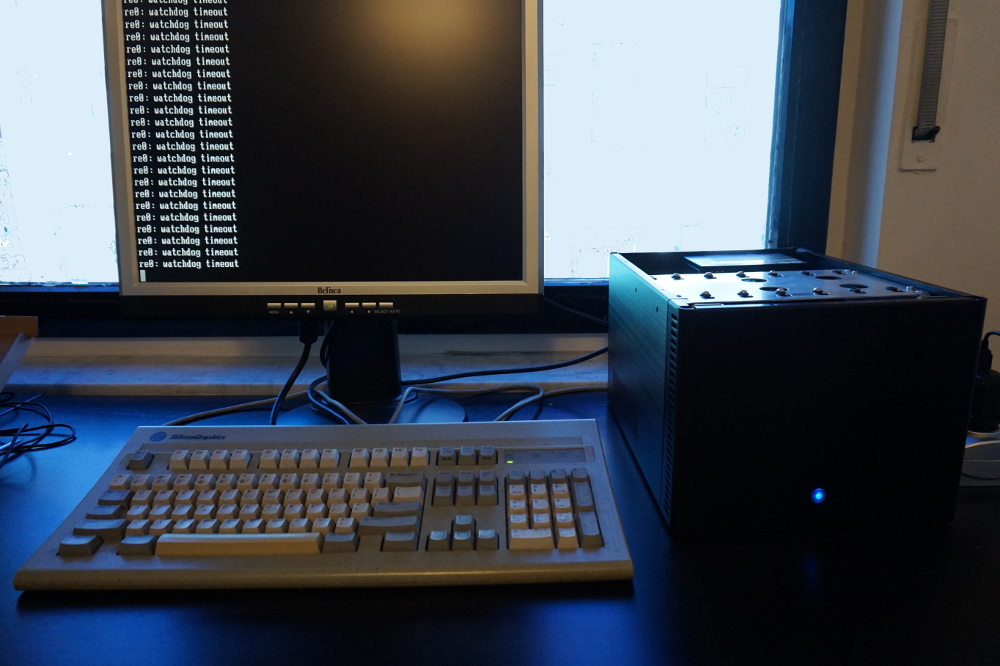
However transferring large data files to it causes the network to hang. The realtek network interface had issues with freebsd from the beginning. On the screen and in syslog the entry “re0: watchdog timeout” is printed.
Most FreeBSD people recommends to use Intel nics, I ordered a new Intel nic at dx.com. After the installation of the new NIC the network seems to be stable again.
The installation went fine but it was impossible to create new credentials.
I had a similar issue with my openvas 6 installation, this was resolved by creating the /etc/openvas/gnupg directory and creating the key openvasmd --create-credentials-encryption-key
But on my openvas 7 installation a creation of the encryption key was slooooow.
As always Good Randomness is important for creating keys. So I decided to install haveged to get more randomness and hopefully this would speed up key creation.
Update (Mon Jun 8 2015):
Running google-chrome inside a docker container isn't stable for me.
I switched back to LXC to run google-chrome which seems to be more stable.
Created a docker image to start a docker container with chrome.
Destroying the container each time that you start a browser is a easy way to get rid of your cookies and browser history.
I’m a big fan of containers and used them a lot on Solaris and jails on Freebsd. Containers/jails are the fastest way to spinup an new system and the easiest way to isolate services.
As always with virtualization you’ve to careful with sharing systems or containers that doesn’t below to the same customer or service on the same physical machine since you’re never sure which traces are left behind in the memory etc.
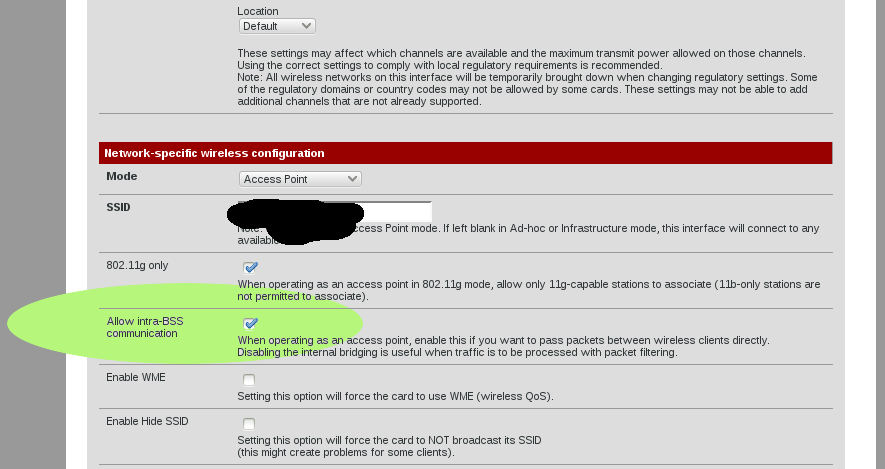
I purchased a chromecast at amazon.de. The installation didn’t work, after debugging the issue it seems that “Allow intra-BSS communication” needs to be enabled for chromecast.
$ ./create_cache_entries.sh  > create_cache_entries.sh
-bash: ./create_cache_entries.sh: /bin/bash: bad interpreter: Text file busy
$ vi create_cache_entries.sh
The installation was pretty straightforward but after the installation of zfsyum update failed.
[root@vicky etc]# yum update -y
Loaded plugins: langpacks, refresh-packagekit
Repository google-chrome is listed more than once in the configuration
fedora/19/x86_64/metalink                                                                                                                                                                   |  33 kB  00:00:00
fedora                                                                                                                                                                                      | 4.2 kB  00:00:00
fedora-chromium-stable                                                                                                                                                                      | 3.4 kB  00:00:00
google-chrome                                                                                                                                                                               |  951 B  00:00:00
rpmfusion-free                                                                                                                                                                              | 3.3 kB  00:00:00
rpmfusion-free-updates                                                                                                                                                                      | 3.3 kB  00:00:00
rpmfusion-nonfree                                                                                                                                                                           | 3.3 kB  00:00:00
rpmfusion-nonfree-updates                                                                                                                                                                   | 3.3 kB  00:00:00
updates/19/x86_64/metalink                                                                                                                                                                  |  30 kB  00:00:00
updates                                                                                                                                                                                     | 4.4 kB  00:00:00
zfs                                                                                                                                                                                         | 2.9 kB  00:00:00
(1/6): fedora-chromium-stable/19/x86_64/primary_db                                                                                                                                          |  20 kB  00:00:00
(2/6): zfs/19/x86_64/primary_db                                                                                                                                                             | 6.7 kB  00:00:00
(3/6): updates/19/x86_64/group_gz                                                                                                                                                           | 385 kB  00:00:02
(4/6): fedora/19/x86_64/group_gz                                                                                                                                                            | 384 kB  00:00:06
(5/6): updates/19/x86_64/primary_db                                                                                                                                                         | 8.8 MB  00:01:53
(6/6): fedora/19/x86_64/primary_db                                                                                                                                                          |  17 MB  00:03:34
(1/10): google-chrome/primary                                                                                                                                                               | 1.9 kB  00:00:00
(2/10): rpmfusion-free-updates/19/x86_64/primary_db                                                                                                                                         | 217 kB  00:00:01
(3/10): rpmfusion-nonfree/19/x86_64/primary_db                                                                                                                                              | 149 kB  00:00:00
(4/10): rpmfusion-free/19/x86_64/primary_db                                                                                                                                                 | 440 kB  00:00:03
(5/10): rpmfusion-nonfree-updates/19/x86_64/primary_db                                                                              b                                                       |  97 kB  00:00:00
(6/10): rpmfusion-nonfree-updates/19/x86_64/group_gz                                                                                                                                        |  990 B  00:00:05
(7/10): rpmfusion-nonfree/19/x86_64/group_gz                                                                                                                                                |  993 B  00:00:07
(8/10): rpmfusion-free/19/x86_64/group_gz                                                                                                                                                   | 1.6 kB  00:00:07
(9/10): rpmfusion-free-updates/19/x86_64/group_gz                                                                                                                                           | 1.6 kB  00:00:07
(10/10): updates/19/x86_64/updateinfo                                                                                                                                                       | 861 kB  00:00:09
google-chrome                                                                                                                                                                                                  3/3
Resolving Dependencies
--> Running transaction check
---> Package dkms.noarch 0:2.2.0.3-14.zfs1.fc19 will be updated
--> Processing Dependency: dkms = 2.2.0.3-14.zfs1.fc19 for package: zfs-dkms-0.6.2-1.fc19.noarch
---> Package dkms.noarch 0:2.2.0.3-17.fc19 will be an update
--> Finished Dependency Resolution
Error: Package: zfs-dkms-0.6.2-1.fc19.noarch (@zfs)
           Requires: dkms = 2.2.0.3-14.zfs1.fc19
           Removing: dkms-2.2.0.3-14.zfs1.fc19.noarch (@zfs)
               dkms = 2.2.0.3-14.zfs1.fc19
           Updated By: dkms-2.2.0.3-17.fc19.noarch (updates)
               dkms = 2.2.0.3-17.fc19
           Available: dkms-2.2.0.3-5.fc19.noarch (fedora)
               dkms = 2.2.0.3-5.fc19
 You could try using --skip-broken to work around the problem
 You could try running: rpm -Va --nofiles --nodigest
[root@vicky etc]#
On another fedora system yum update worked fine, after reviewing the differences in the yum configuration it seems that yum-plugin-priorities wasn’t installed on my box. After installing yum-plugin-priorities
[root@vicky etc]# yum install yum-plugin-priorities
Loaded plugins: langpacks, refresh-packagekit
Repository google-chrome is listed more than once in the configuration
Resolving Dependencies
--> Running transaction check
---> Package yum-plugin-priorities.noarch 0:1.1.31-18.fc19 will be installed
--> Finished Dependency Resolution

Dependencies Resolved

===================================================================================================================================================================================================================
 Package                                                     Arch                                         Version                                              Repository                                     Size
===================================================================================================================================================================================================================
Installing:
 yum-plugin-priorities                                       noarch                                       1.1.31-18.fc19                                       updates                                        22 k

Transaction Summary
===================================================================================================================================================================================================================
Install  1 Package

Total download size: 22 k
Installed size: 28 k
Is this ok [y/d/N]: y
Downloading packages:
yum-plugin-priorities-1.1.31-18.fc19.noarch.rpm                                                                                                                                             |  22 kB  00:00:01
Running transaction check
Running transaction test
Transaction test succeeded
Running transaction
  Installing : yum-plugin-priorities-1.1.31-18.fc19.noarch                                                                                                                                                     1/1
  Verifying  : yum-plugin-priorities-1.1.31-18.fc19.noarch                                                                                                                                                     1/1

Installed:
  yum-plugin-priorities.noarch 0:1.1.31-18.fc19

Complete!
[root@vicky etc]#
And make sure that the zfs has the priority
[root@localhost etc]# cat yum.repos.d/zfs.repo
[zfs]
name=ZFS of Linux for Fedora $releasever
baseurl=http://archive.zfsonlinux.org/fedora/$releasever/$basearch/
enabled=1
priority=1
metadata_expire=7d
gpgcheck=1
gpgkey=file:///etc/pki/rpm-gpg/RPM-GPG-KEY-zfsonlinux
Requires:       yum-plugin-priorities

[zfs-source]
name=ZFS of Linux for Fedora $releasever - Source
baseurl=http://archive.zfsonlinux.org/fedora/$releasever/SRPMS/
enabled=0
metadata_expire=7d
gpgcheck=1
gpgkey=file:///etc/pki/rpm-gpg/RPM-GPG-KEY-zfsonlinux
[root@vicky etc]#
yum update works again.
[root@vicky etc]# yum update -y
Loaded plugins: langpacks, priorities, refresh-packagekit
Repository google-chrome is listed more than once in the configuration
2 packages excluded due to repository priority protections
No packages marked for update
[root@vicky etc]#
I enjoy reading ebooks during my train trip to work on my nexus 7.
At home I prefer to read on my monitor since this is bigger.
Most of the time I use epub or pdf for reading, I bought a kindle version of a book from amazon assuming that I could read with amazon cloud reader at home.
Unfortunately this books is not compatible with cloud reader.
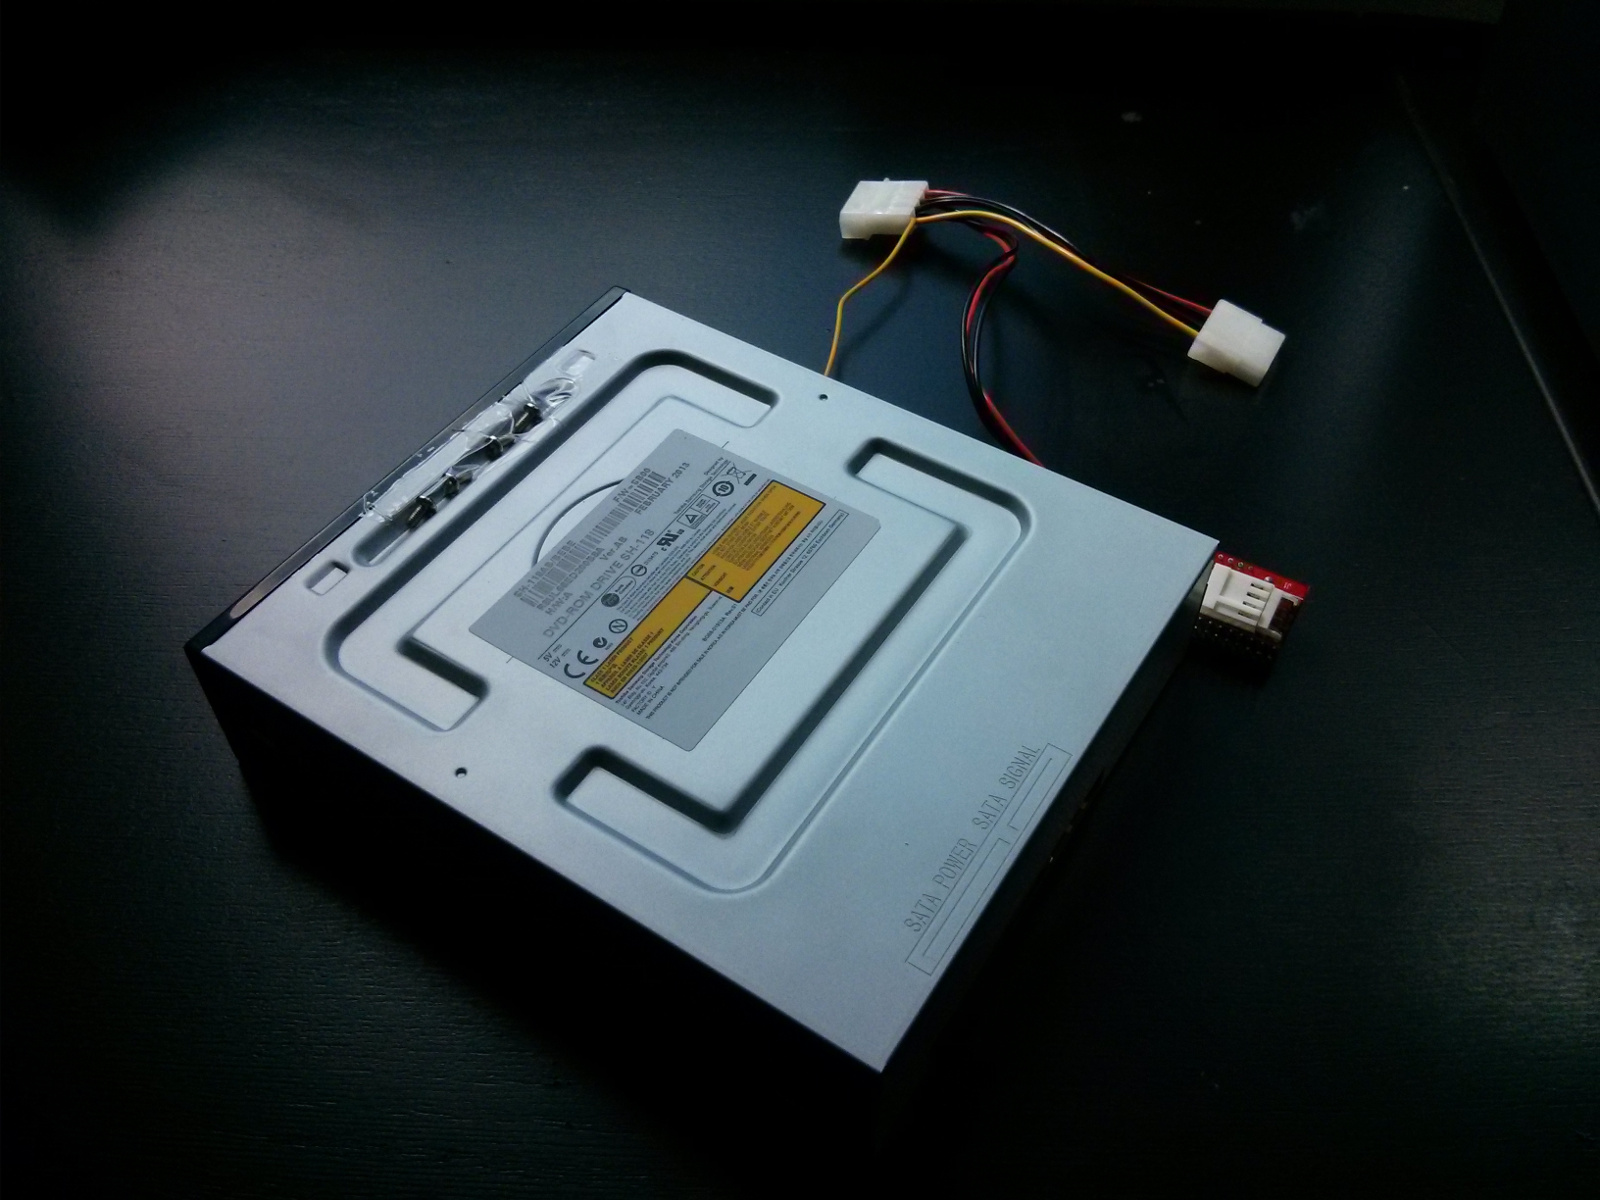
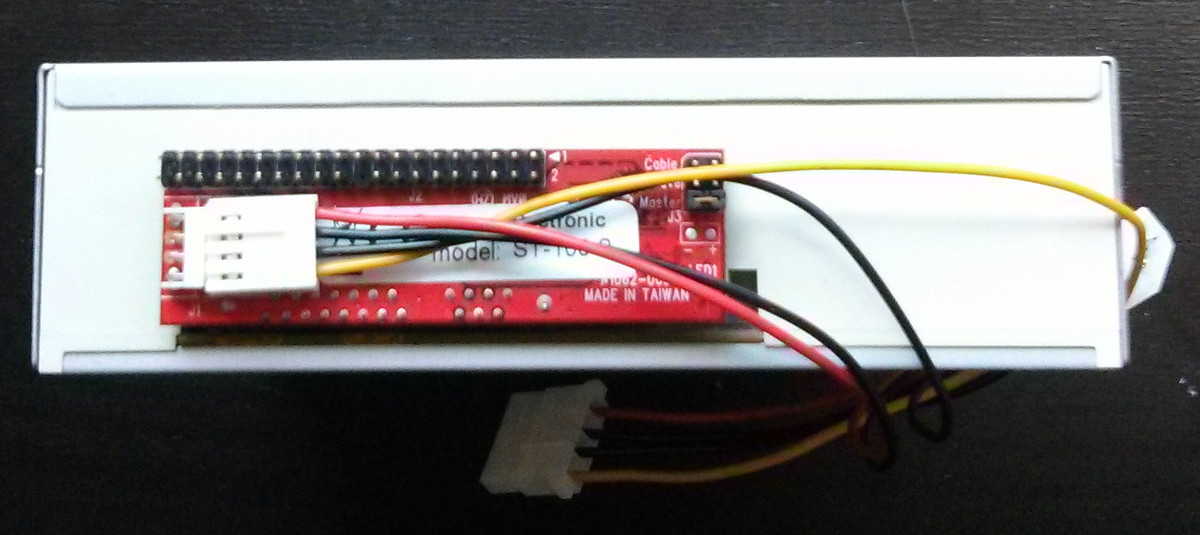
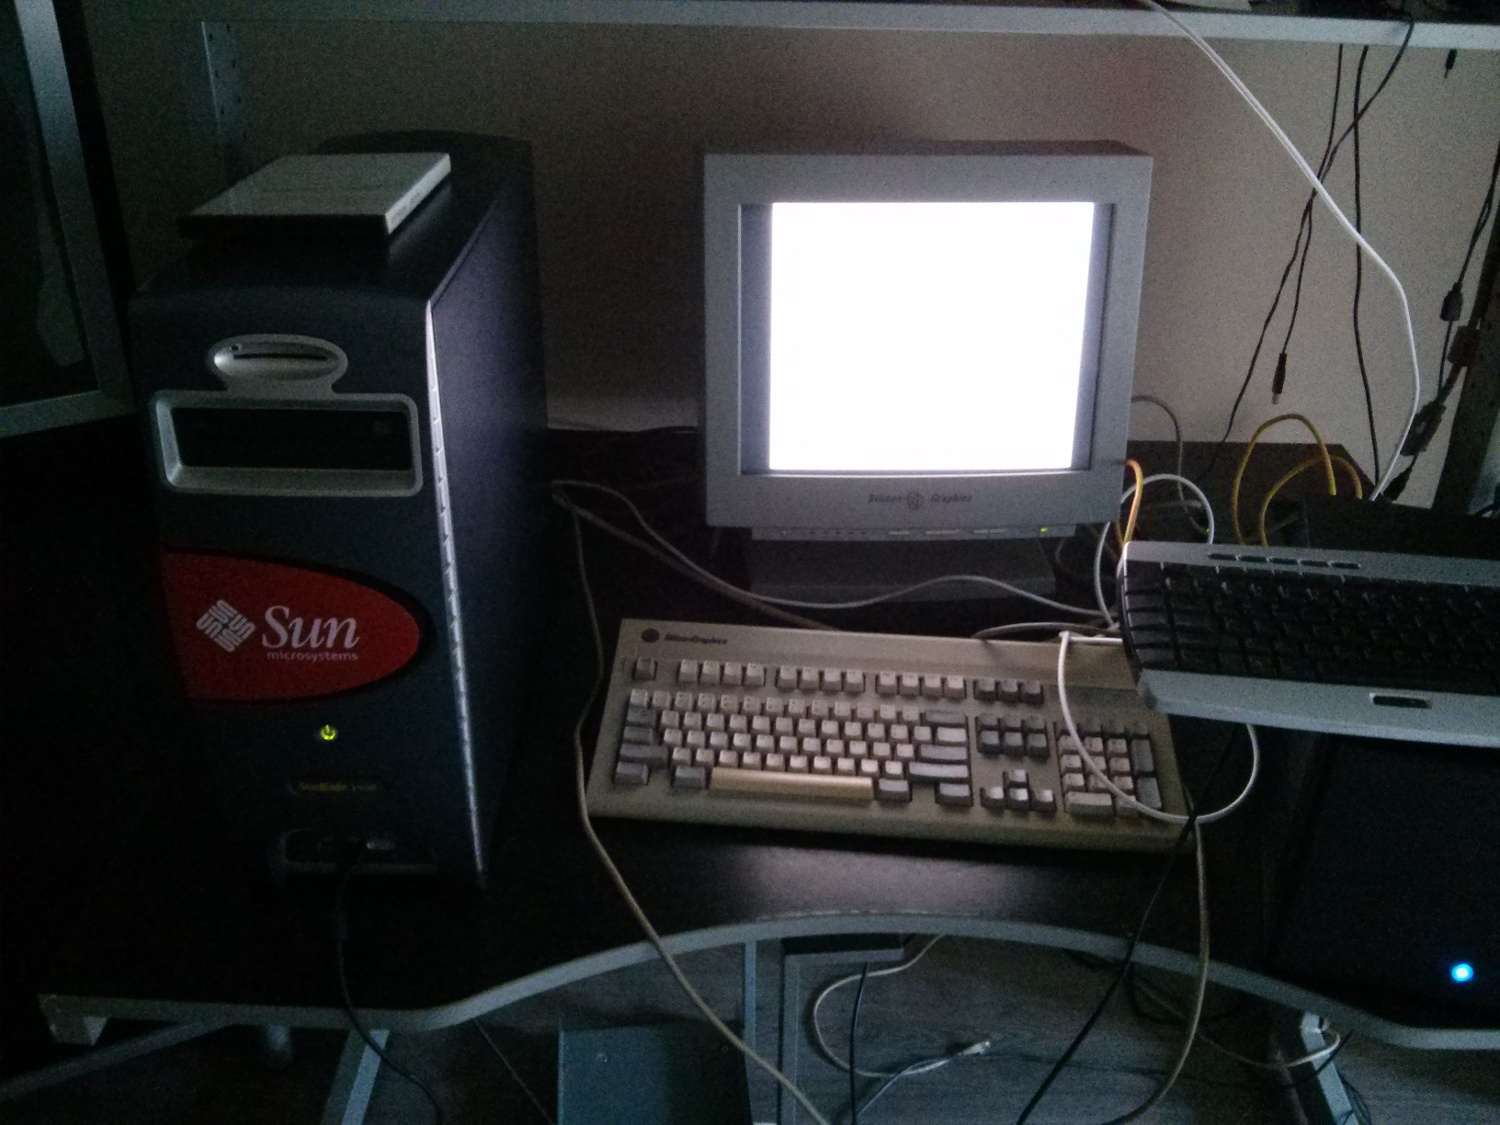
The dvd drive in my sun blade 1500 workstation broke down. I use this system acausally for some development, it's always handy to have a big endian system at hand.
The dvd drive was still handy to load another operating system on it. The dvd drive has an ide interface which are hard to get these days…
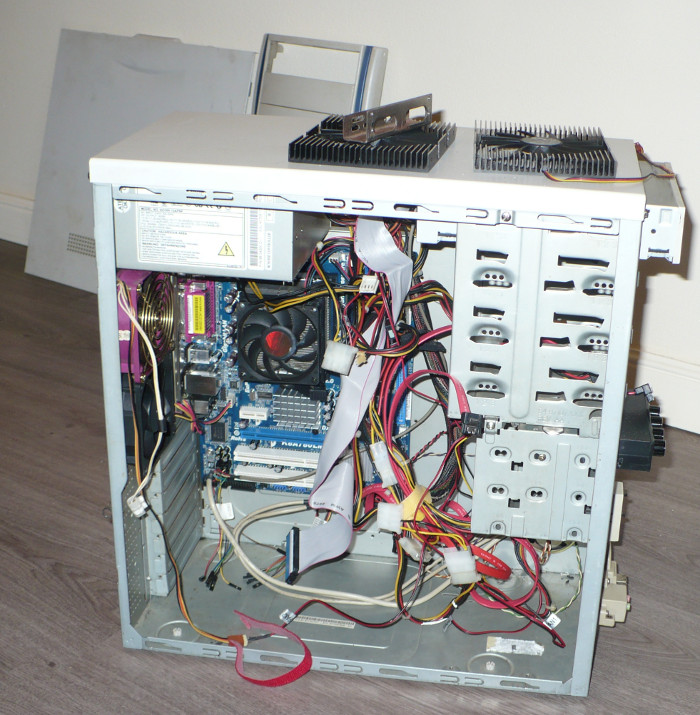
As my file and backup system pluto died i’m building a new one.
This system will run Freebsd mainly for the ZFS filesystem.
The motherbord will be a Asus C60M1-I. The cpu may not have not enough horsepower for deplucation at full speed but it has 6 sata ports which is not common on a mini ITX motherbord. I will reuse my old harddrives and add or replace them when I need more storage.
The freebsd 9.0 installation with ZFS root went well but the network adapter a Realtek 8111F isn’t supported by Freebsd 9.0. After checking google I found this on the freebsd-net mailinglist.
The realtek f8111F is supported in the latest driver code, after rebuilding my kernel the network adapter works fine. Very useful on a NAS ;-)
After 10 year, my fileserver pluto died.
Pluto was a AMD64 had 1GB RAM and 4 too loud samsung drives (160GB).
( 1 minute silence …. )
I take backups of course ;-)
I already ordered the parts to build a new pluto.
Pluto still hosted some CSV repositorties like CGIpaf.
But it’s time to move the source to a safer place. This will be github.
I also decided to create a blog and I wanted something that integrated well with github. Octopress seems to be the most logical choose. It’s written in ruby which is a nice bonus.


 I migrated
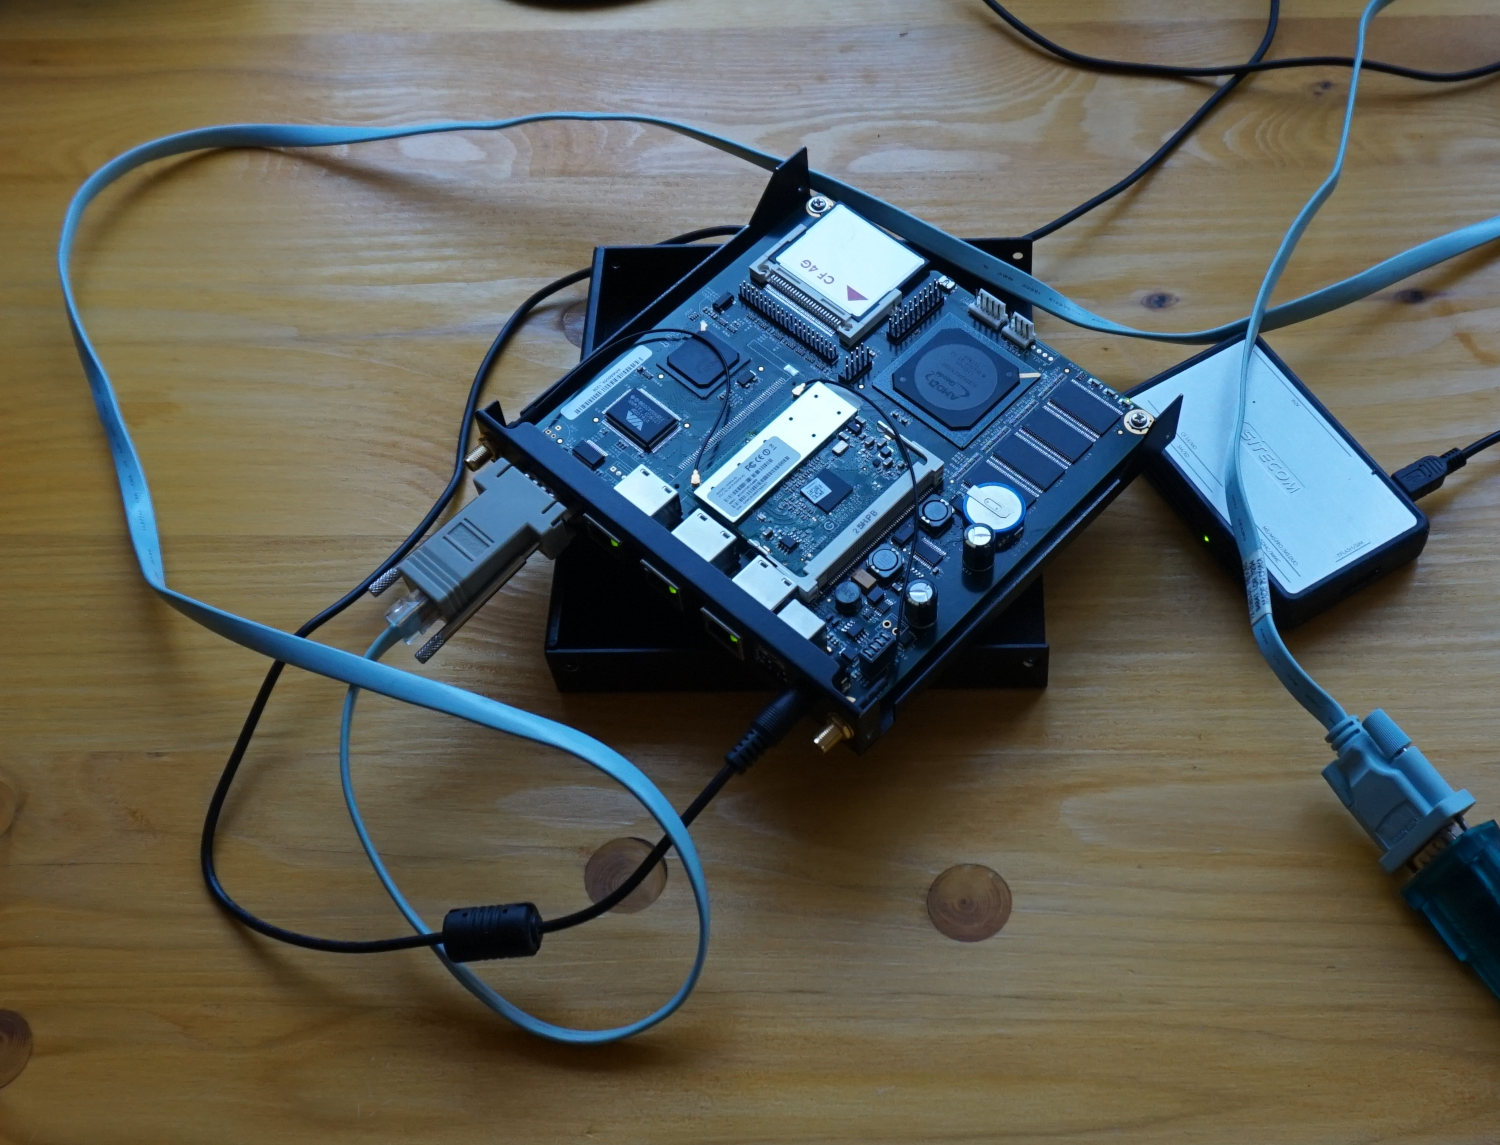


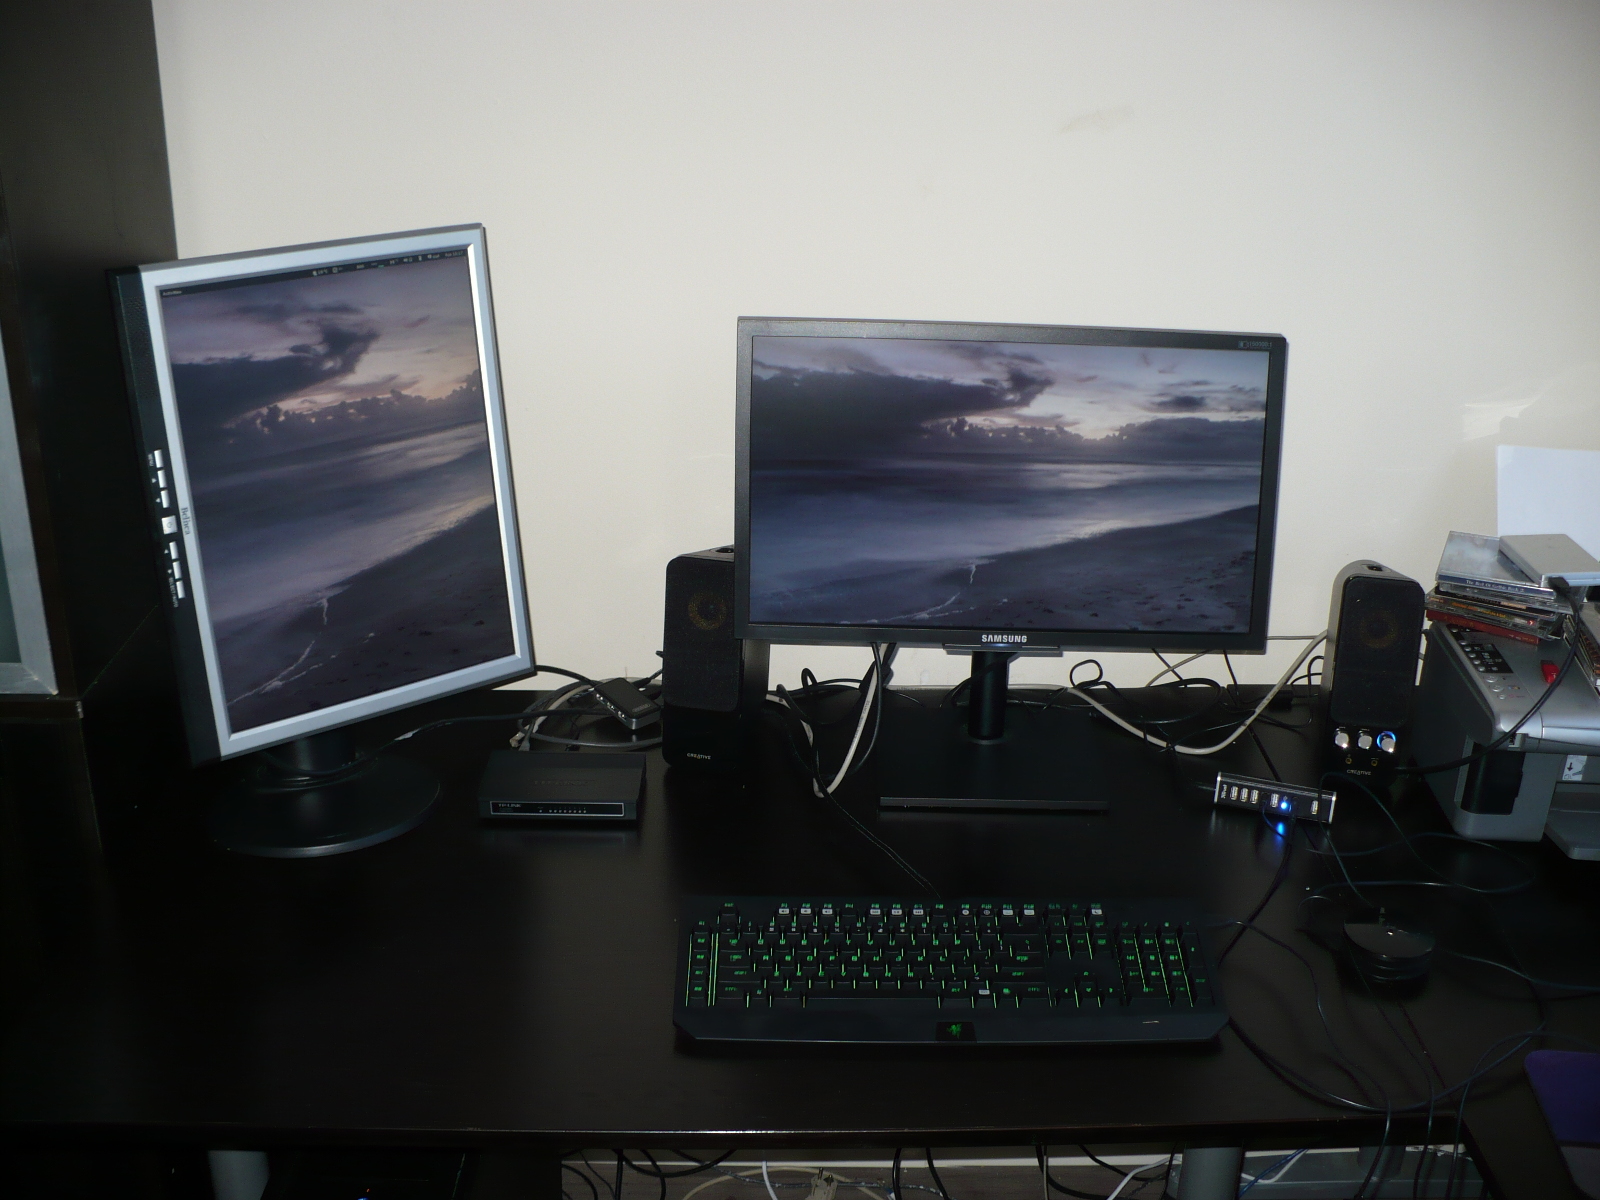
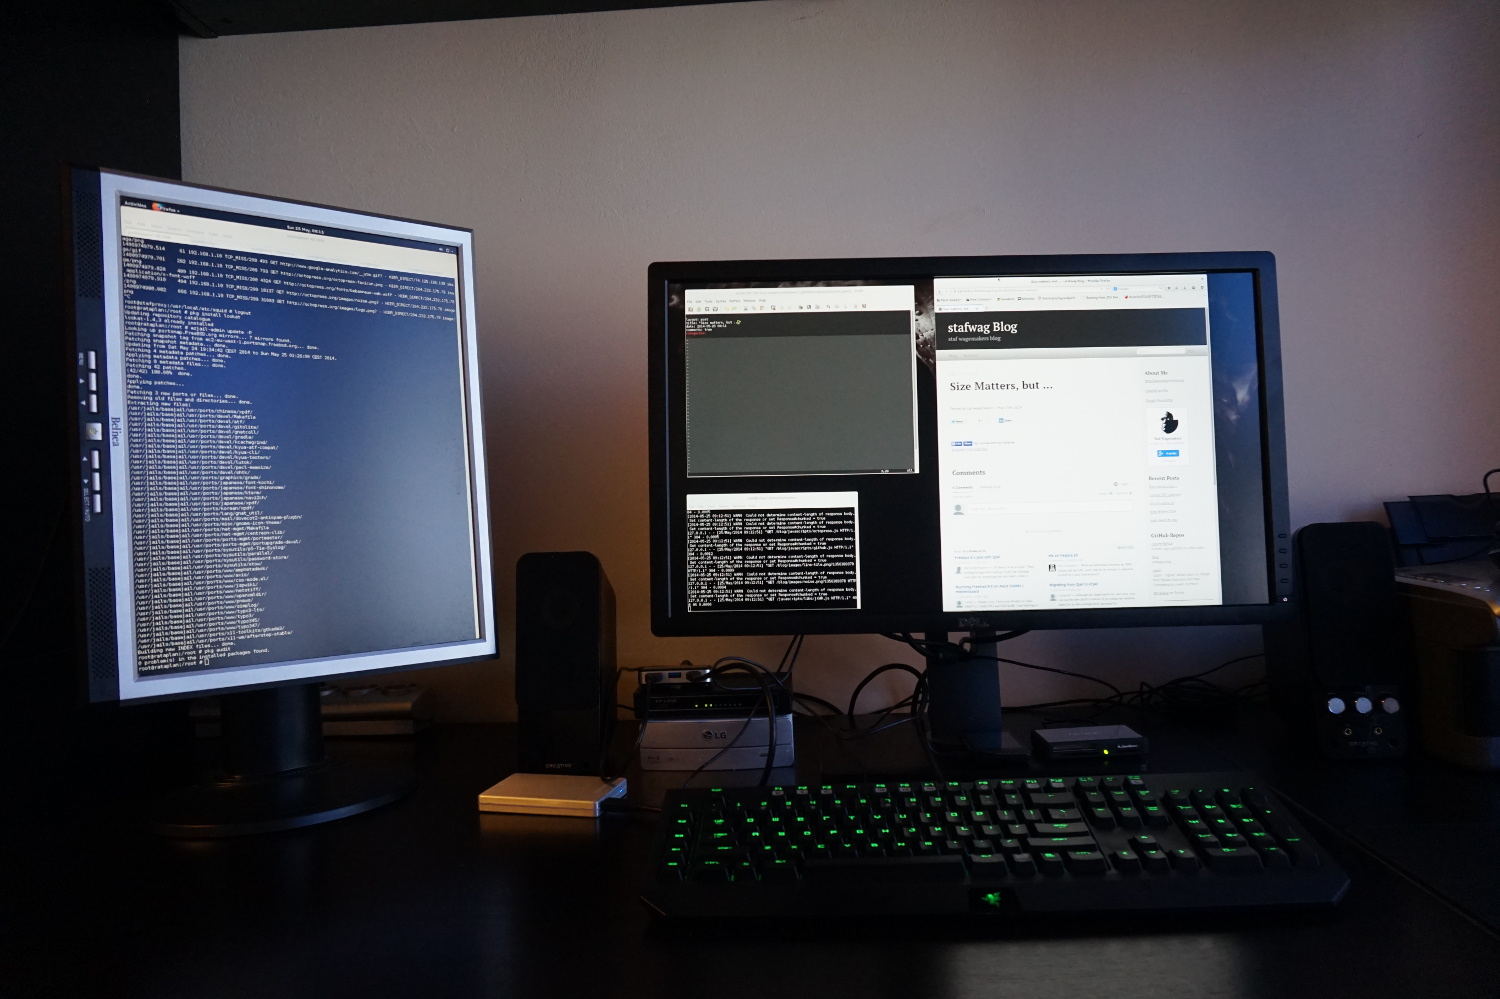 Size matters, but … resolution and image quality are as import.


 Besides the health benefits you save a lot of money.
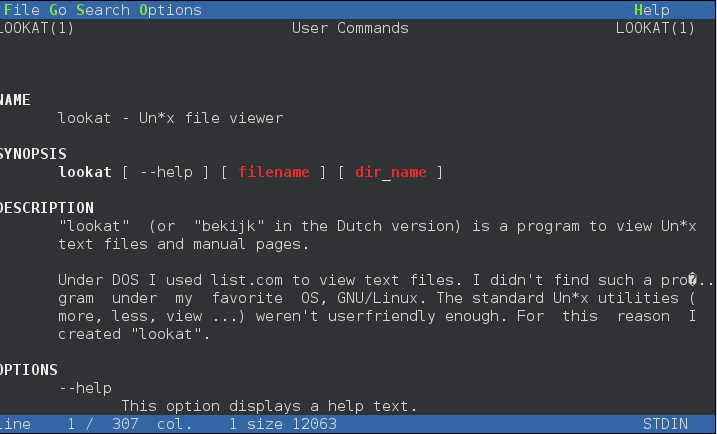 I’m pleased to anounce that Lookat/Bekijk 1.4.3 has been released.

 After 10 year, my fileserver pluto died.
Pluto was a AMD64 had 1GB RAM and 4 too loud samsung drives (160GB).
After 10 year, my fileserver pluto died.
Pluto was a AMD64 had 1GB RAM and 4 too loud samsung drives (160GB).