


OpenVAS on Kali GNU/Linux Part 1: How to install OpenVAS
OpenVAS is an opensource security scanner it started as a fork of Nessus which went from an opensource project to a closed source scanner.
I always prefer opensource software, for security tools, I even prefer it more… It nice to see/audit where the security data comes from, instead of the “magic” that is used by the close source software.
To scan for missing patches on your systems there are faster/better tools available that can be integrated into your build pipeline more easily. But OpenVAS is still a very nice network security scanner. Relying on one security tool is also not a “best security practice”.
Kali GNU/Linux has become the default Linux distribution for security auditing pen testing, it’s nice to have OpenVAS installed on your Kali GNU/Linux setup. If you just want to have OpenVAS available there is also a (virtual) appliance available from the OpenVAS developers ( Greenbone ).
You’ll find my journey to install OpenVAS on Kali GNU/Linux.
Installation
Update packages
It’s always a good idea to start with an update of your system.
Update the repository database with apt update.
staf@kali:~$ sudo apt update
Hit:1 http://ftp.belnet.be/pub/kali/kali kali-rolling InRelease
Reading package lists... Done
Building dependency tree
Reading state information... Done
All packages are up to date.
staf@kali:~$ sudo apt dist-upgrade
Reading package lists... Done
Building dependency tree
Reading state information... Done
Calculating upgrade... Done
0 upgraded, 0 newly installed, 0 to remove and 0 not upgraded.
staf@kali:~$
Run apt upgrade to upgrade your packages.
staf@kali:~$ sudo apt dist-upgrade
[sudo] password for staf:
Sorry, try again.
[sudo] password for staf:
Reading package lists... Done
Building dependency tree
Reading state information... Done
Calculating upgrade... Done
0 upgraded, 0 newly installed, 0 to remove and 0 not upgraded.
staf@kali:~$
Make sure that haveged is running
During the setup, OpenVAS will create an encryption key to create this key it’s important to have enough random data available. I had an issue (back in 2015) to create this key in the past. For this reason, I always verify that haveged daemon is running on my system when I install OpenVAS.
staf@kali:~$ ps aux | grep -i have
root         547  0.3  0.1   8088  4852 ?        Ss   10:00   0:01 /usr/sbin/haveged --Foreground --verbose=1 -w 1024
staf        4823  0.0  0.0   6204   836 pts/1    S+   10:10   0:00 grep -i have
staf@kali:~$
Install Openvas
Install OpenVAS with apt install openvas.
staf@kali:~$ sudo apt install openvas
Reading package lists... Done
Building dependency tree
Reading state information... Done
The following additional packages will be installed:
  doc-base dvisvgm fonts-lmodern fonts-texgyre gnutls-bin
  greenbone-security-assistant greenbone-security-assistant-common
<snip>
  texlive-plain-generic tipa tk tk8.6 xdg-utils
0 upgraded, 64 newly installed, 0 to remove and 0 not upgraded.
Need to get 141 MB of archives.
After this operation, 451 MB of additional disk space will be used.
Do you want to continue? [Y/n]
Redis
OpenVAS comes with its own redis service on Kali GNU/Linux. This redis service is configured to work with OpenVAS correctly.
systemctl status redis-server@openvas.service
Run gvm-setup
The openvas-setup setup script has been renamed to gvm-setup. This for marketing reasons, GVM stands for
Greenbone Vulnerability Manager. As long the software remains opensource I don’t care.
Gvm-setup will set the PostgreSQL database, create the admin user and download/import all the ScapData.
└─# gvm-setup
Creating openvas-scanner's certificate files

[>] Creating database
<snip>
sent 45,218 bytes  received 323,087 bytes  245,536.67 bytes/sec
total size is 73,604,011  speedup is 199.85
[*] Checking Default scanner
OpenVAS  /var/run/ospd/ospd.sock  0  OpenVAS Default
[>] Checking for admin user
[*] Creating admin user
User created with password '*****'.
Password
The gvm-setup script will display the password for the admin at the end.
If you forgot to write it down you can reset the admin password with the gvmd command as the _gvm.
Unfortunately, you need to use the password as an argument. So it recommended to use a shell without a history
or to clear the history (or both) after the password update.
# su - _gvm -s /bin/sh -c "gvmd --user=admin --new-password mypasswd; history -c"
# history -c
Verify
You can verify your installation with gvm-check-setup.
$ sudo gvm-check-setup                                                    1 ⨯
[sudo] password for staf:
We'll all be murdered in our beds!
[sudo] password for staf:
gvm-check-setup 20.8.0
  Test completeness and readiness of GVM-20.8.0
Step 1: Checking OpenVAS (Scanner)...
        OK: OpenVAS Scanner is present in version 20.8.1.
        OK: Server CA Certificate is present as /var/lib/gvm/CA/servercert.pem.
Checking permissions of /var/lib/openvas/gnupg/*
        OK: _gvm owns all files in /var/lib/openvas/gnupg
        OK: redis-server is present.
        OK: scanner (db_address setting) is configured properly using the redis-server socket: /var/run/redis-openvas/redis-server.sock
        OK: redis-server is running and listening on socket: /var/run/redis-openvas/redis-server.sock.
        OK: redis-server configuration is OK and redis-server is running.
        OK: _gvm owns all files in /var/lib/openvas/plugins
        OK: NVT collection in /var/lib/openvas/plugins contains 65370 NVTs.
Checking that the obsolete redis database has been removed
        OK: No old Redis DB
        OK: ospd-OpenVAS is present in version 20.8.1.
Step 2: Checking GVMD Manager ...
        OK: GVM Manager (gvmd) is present in version 20.08.1.
Step 3: Checking Certificates ...
        OK: GVM client certificate is valid and present as /var/lib/gvm/CA/clientcert.pem.
        OK: Your GVM certificate infrastructure passed validation.
Step 4: Checking data ...
        OK: SCAP data found in /var/lib/gvm/scap-data.
        OK: CERT data found in /var/lib/gvm/cert-data.
Step 5: Checking Postgresql DB and user ...
        OK: Postgresql version and default port are OK.
 gvmd      | _gvm     | UTF8     | en_US.UTF-8 | en_US.UTF-8 |
        OK: At least one user exists.
Step 6: Checking Greenbone Security Assistant (GSA) ...
Oops, secure memory pool already initialized
        OK: Greenbone Security Assistant is present in version 20.08.1~git.
Step 7: Checking if GVM services are up and running ...
        OK: ospd-openvas service is active.
        OK: gvmd service is active.
        OK: greenbone-security-assistant service is active.
Step 8: Checking few other requirements...
        OK: nmap is present in version 20.08.1~git.
        OK: ssh-keygen found, LSC credential generation for GNU/Linux targets is likely to work.
        WARNING: Could not find makensis binary, LSC credential package generation for Microsoft Windows targets will not work.
        SUGGEST: Install nsis.
        OK: xsltproc found.
        WARNING: Your password policy is empty.
        SUGGEST: Edit the /etc/gvm/pwpolicy.conf file to set a password policy.

It seems like your GVM-20.8.0 installation is OK.
Keep your scapdata up-to-date
It’s import for a security scanner to keep the security data up to date. A security scanner can only know which software packages have vulnerabilities or how to verify for network exploits when it gets the security data from somewhere. For this reason, vendors must publish security data with OVAL - Open Vulnerability and Assessment Language - for example. This way security scanners can use this data to verify system/network for security issues.
To sync the security feeds on OpenVAS you can use the gvm-feed-update command, this will fetch the security data from Greenbone.
$ sudo gvm-feed-update
Start the openvas services
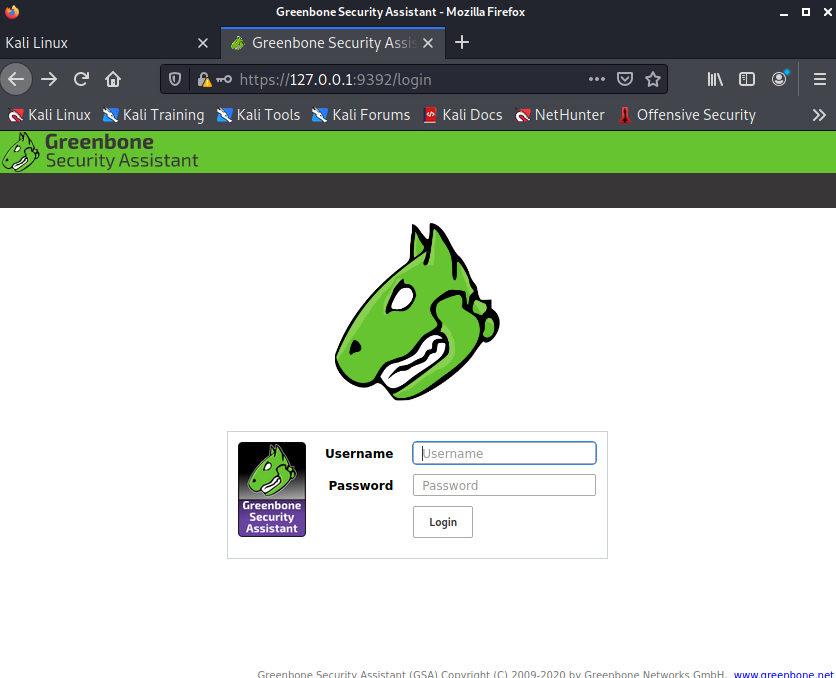
There is a gvm-start script, this will start the required services and start the web browser to the openvas login url: https://127.0.0.1:9392. This script needs to be executed as root.
For this reason, I just enable/start the required systemd services.
$ sudo systemctl start gvmd ospd-openvas
$ sudo systemctl enable gvmd ospd-openvas
Created symlink /etc/systemd/system/multi-user.target.wants/gvmd.service → /lib/systemd/system/gvmd.service.
Created symlink /etc/systemd/system/multi-user.target.wants/ospd-openvas.service → /lib/systemd/system/ospd-openvas.service.
$ sudo systemctl enable greenbone-security-assistant

Created symlink /etc/systemd/system/gsad.service → /lib/systemd/system/greenbone-security-assistant.service.
Created symlink /etc/systemd/system/multi-user.target.wants/greenbone-security-assistant.service → /lib/systemd/system/greenbone-security-assistant.service.

┌──(staf㉿kali)-[~]
First login
If you rebooted your system or just started the services, you might need a few minutes to let the services startup.
Have fun!
Leave a comment