


Running OpenBSD as an UEFI virtual machine (on a Raspberry Pi)
I started to migrate all the services that I use on my internal network to my Raspberry Pi 4 cluster. I migrated my FreeBSD jails to BastileBSD on a virtual machine running on a Raspberry Pi. See my blog post on how to migrate from ezjail to BastilleBSD. https://stafwag.github.io/blog/blog/2023/09/10/migrate-from-ezjail-to-bastille-part1-introduction-to-bastillebsd/
![]()
Running FreeBSD as a virtual machine with UEFI on ARM64 came to the point that it just works. I have to use QEMU with u-boot to get FreeBSD up and running on the Raspberry Pi as a virtual machine with older FreeBSD versions: https://stafwag.github.io/blog/blog/2021/03/14/howto_run_freebsd_as_vm_on_pi/.
But with the latest versions of FreeBSD ( not sure when it started to work, but it works on FreeBSD 14) you can run FreeBSD as a virtual machine on ARM64 with UEFI just like on x86 on GNU/Linux with KVM.
UEFI on KVM is in general provided by the open-source tianocore project.
I didn’t find much information on how to run OpenBSD with UEFI on x86 or ARM64.

So I decided to write a blog post about it, in the hope that this information might be useful to somebody else. First I tried to download the OpenBSD 7.4 ISO image and boot it as a virtual machine on KVM (x86). But the iso image failed to boot on a virtual with UEFI enabled. It looks like the ISO image only supports a legacy BIOS.
ARM64 doesn’t support a “legacy BIOS”. The ARM64 download page for OpenBSD 7.4 doesn’t even have an ISO image, but there is an install-<version>.img image available. So I tried to boot this image on one of my Raspberry Pi systems and this worked. I had more trouble getting NetBSD working as a virtual machine on the Raspberry Pi but this might be a topic for another blog post :-)
You’ll find my journey with my installation instructions below.
Download
Download the installation image
Download the latest OpenBSD installation ARM64 image from: https://www.openbsd.org/faq/faq4.html#Download
The complete list of the mirrors is available at https://www.openbsd.org/ftp.html
Download the image.
[staf@staf-pi002 openbsd]$ wget https://cdn.openbsd.org/pub/OpenBSD/7.4/arm64/install74.img
--2024-02-13 19:04:52--  https://cdn.openbsd.org/pub/OpenBSD/7.4/arm64/install74.img
Connecting to xxx.xxx.xxx.xxx:3128... connected.
Proxy request sent, awaiting response... 200 OK
Length: 528482304 (504M) [application/octet-stream]
Saving to: 'install74.img'

install74.img       100%[===================>] 504.00M  3.70MB/s    in 79s

2024-02-13 19:06:12 (6.34 MB/s) - 'install74.img' saved [528482304/528482304]

[staf@staf-pi002 openbsd]$
Download the checksum and the signed checksum.
2024-02-13 19:06:12 (6.34 MB/s) - 'install74.img' saved [528482304/528482304]

[staf@staf-pi002 openbsd]$ wget https://cdn.openbsd.org/pub/OpenBSD/7.4/arm64/SHA256
--2024-02-13 19:07:00--  https://cdn.openbsd.org/pub/OpenBSD/7.4/arm64/SHA256
Connecting to xxx.xxx.xxx.xxx:3128... connected.
Proxy request sent, awaiting response... 200 OK
Length: 1392 (1.4K) [text/plain]
Saving to: 'SHA256'

SHA256                  100%[=============================>]   1.36K  --.-KB/s    in 0s

2024-02-13 19:07:01 (8.09 MB/s) - 'SHA256' saved [1392/1392]

[staf@staf-pi002 openbsd]$
[staf@staf-pi002 openbsd]$ wget https://cdn.openbsd.org/pub/OpenBSD/7.4/arm64/SHA256.sig
--2024-02-13 19:08:01--  https://cdn.openbsd.org/pub/OpenBSD/7.4/arm64/SHA256.sig
Connecting to xxx.xxx.xxx.xxx:3128... connected.
Proxy request sent, awaiting response... 200 OK
Length: 1544 (1.5K) [text/plain]
Saving to: 'SHA256.sig'

SHA256.sig              100%[=============================>]   1.51K  --.-KB/s    in 0s

2024-02-13 19:08:02 (3.91 MB/s) - 'SHA256.sig' saved [1544/1544]

[staf@staf-pi002 openbsd]$
Verify
OpenBSD uses signify to validate the cryptographic signatures. signify is also available for GNU/Linux (at least on Debian GNU/Linux and Arch Linux).
More details on how to verify the signature with signify is available at: https://www.openbsd.org/74.html
This blog post was also useful: https://www.msiism.org/blog/2019/10/20/authentic_pufferfish_for_penguins.html
Install OpenBSD signify
Download the signify public key from: https://www.openbsd.org/74.html
[staf@staf-pi002 openbsd]$ wget https://ftp.openbsd.org/pub/OpenBSD/7.4/openbsd-74-base.pub
--2024-02-13 19:14:25--  https://ftp.openbsd.org/pub/OpenBSD/7.4/openbsd-74-base.pub
Connecting to xxx.xxx.xxx.xxx:3128... connected.
Proxy request sent, awaiting response... 200 OK
Length: 99 [text/plain]
Saving to: 'openbsd-74-base.pub'

openbsd-74-base.pub     100%[=============================>]      99   397 B/s    in 0.2s

2024-02-13 19:14:26 (397 B/s) - 'openbsd-74-base.pub' saved [99/99]

[staf@staf-pi002 openbsd]$
I run Debian GNU/Linux on my Raspberry Pi’s, let see which signify packages are available.
[staf@staf-pi002 openbsd]$ sudo apt search signify
sudo: unable to resolve host staf-pi002: Name or service not known
[sudo] password for staf:
Sorting... Done
Full Text Search... Done
chkrootkit/stable 0.57-2+b1 arm64
  rootkit detector

elpa-diminish/stable 0.45-4 all
  hiding or abbreviation of the mode line displays of minor-modes

fcitx-sayura/stable 0.1.2-2 arm64
  Fcitx wrapper for Sayura IM engine

fcitx5-sayura/stable 5.0.8-1 arm64
  Fcitx5 wrapper for Sayura IM engine

signify/stable 1.14-7 all
  Automatic, semi-random ".signature" rotator/generator

signify-openbsd/stable 31-3 arm64
  Lightweight cryptographic signing and verifying tool

signify-openbsd-keys/stable 2022.2 all
  Public keys for use with signify-openbsd

[staf@staf-pi002 openbsd]$
There’re two OpenBSD signify packages available on Debian 12 (bookworm);
signify-openbsd/: The OpenBSDsignifytool.signify-openbsd-keys: This package contains the OpenBSD release public keys, installed in/usr/share/signify-openbsd-keys/. Unfortunately, the OpenBSD 7.4 release isn’t (yet) included in Debian 12 (bookworm).
[staf@staf-pi002 openbsd]$ sudo apt install signify-openbsd signify-openbsd-keys
sudo: unable to resolve host staf-pi002: Name or service not known
Reading package lists... Done
Building dependency tree... Done
Reading state information... Done
The following NEW packages will be installed:
  signify-openbsd signify-openbsd-keys
0 upgraded, 2 newly installed, 0 to remove and 0 not upgraded.
Need to get 70.4 kB of archives.
After this operation, 307 kB of additional disk space will be used.
Get:1 http://deb.debian.org/debian bookworm/main arm64 signify-openbsd arm64 31-3 [62.3 kB]
Get:2 http://deb.debian.org/debian bookworm/main arm64 signify-openbsd-keys all 2022.2 [8020 B]
Fetched 70.4 kB in 0s (404 kB/s)
Selecting previously unselected package signify-openbsd.
(Reading database ... 94575 files and directories currently installed.)
Preparing to unpack .../signify-openbsd_31-3_arm64.deb ...
Unpacking signify-openbsd (31-3) ...
Selecting previously unselected package signify-openbsd-keys.
Preparing to unpack .../signify-openbsd-keys_2022.2_all.deb ...
Unpacking signify-openbsd-keys (2022.2) ...
Setting up signify-openbsd-keys (2022.2) ...
Setting up signify-openbsd (31-3) ...
[staf@staf-pi002 openbsd]$
Verify the checksum
Verify the checksum.
[staf@staf-pi002 openbsd]$ sha256sum install74.img
09e4d0fe6d3f49f2c4c99b6493142bb808253fa8a8615ae1ca8e5f0759cfebd8  install74.img
[staf@staf-pi002 openbsd]$
[staf@staf-pi002 openbsd]$ grep 09e4d0fe6d3f49f2c4c99b6493142bb808253fa8a8615ae1ca8e5f0759cfebd8 SHA256
SHA256 (install74.img) = 09e4d0fe6d3f49f2c4c99b6493142bb808253fa8a8615ae1ca8e5f0759cfebd8
[staf@staf-pi002 openbsd]$
Verify with signify
Execute the signify command to verify the checksum. See the OpenBSD signify manpage for more information.
You’ll find a brief list of the arguments that are used to verify the authenticity of the image.
-C: Will verify the Checksum.-p <path>: The path to the Public key.-x <path>: The path to the signature file.
Verify the image with signify.
[staf@staf-pi002 openbsd]$ signify-openbsd -C -p openbsd-74-base.pub -x SHA256.sig install74.img
Signature Verified
install74.img: OK
[staf@staf-pi002 openbsd]$
Secure boot
The Debian UEFI package for libvirt ovmf is based on https://github.com/tianocore/tianocore.github.io/wiki/OVMF.
Debian Bookworm comes with the following UEFI BIOS settings:
/usr/share/AAVMF/AAVMF_CODE.ms.fdThis is with secure boot enabled./usr/share/AAVMF/AAVMF_CODE.fdThis is without secure boot enabled.
The full description is available at /usr/share/doc/ovmf/README.Debian on a Debian system when the ovmf package is installed.
To install OpenBSD we need to disable secure boot.
Test boot
I first started a test boot.
Logon to the Raspberry Pi.
[staf@vicky ~]$ ssh -X -CCC staf-pi002
Warning: untrusted X11 forwarding setup failed: xauth key data not generated
Linux staf-pi002 6.1.0-17-arm64 #1 SMP Debian 6.1.69-1 (2023-12-30) aarch64

The programs included with the Debian GNU/Linux system are free software;
the exact distribution terms for each program are described in the
individual files in /usr/share/doc/*/copyright.

Debian GNU/Linux comes with ABSOLUTELY NO WARRANTY, to the extent
permitted by applicable law.
Last login: Wed Feb 14 06:08:45 2024 from xxx.xxx.xxx.xxx
[staf@staf-pi002 ~]$
Start virt-manager and click on the [ Create on new VM ] icon.

This will bring up the new vm window. Select ( ) Import existing disk image, you review the architecture option by selecting the \/ Architecture options. The defaults are fine. Click on [ Forward ].
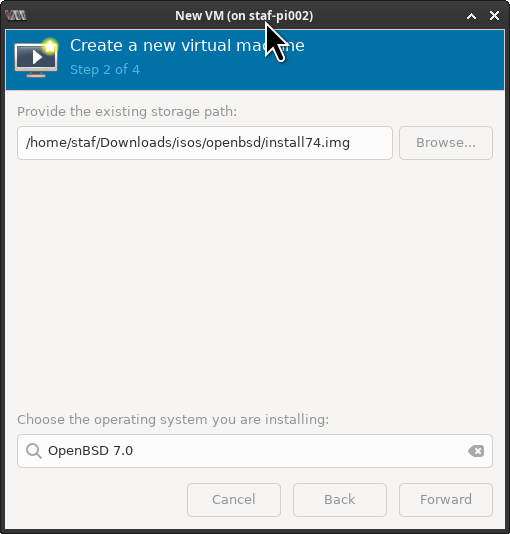
This will open the “import vm” window. Click on [ Browse ] to select the OpenBSD installation image or just copy/paste the path.
At the bottom of the screen, you’ll see Choose the operating system you are installing. Starting type openbsd and select [ X ] include end-of-life operating systems Debian 12 (bookworm) doesn’t include support for OpenBSD 7.4 (yet) so we need to set it to “OpenBSD 7.0”. Click on [ Forward ].
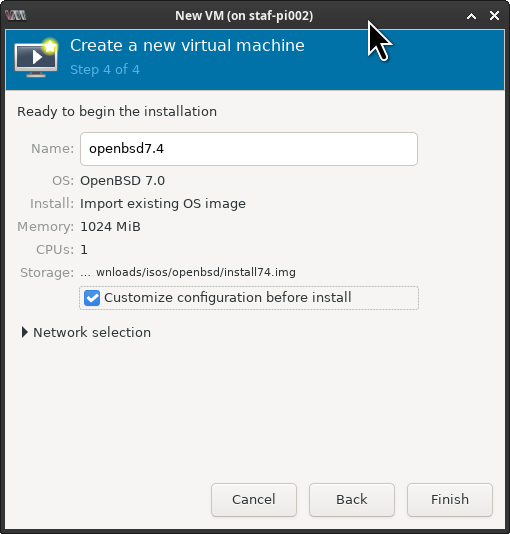
In the next windows keep the default Memory and CPU settings as we’re just verifying that we can boot from the installation image.
Debian uses “secure boot” by default. We need to disable secure boot. Select [ X ] Customize configuration before install, this allows us to set the UEFI boot image.
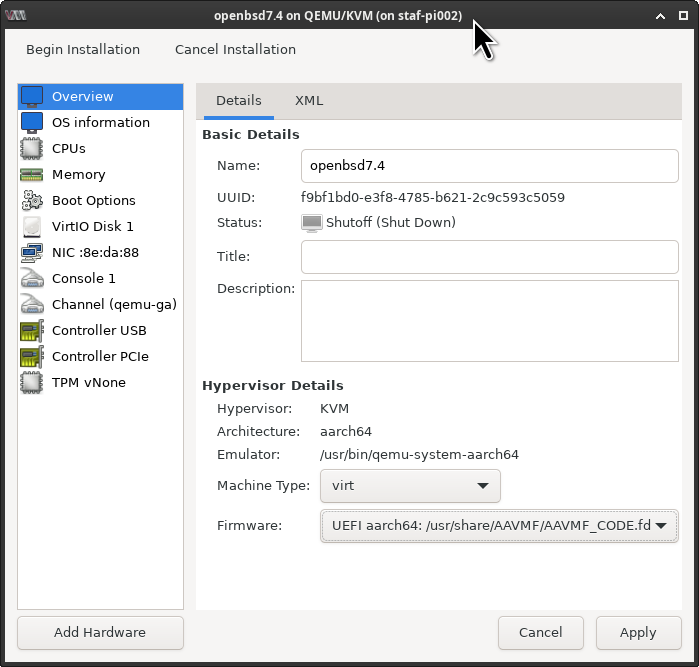
Set the Firmware to: /usr/share/AAVMF/AAVMF_CODE.fd to disable secure boot and click on [ Begin Installation ].
Let’s check if OpenBSD can boot. Great, it works!
Installation with virt-install
I prefer to use the command line to install as this allows me to make the installation reproducible and automated.
Create a ZFS dataset
I used ZFS on my Raspberry Pi’s, this makes it easier to create snapshots etc when you’re testing software etc.
root@staf-pi002:/var/lib/libvirt/images# zfs create staf-pi002_pool/root/var/lib/libvirt/images/openbsd-gitlabrunner001
root@staf-pi002:/var/lib/libvirt/images#
root@staf-pi002:/var/lib/libvirt/images/openbsd-gitlabrunner001# pwd
/var/lib/libvirt/images/openbsd-gitlabrunner001
root@staf-pi002:/var/lib/libvirt/images/openbsd-gitlabrunner001#
Get the correct os-variant
To get the operating system settings you can execute the command virt-install --osinfo list
root@staf-pi002:/var/lib/libvirt/images/openbsd-gitlabrunner001# virt-install --osinfo list | grep -i openbsd7
openbsd7.0
root@staf-pi002:/var/lib/libvirt/images/openbsd-gitlabrunner001#
We’ll use openbsd7.0 as the operating system variant.
Create QEMU image
Create a destination disk image.
root@staf-pi002:/var/lib/libvirt/images/openbsd-gitlabrunner001# qemu-img create -f qcow2 openbsd-gitlabrunner001.qcow2 50G
Formatting 'openbsd-gitlabrunner001.qcow2', fmt=qcow2 cluster_size=65536 extended_l2=off compression_type=zlib size=53687091200 lazy_refcounts=off refcount_bits=16
root@staf-pi002:/var/lib/libvirt/images/openbsd-gitlabrunner001#
Run virt-install
Run virt-install to import the virtual machine.
#!/bin/bash

virt-install --name openbsd-gitlabrunner001  \
 --noacpi \
 --boot loader=/usr/share/AAVMF/AAVMF_CODE.fd \
 --os-variant openbsd7.0 \
 --ram 2048 \
 --import \
 --disk /home/staf/Downloads/isos/openbsd/install74.img  \
 --disk /var/lib/libvirt/images/openbsd-gitlabrunner001/openbsd-gitlabrunner001.qcow2
If everything goes well the virtual machine gets booted.
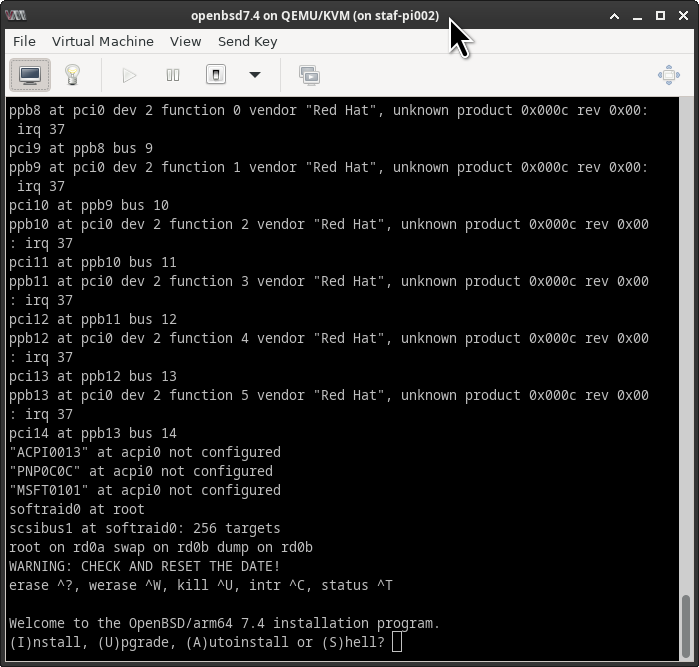
BdsDxe: loading Boot0001 "UEFI Misc Device" from PciRoot(0x0)/Pci(0x1,0x3)/Pci(0x0,0x0)
BdsDxe: starting Boot0001 "UEFI Misc Device" from PciRoot(0x0)/Pci(0x1,0x3)/Pci(0x0,0x0)
disks: sd0*
>> OpenBSD/arm64 BOOTAA64 1.18
boot>
cannot open sd0a:/etc/random.seed: No such file or directory
booting sd0a:/bsd: 2861736+1091248+12711584+634544 [233295+91+666048+260913]=0x13d5cf8
Copyright (c) 1982, 1986, 1989, 1991, 1993
	The Regents of the University of California.  All rights reserved.
Copyright (c) 1995-2023 OpenBSD. All rights reserved.  https://www.OpenBSD.org

OpenBSD 7.4 (RAMDISK) #2131: Sun Oct  8 13:35:40 MDT 2023
    deraadt@arm64.openbsd.org:/usr/src/sys/arch/arm64/compile/RAMDISK
real mem  = 2138013696 (2038MB)
avail mem = 2034593792 (1940MB)
random: good seed from bootblocks
mainbus0 at root: linux,dummy-virt
psci0 at mainbus0: PSCI 1.1, SMCCC 1.1
efi0 at mainbus0: UEFI 2.7
efi0: EDK II rev 0x10000
smbios0 at efi0: SMBIOS 3.0.0
smbios0:
sd1 at scsibus1 targ 0 lun 0: <VirtIO, Block Device, >
sd1: 51200MB, 512 bytes/sector, 104857600 sectors
virtio35: msix per-VQ
ppb5 at pci0 dev 1 function 5 vendor "Red Hat", unknown product 0x000c rev 0x00: irq
pci6 at ppb5 bus 6
ppb6 at pci0 dev 1 function 6 vendor "Red Hat", unknown product 0x000c rev 0x00: irq
pci7 at ppb6 bus 7
ppb7 at pci0 dev 1 function 7 vendor "Red Hat", unknown product 0x000c rev 0x00: irq
pci8 at ppb7 bus 8
ppb8 at pci0 dev 2 function 0 vendor "Red Hat", unknown product 0x000c rev 0x00: irq
pci9 at ppb8 bus 9
ppb9 at pci0 dev 2 function 1 vendor "Red Hat", unknown product 0x000c rev 0x00: irq
pci10 at ppb9 bus 10
ppb10 at pci0 dev 2 function 2 vendor "Red Hat", unknown product 0x000c rev 0x00: irq
pci11 at ppb10 bus 11
ppb11 at pci0 dev 2 function 3 vendor "Red Hat", unknown product 0x000c rev 0x00: irq
pci12 at ppb11 bus 12
ppb12 at pci0 dev 2 function 4 vendor "Red Hat", unknown product 0x000c rev 0x00: irq
pci13 at ppb12 bus 13
ppb13 at pci0 dev 2 function 5 vendor "Red Hat", unknown product 0x000c rev 0x00: irq
pci14 at ppb13 bus 14
pluart0 at mainbus0: rev 1, 16 byte fifo
pluart0: console
"pmu" at mainbus0 not configured
agtimer0 at mainbus0: 54000 kHz
"apb-pclk" at mainbus0 not configured
softraid0 at root
scsibus2 at softraid0: 256 targets
root on rd0a swap on rd0b dump on rd0b
WARNING: CHECK AND RESET THE DATE!
erase ^?, werase ^W, kill ^U, intr ^C, status ^T

Welcome to the OpenBSD/arm64 7.4 installation program.
(I)nstall, (U)pgrade, (A)utoinstall or (S)hell?
Continue with the OpenBSD installation as usual. Make sure that you select the second disk during the installation process.
To fully automate the installation we need a system that executes the post-configuration at the first boot. On GNU/Linux is normally done by cloud-init while there are solutions to get cloud-init working on the BSDs. I didn’t look into this (yet).
Have fun!
Links
- https://www.openbsd.org/faq/faq4.html#Download
- https://www.msiism.org/blog/2019/10/20/authentic_pufferfish_for_penguins.html
- https://wiki.debian.org/QEMU
- https://docs.openstack.org/image-guide/convert-images.html
- http://wiki.netbsd.org/ports/evbarm/qemu_arm/
- https://mike42.me/blog/2019-08-how-to-use-the-qemu-bridge-helper-on-debian-10
- https://www.spad.uk/posts/really-simple-network-bridging-with-qemu/
- https://pellaeon.github.io/bsd-cloudinit/
- https://cloudinit.readthedocs.io/en/latest/reference/datasources/nocloud.html
Leave a comment