


How to install coreboot on a Lenovo x230
I already use coreboot on my Lenovo W500 with FreeBSD. I bought a Lenovo x230 for a nice price I decide to install coreboot on it. After reading a lot of online documentation. I decided to install the skulls coreboot distribution on it. The skulls project has nice documentation on how to install it.
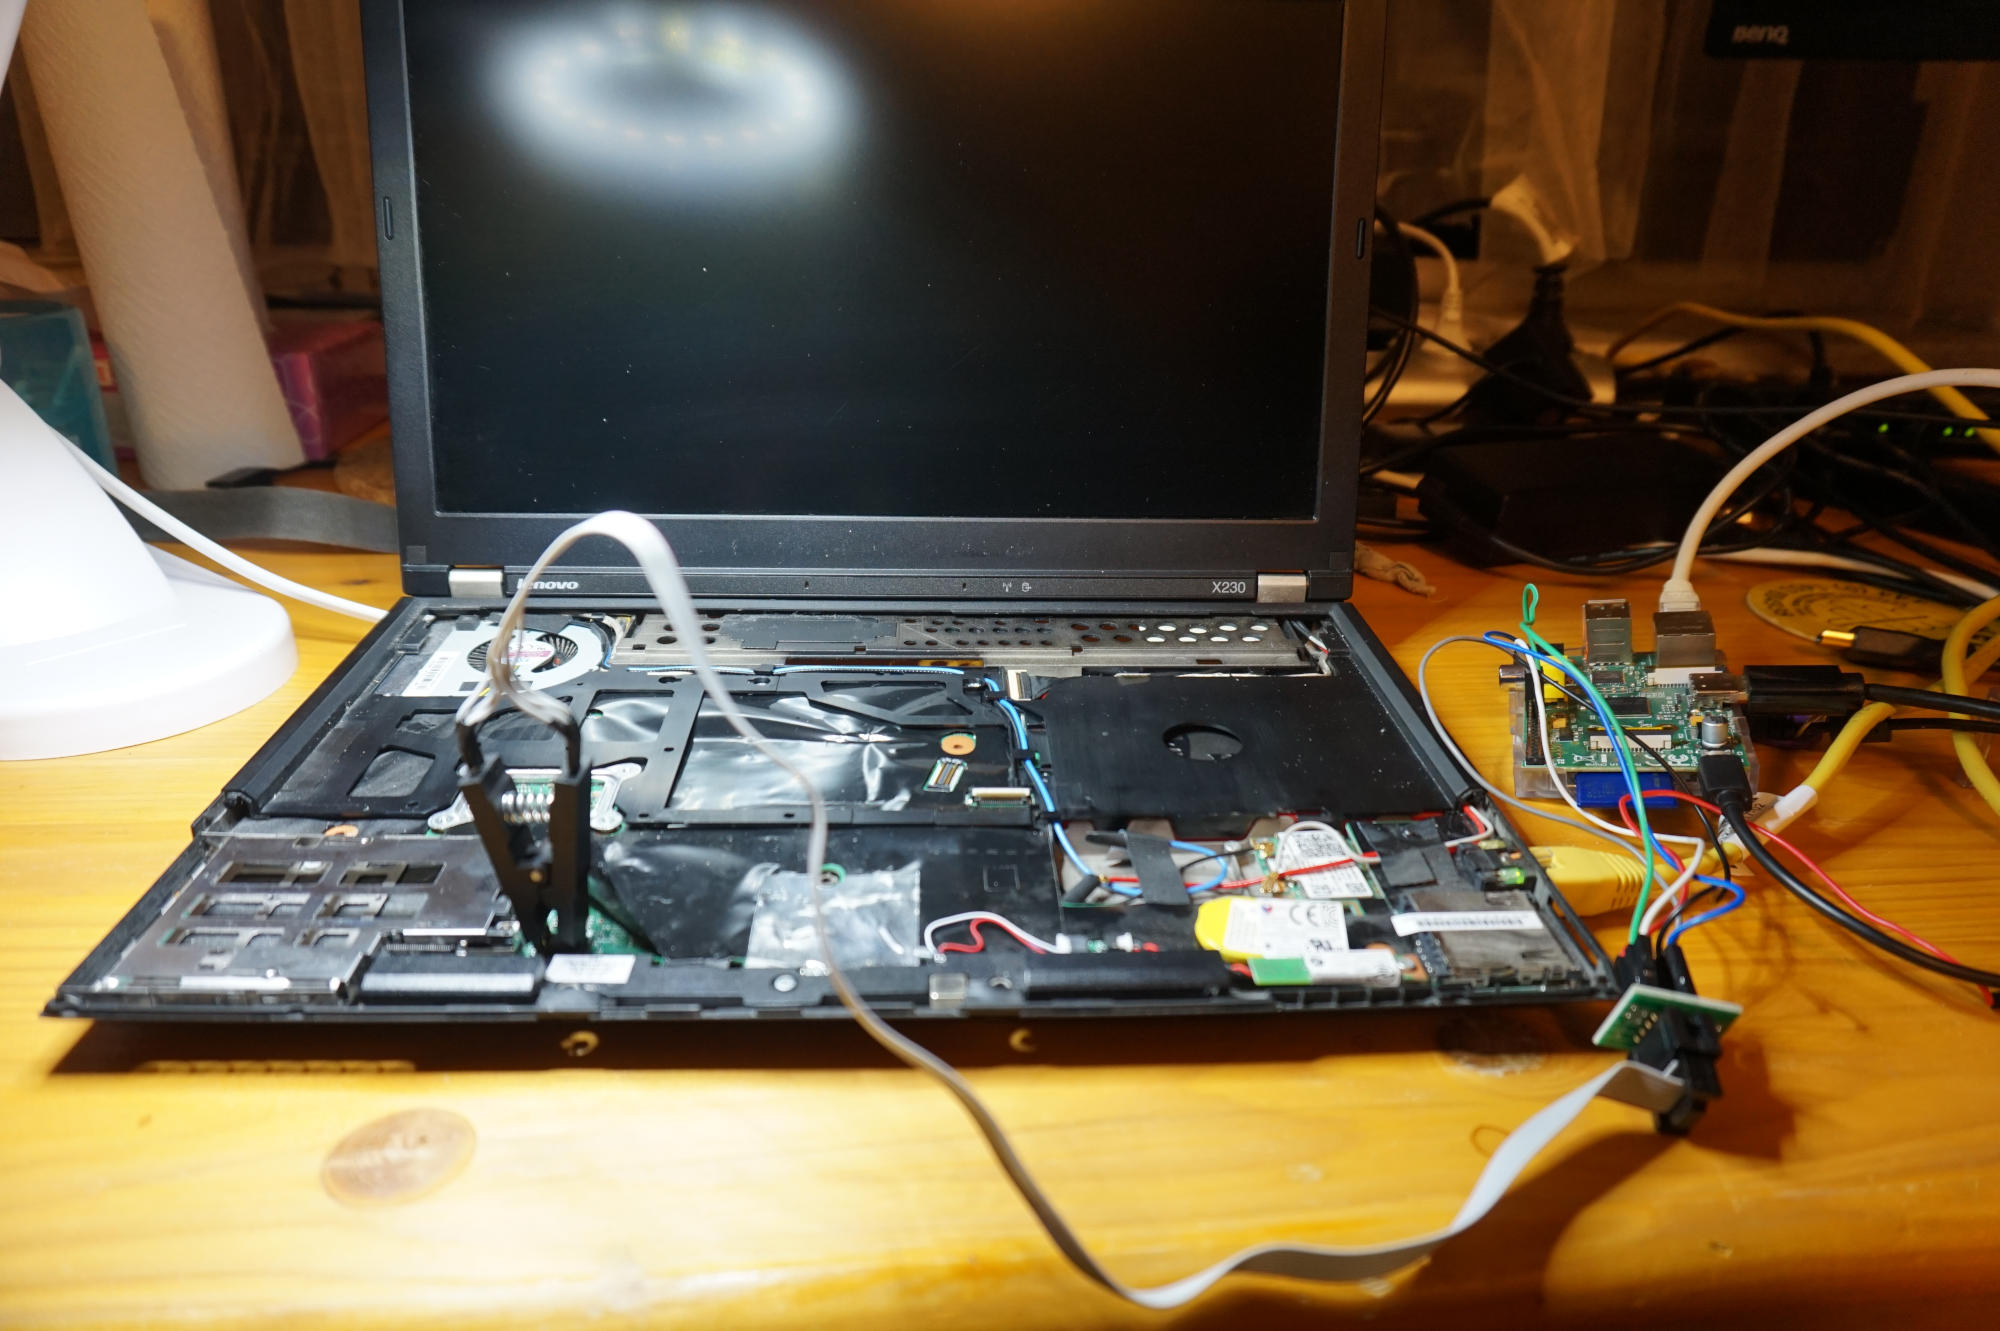
To replace the BIOS with coreboot you will need to disassemble the laptop and use a clip on the BIOS chip to install it.
During the installation, I followed the links below:
- https://github.com/merge/skulls
- https://www.chucknemeth.com/laptop/lenovo-x230/flash-lenovo-x230-coreboot
As my installation notes might be useful for other people I decided to create a blog post about it.
Update the x230 BIOS
The first step is to update the BIOS and your EC firmware to the latest stable version. You cannot update the EC firmware when Coreboot is installed unless you restore the original BIOS.
I downloaded the BIOS Update (Bootable CD) from:
and updated the BIOS with an external USB CDROM drive.
Requirements
To flash the BIOS you’ll need a Raspberry Pi and a SOIC 8 test clip.
Prepare raspberry-pi
I use a Raspbery-pi 1 model B to flash coreboot.
Install Raspberry PI OS
Downloads the latest 32 bits Raspberry Pi OS version from:
https://www.raspberrypi.com/software/operating-systems/
Enable the SPI port
The SPI port isn’t enabled by default on Raspberry PI os. We’ll need to enable it.
Open /boot/config.txt in your favourite text editor.
root@raspberrypi:/boot# cd /boot
root@raspberrypi:/boot# vi config.txt
# Uncomment some or all of these to enable the optional hardware interfaces
#dtparam=i2c_arm=on
#dtparam=i2s=on
dtparam=spi=on
And reboot your Raspberry PI.
root@raspberrypi:/boot# reboot
root@raspberrypi:/boot# Connection to pi1 closed by remote host.
Connection to pi1 closed.
[staf@vicky ~]$
Flashing
Open the Laptop
Open your laptop and pull the protective film to get access to the two BIOS chips.
The blog post from Chuck Nemeth: https://www.chucknemeth.com/laptop/lenovo-x230/flash-lenovo-x230-coreboot has some nice pictures about it.
Wiring
I used the wiring diagram from the skulls project:
https://github.com/merge/skulls/blob/master/x230/README.md
| Pin Number | Clip (25xx signal) | Raspberry Pi |
|---|---|---|
| 1 | CS | 24 |
| 2 | MISO | 21 |
| 3 | not used | not used |
| 4 | GND | 25 |
| 5 | MOSI | 19 |
| 6 | CLK | 23 |
| 7 | not used | not used |
| 8 | 3.3V |
I didn’t connect the 3.5V line. The 3.5V line on the raspberry-pi isn’t stable enough.
You can use a separate power supply.
Another trick is to connect the network cable to the x230 and connect the power supply, this way you get a stable 3.5V connection.
I used the later method.
Test
Test the connection to your flash chip with flashrom.
I start a test with a low speed and specify the spispeed=512 to get the connection established.
Sometime it helps to execute the flashrom command twice.
pi@raspberrypi:~ $ flashrom -p linux_spi:dev=/dev/spidev0.0,spispeed=512
flashrom v1.2 on Linux 5.10.63+ (armv6l)
flashrom is free software, get the source code at https://flashrom.org

Using clock_gettime for delay loops (clk_id: 1, resolution: 1ns).
Found Macronix flash chip "MX25L6405" (8192 kB, SPI) on linux_spi.
Found Macronix flash chip "MX25L6405D" (8192 kB, SPI) on linux_spi.
Found Macronix flash chip "MX25L6406E/MX25L6408E" (8192 kB, SPI) on linux_spi.
Found Macronix flash chip "MX25L6436E/MX25L6445E/MX25L6465E/MX25L6473E/MX25L6473F" (8192 kB, SPI) on linux_spi.
Multiple flash chip definitions match the detected chip(s): "MX25L6405", "MX25L6405D", "MX25L6406E/MX25L6408E", "MX25L6436E/MX25L6445E/MX25L6465E/MX25L6473E/MX25L6473F"
Please specify which chip definition to use with the -c <chipname> option.
pi@raspberrypi:~ $
When the connection is stable you can try it without the spispeed setting.
pi@raspberrypi:~ $ flashrom -p linux_spi:dev=/dev/spidev0.0
flashrom v1.2 on Linux 5.10.63+ (armv6l)
flashrom is free software, get the source code at https://flashrom.org

Using clock_gettime for delay loops (clk_id: 1, resolution: 1ns).
Using default 2000kHz clock. Use 'spispeed' parameter to override.
Found Macronix flash chip "MX25L6405" (8192 kB, SPI) on linux_spi.
Found Macronix flash chip "MX25L6405D" (8192 kB, SPI) on linux_spi.
Found Macronix flash chip "MX25L6406E/MX25L6408E" (8192 kB, SPI) on linux_spi.
Found Macronix flash chip "MX25L6436E/MX25L6445E/MX25L6465E/MX25L6473E/MX25L6473F" (8192 kB, SPI) on linux_spi.
Multiple flash chip definitions match the detected chip(s): "MX25L6405", "MX25L6405D", "MX25L6406E/MX25L6408E", "MX25L6436E/MX25L6445E/MX25L6465E/MX25L6473E/MX25L6473F"
Please specify which chip definition to use with the -c <chipname> option.
pi@raspberrypi:~ $
root@raspberrypi:~/x230# flashrom -c "MX25L6406E/MX25L6408E" -p linux_spi:dev=/dev/spidev0.0,spispeed=512
flashrom v1.2 on Linux 5.10.63+ (armv6l)
flashrom is free software, get the source code at https://flashrom.org

Using clock_gettime for delay loops (clk_id: 1, resolution: 1ns).
Found Macronix flash chip "MX25L6406E/MX25L6408E" (8192 kB, SPI) on linux_spi.
No operations were specified.
root@raspberrypi:~/x230#
Backup
The x230 has two BIOS chips.
The top chips is 4MB, the bottom is 8MB.
The skull scripts to install coreboot will to backup of the existing BIOSes. But I also created a backup manually. It’s also a nice test to verify that you have a stable connection.
Get the chip types
It’s recommended to verify the BIOS chip type with a magnifier loupe. But I cloudn’t read the chip types on my laptop.
The Lenovo x230 uses the following chip types:
- bottom ROM: MX25L6406E/MX25L6408E
- top ROM: MX25L3206E/MX25L3208E
bottom rom
The bottom ROM is “MX25L6406E/MX25L6408E” on the x230.
Read the ROM 3 times.
pi@raspberrypi:~/x230 $ flashrom -c "MX25L6406E/MX25L6408E" -p linux_spi:dev=/dev/spidev0.0 -r bottom_1.rom
flashrom v1.2 on Linux 5.10.63+ (armv6l)
flashrom is free software, get the source code at https://flashrom.org

Using clock_gettime for delay loops (clk_id: 1, resolution: 1ns).
Using default 2000kHz clock. Use 'spispeed' parameter to override.
Found Macronix flash chip "MX25L6406E/MX25L6408E" (8192 kB, SPI) on linux_spi.
Reading flash... done.
pi@raspberrypi:~/x230 $
pi@raspberrypi:~/x230 $ flashrom -c "MX25L6406E/MX25L6408E" -p linux_spi:dev=/dev/spidev0.0 -r bottom_2.rom
pi@raspberrypi:~/x230 $ flashrom -c "MX25L6406E/MX25L6408E" -p linux_spi:dev=/dev/spidev0.0 -r bottom_3.rom
And compare the hashes.
pi@raspberrypi:~/x230 $ sha256sum bottom*.rom
593b7ebad463d16ee7474f743883db86dd57c841c36136fe87374151f829d663  bottom_1.rom
593b7ebad463d16ee7474f743883db86dd57c841c36136fe87374151f829d663  bottom_2.rom
593b7ebad463d16ee7474f743883db86dd57c841c36136fe87374151f829d663  bottom_3.rom
top rom
Read the top ROM 3 three times.
pi@raspberrypi:~/x230 $ flashrom -c "MX25L3206E/MX25L3208E" -p linux_spi:dev=/dev/spidev0.0 -r top_1.rom
flashrom v1.2 on Linux 5.10.63+ (armv6l)
flashrom is free software, get the source code at https://flashrom.org

Using clock_gettime for delay loops (clk_id: 1, resolution: 1ns).
Using default 2000kHz clock. Use 'spispeed' parameter to override.
Found Macronix flash chip "MX25L3206E/MX25L3208E" (4096 kB, SPI) on linux_spi.
Reading flash... done.
$ flashrom -c "MX25L3206E/MX25L3208E" -p linux_spi:dev=/dev/spidev0.0 -r top_2.rom
$ flashrom -c "MX25L3206E/MX25L3208E" -p linux_spi:dev=/dev/spidev0.0 -r top_3.rom
And compare the hashes.
pi@raspberrypi:~/x230 $ sha256sum top*.rom
3ab6eafe675817ab9955e7bd4a0f003098c46cfe4016d98184f7c199ebae874a  top_1.rom
3ab6eafe675817ab9955e7bd4a0f003098c46cfe4016d98184f7c199ebae874a  top_2.rom
3ab6eafe675817ab9955e7bd4a0f003098c46cfe4016d98184f7c199ebae874a  top_3.rom
pi@raspberrypi:~/x230 $
Copy
Copy the backup ROM’s to save location.
[staf@vicky ~]$ cd backup/
[staf@vicky backup]$ cd x230/
[staf@vicky x230]$ ls
bottom_1.rom  bottom_2.rom  bottom_3.rom
[staf@vicky x230]$ scp pi@pi1:~/x230/* .
pi@pi1's password:
bottom_1.rom                                  100% 8192KB   2.9MB/s   00:02
bottom_2.rom                                  100% 8192KB   2.9MB/s   00:02
bottom_3.rom                                  100% 8192KB   3.0MB/s   00:02
top_1.rom                                     100% 4096KB   2.8MB/s   00:01
top_2.rom                                     100% 4096KB   2.9MB/s   00:01
top_3.rom                                     100% 4096KB   2.9MB/s   00:01
[staf@vicky x230]$
Flash skulls
Download the skulls project.
Logon to the raspberry pi.
[staf@vicky ~]$ ssh pi@pi1
Received disconnect from 192.168.1.23 port 22:2: Too many authentication failures
Disconnected from 192.168.1.23 port 22
[staf@vicky ~]$ ssh pi@pi1
pi@pi1's password:
Linux raspberrypi 5.10.63+ #1488 Thu Nov 18 16:14:04 GMT 2021 armv6l

The programs included with the Debian GNU/Linux system are free software;
the exact distribution terms for each program are described in the
individual files in /usr/share/doc/*/copyright.

Debian GNU/Linux comes with ABSOLUTELY NO WARRANTY, to the extent
permitted by applicable law.
Last login: Sun Jan 16 09:46:51 2022 from 192.168.1.10
pi@raspberrypi:~ $
Create a directory to download the skulls release.
pi@raspberrypi:~ $ mkdir skull
pi@raspberrypi:~ $ cd skulls
Download the latest skulls release.
$ wget https://github.com/merge/skulls/releases/download/1.0.4/skulls-1.0.4.tar.xz
$ wget https://github.com/merge/skulls/releases/download/1.0.4/skulls-1.0.4.tar.xz.asc
pi@raspberrypi:~/skull $ gpg --verify skulls-1.0.4.tar.xz.asc
gpg: directory '/home/pi/.gnupg' created
gpg: keybox '/home/pi/.gnupg/pubring.kbx' created
gpg: assuming signed data in 'skulls-1.0.4.tar.xz'
gpg: Signature made Thu 16 Dec 2021 12:23:03 GMT
gpg:                using RSA key 15339E3B5F19D8688519D268C7BCBE1E66F0DB3C
gpg: Can't check signature: No public key
pi@raspberrypi:~/skull $
The tar ball must be signed with the “15339E3B5F19D8688519D268C7BCBE1E66F0DB3C” gpg public key. Which is the public key of Martin Kepplinger the main developer of the skulls project.
Extract the tar ball.
pi@raspberrypi:~/skull $ tar xvf skulls-1.0.4.tar.xz
Goto th extracted directory.
pi@raspberrypi:~/skull $ cd skulls-1.0.4/
pi@raspberrypi:~/skull/skulls-1.0.4 $
Flash the bottom rom (8MB)
Verify that you have stable connection.
pi@raspberrypi:~/skull/skulls-1.0.4 $ flashrom -p linux_spi:dev=/dev/spidev0.0
flashrom v1.2 on Linux 5.10.63+ (armv6l)
flashrom is free software, get the source code at https://flashrom.org

Using clock_gettime for delay loops (clk_id: 1, resolution: 1ns).
Using default 2000kHz clock. Use 'spispeed' parameter to override.
Found Macronix flash chip "MX25L6405" (8192 kB, SPI) on linux_spi.
Found Macronix flash chip "MX25L6405D" (8192 kB, SPI) on linux_spi.
Found Macronix flash chip "MX25L6406E/MX25L6408E" (8192 kB, SPI) on linux_spi.
Found Macronix flash chip "MX25L6436E/MX25L6445E/MX25L6465E/MX25L6473E/MX25L6473F" (8192 kB, SPI) on linux_spi.
Multiple flash chip definitions match the detected chip(s): "MX25L6405", "MX25L6405D", "MX25L6406E/MX25L6408E", "MX25L6436E/MX25L6445E/MX25L6465E/MX25L6473E/MX25L6473F"
Please specify which chip definition to use with the -c <chipname> option.
pi@raspberrypi:~/skull/skulls-1.0.4 $
The top chips is 4MB, the bottom is 8MB.
Execute the external_install_bottom.sh
With the -m you’ll run me_cleaner to clean the Intel Management Engine.
pi@raspberrypi:~/skull/skulls-1.0.4 $ sudo ./external_install_bottom.sh -m -k /home/pi/x230/skulls_backup_bottom.rom
Select your flashing device.
Skulls

Please select the hardware you use:
1) Raspberry Pi
2) CH341A
3) Exit
Please select the hardware flasher: 1
Ok. Run this on a Rasperry Pi.
trying to detect the chip...
Detected MX25L6406E/MX25L6408E.
make: Entering directory '/home/pi/skull/skulls-1.0.4/util/ifdtool'
gcc -O2 -g -Wall -Wextra -Wmissing-prototypes -Werror -I../commonlib/include -c -o ifdtool.o ifdtool.c
gcc -o ifdtool ifdtool.o
Intel ME will be cleaned.
<snip>

Using clock_gettime for delay loops (clk_id: 1, resolution: 1ns).
Found Macronix flash chip "MX25L6406E/MX25L6408E" (8192 kB, SPI) on linux_spi.
Reading old flash chip contents... done.
Erasing and writing flash chip... Erase/write done.
Verifying flash... VERIFIED.
DONE
pi@raspberrypi:~/skull/skulls-1.0.4 $
Flash the top (4MB) chip
Poweroff the RaspBerry PI. And connect the clip to the top chip.
pi@raspberrypi:~/skull/skulls-1.0.4 $ sudo poweroff
pi@raspberrypi:~/skull/skulls-1.0.4 $ Connection to pi1 closed by remote host.
Connection to pi1 closed.
[staf@vicky ~]$
Verify that you have a stable connection.
pi@raspberrypi:~ $ flashrom -p linux_spi:dev=/dev/spidev0.0
flashrom v1.2 on Linux 5.10.63+ (armv6l)
flashrom is free software, get the source code at https://flashrom.org

Using clock_gettime for delay loops (clk_id: 1, resolution: 1ns).
Using default 2000kHz clock. Use 'spispeed' parameter to override.
Found Macronix flash chip "MX25L3205(A)" (4096 kB, SPI) on linux_spi.
Found Macronix flash chip "MX25L3205D/MX25L3208D" (4096 kB, SPI) on linux_spi.
Found Macronix flash chip "MX25L3206E/MX25L3208E" (4096 kB, SPI) on linux_spi.
Found Macronix flash chip "MX25L3273E" (4096 kB, SPI) on linux_spi.
Multiple flash chip definitions match the detected chip(s): "MX25L3205(A)", "MX25L3205D/MX25L3208D", "MX25L3206E/MX25L3208E", "MX25L3273E"
Please specify which chip definition to use with the -c <chipname> option.
pi@raspberrypi:~ $
Go to the skulls directory.
pi@raspberrypi:~ $ cd skull/
pi@raspberrypi:~/skull $ ls
skulls-1.0.4  skulls-1.0.4.tar.xz  skulls-1.0.4.tar.xz.asc
pi@raspberrypi:~/skull $ cd skulls-1.0.4/
And execute the external_install_top.sh script.
pi@raspberrypi:~/skull/skulls-1.0.4 $ sudo ./external_install_top.sh -b x230 -k /home/pi/x230/skulls_top_backup.rom
Select the BIOS that you want to flash.
1) ./x230_coreboot_seabios_free_74d2218cc7_top.rom
2) ./x230_coreboot_seabios_74d2218cc7_top.rom
3) Quit
Please select a file to flash or start with the -i option to use a different one: 1
Select your flashing device.
Please select the hardware you use:
1) Raspberry Pi
2) CH341A
3) Quit
Please select the hardware flasher: 1
Wait for of the flashing to complete. And try to boot your system.
Updating
After you’ve installed coreboot on the x230. You’re able to update the BIOS from the commandline. In order to be able to flash the BIOS you’ll need to update kernel boot arguments.
Update grub config
Edit your grub configuration.
# vi /etc/default/grub
GRUB_CMDLINE_LINUX_DEFAULT="iomem=relaxed"
root@x230:/home/staf/github/merge/skulls# /usr/sbin/update-grub
Generating grub configuration file ...
Found background image: /usr/share/images/desktop-base/desktop-grub.png
Found linux image: /boot/vmlinuz-5.10.0-10-amd64
Found initrd image: /boot/initrd.img-5.10.0-10-amd64
done
root@x230:/home/staf/github/merge/skulls#
Flash
Download the latest skulls release from https://github.com/merge/skulls/.
$ wget https://github.com/merge/skulls/releases/download/1.0.4/skulls-1.0.4.tar.xz
Download the signature file.
staf@x230:~/tmp$ wget https://github.com/merge/skulls/releases/download/1.0.4/skulls-1.0.4.tar.xz.asc
Verify the signature.
staf@x230:~/tmp$ gpg --verify skulls-1.0.4.tar.xz.asc
gpg: keybox '/home/staf/.gnupg/pubring.kbx' created
gpg: assuming signed data in 'skulls-1.0.4.tar.xz'
gpg: Signature made Thu 16 Dec 2021 01:23:03 PM CET
gpg:                using RSA key 15339E3B5F19D8688519D268C7BCBE1E66F0DB3C
gpg: Can't check signature: No public key
staf@x230:~/tmp$
Extract the tar archive.
$ tar xvf skulls-1.0.4.tar.xz
Go to the directory.
$ cd skulls-1.0.4/
Execute the ./skulls.sh.
staf@x230:~/tmp/skulls-1.0.4$ ./skulls.sh -b x230 -U
You are using the latest version of Skulls
staf@x230:~/tmp/skulls-1.0.4$
Have fun!


Leave a comment